
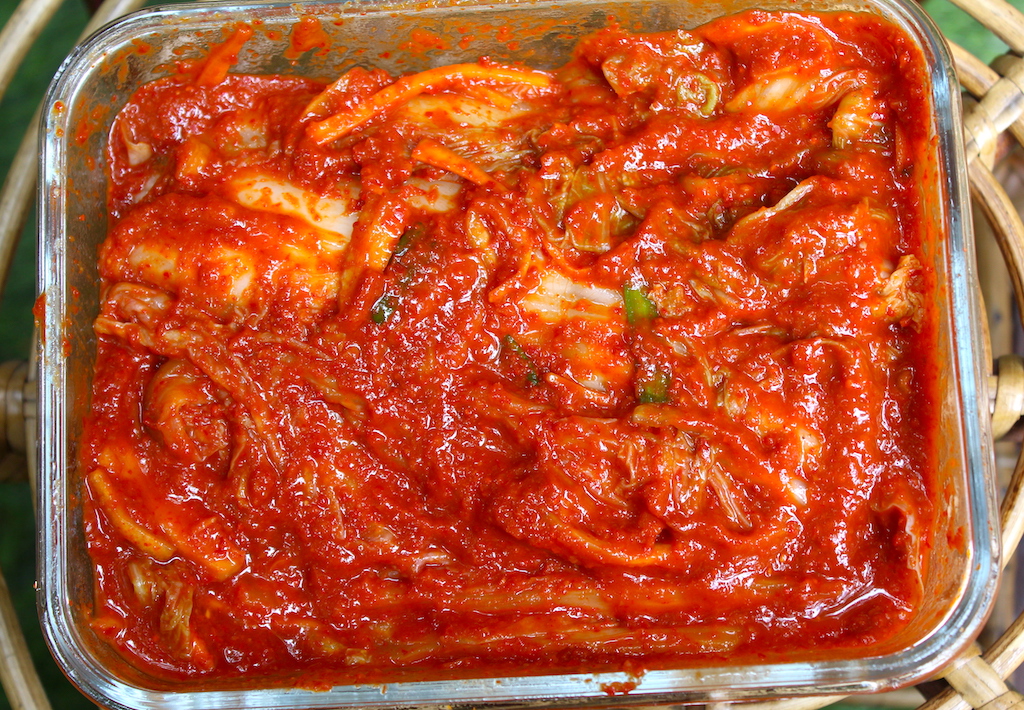
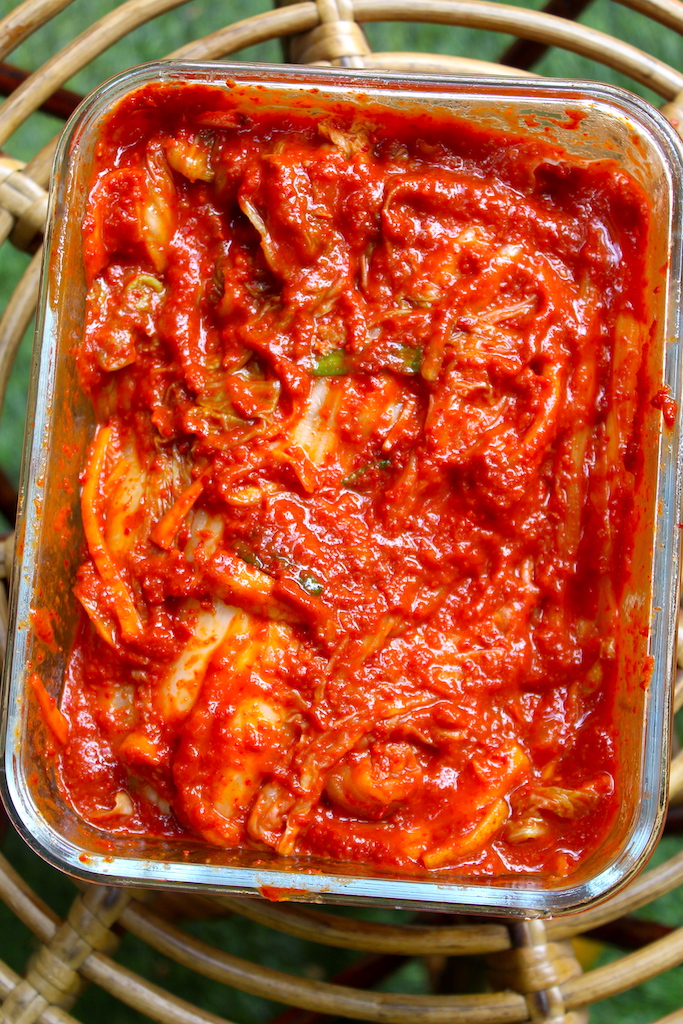
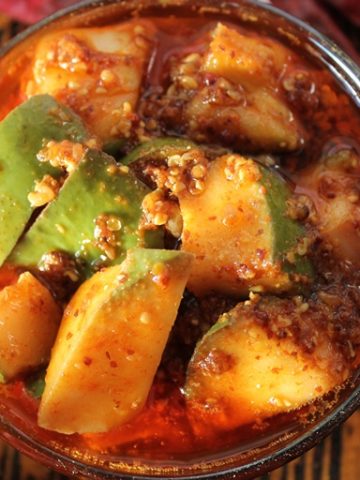
Kimchi is a popular Korean fermented dish made with napa cabbage, spices and seasonings. Traditional napa cabbage kimchi recipe is called as tongbaechu-kimchi, baechu-kimchi or pogi-kimchi. Kimchi is a versatile ingredients which can be consumed with steamed rice or used in fried rice or grilled cheese. In this blog post, I am sharing the best and easy kimchi recipe with step by step pictures and video.
Kimchi recipe
I still remember the time when I tasted my first ever kimchi. I was not a fan of it then. But later when we visited Korea, I got to taste the authentic kimchi in many restaurants and totally fell in love with it. Some of my favorite kimchi dishes are fried rice, kimchi jigae and sandwich made with kimchi. It has a taste that lingers in your mouth for a long time.
Jump to:
After my visit to Korea I decided to make my kimchi at home. I tried to be as authentic as possible and it turned out so good. The kimchi tasted so good just like the real ones which I had in restaurants.
What is Kimchi?
Kimchi literally translates to Pickle. Any vegetable that is fermented or pickled is called as kimchi in Korea.
Kimchi, a staple in Korean cuisine, is a traditional side dish of salted and fermented vegetables, such as napa cabbage and Korean radish, made with a widely varying selection of seasonings including gochugaru, spring onions, garlic, ginger. . It is also used in a variety of soups.
Kimchi can be made many different ways. Some of them uses fermented shrimp, fish sauce and other too. You can make it pure vegetarian as well.
Watch Kimchi Recipe Video


About Kimchi (Homemade Kimchi)
Kimchi is a Korean staple dish made with napa cabbage which is marinated with spicy seasonings and sauces. Authentic kimchi is made with napa cabbage also known as Chinese cabbage. It is a staple fermented cabbage which is usually served with steamed rice or other Korean dishes.
The process of making kimchi includes few steps. The first and foremost step is salting napa cabbage to remove excess water content from the cabbage so your kimchi doesn't get watery. Also this step will soften the cabbage.
Traditionally kimchi has salted shrimp and fish sauce. But I made it entirely vegetarian so everyone can enjoy. I have shared all the substitutes you can use when making kimchi. This particular recipe for instant kimchi is PURE VEGETARIAN, VEGAN & GLUTEN FREE.
Kimchi is one ingredients that everyone should have in their fridge. It is a versatile ingredient, because you can use kimchi to make delicious kimchi fried rice or jigae.
Don't forget to check my other korean recipes too! Enjoy!
Kimchi vegetables to use
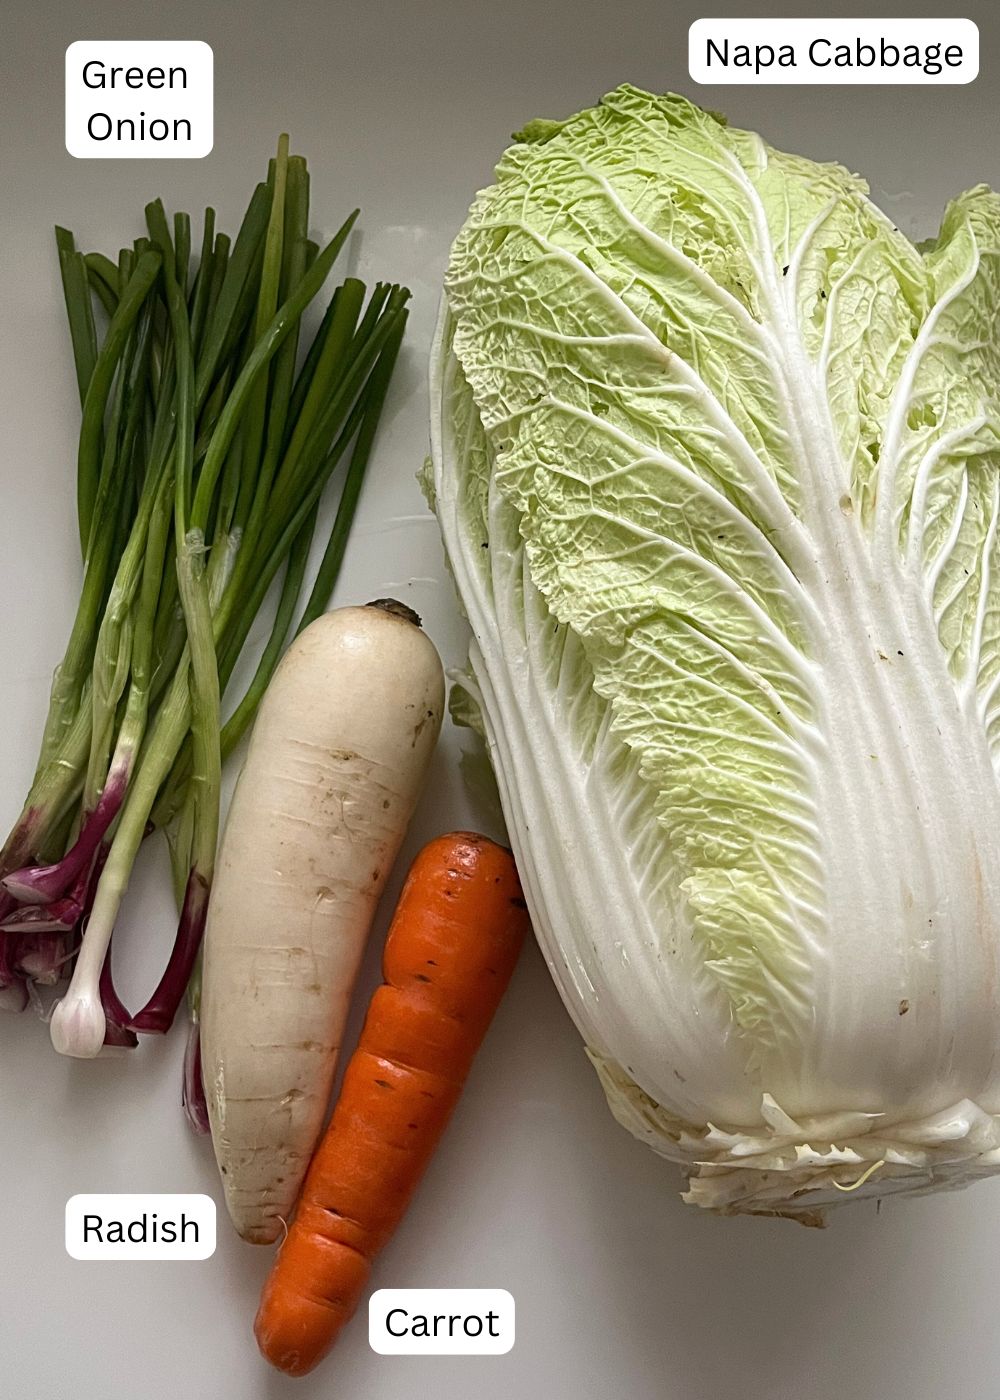
Napa cabbage - one of the main ingredient in making kimchi is napa cabbage. It is also called as Chinese cabbage. It is the elongated leafy vegetable. This cabbage is prevents high blood sugar levels that can contribute to diabetes also it is rich in vitamins c which improves immunity. Try and source fresh looking napa cabbage also when using for kimchi, remove the outer not so good looking leaves.
Radish - Korean radish also known as daikon is used in kimchi. but it is completely optional. You can skip it if you don't prefer the taste of radish.
Carrots - carrots adds colour as well as sweetness to the kimchi. You can skip if you want.
Green onions - I love the taste of kimchi green onions. Traditionally Asian chives is used in kimchi.
Kimchi paste ingredients
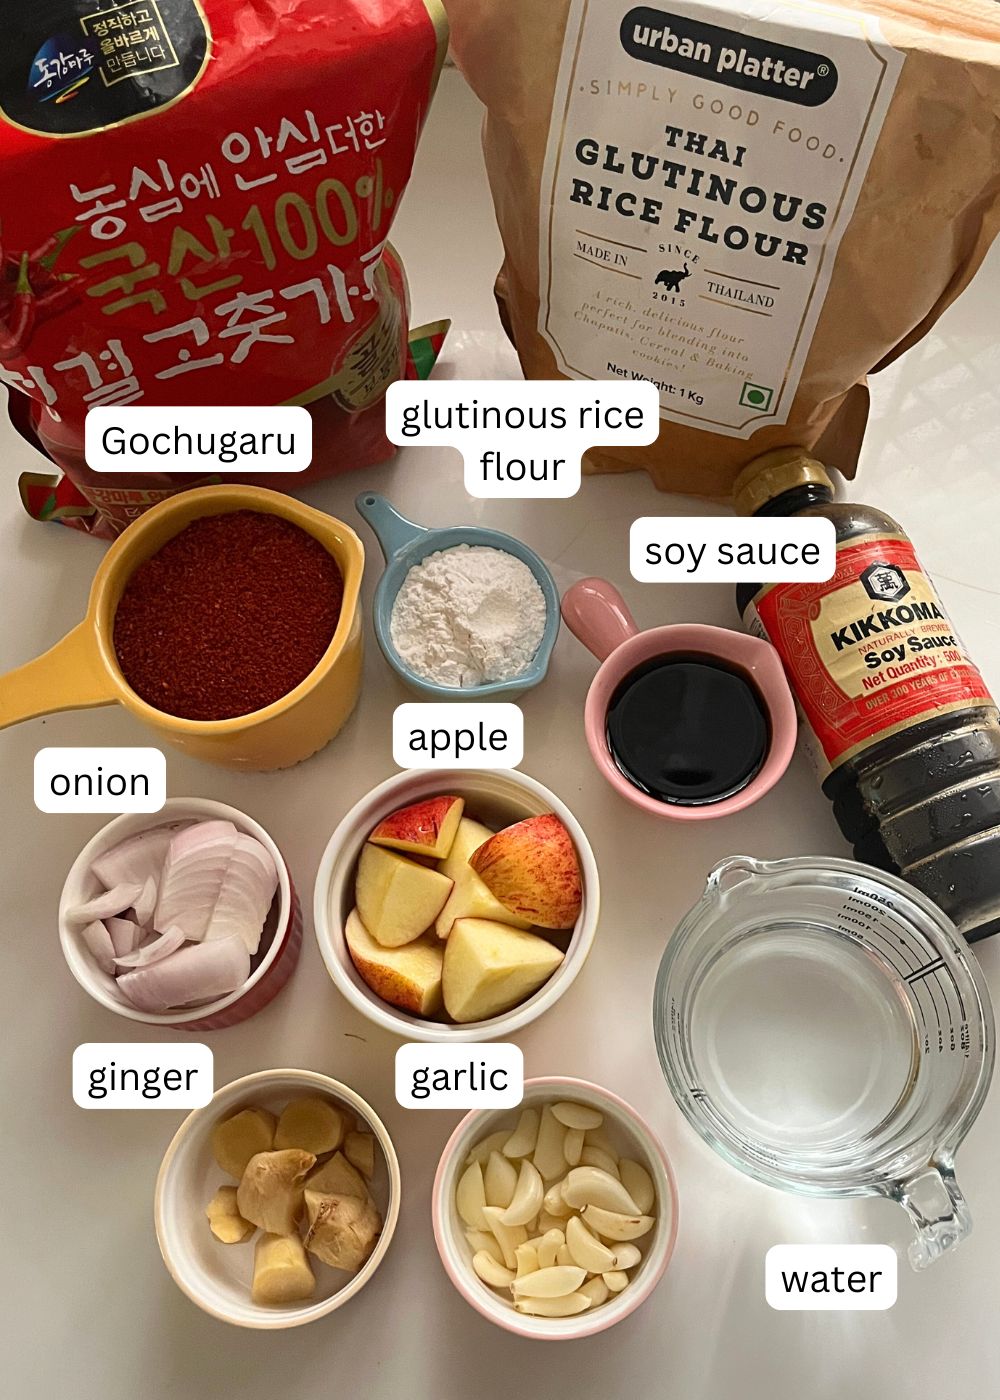
Gochugaru - also known as Korean red chilli powder, Use the bright red coarser chilli powder and I don't recommend using other chilli powder in this recipe, since it can make the kimchi too spicy and undesirable to eat.
Glutinous Rice Flour - rice flour is cooked with water till it gets paste like texture. This is mixed with the kimchi marinade. Rice flour paste helps with the fermentation, it makes the paste stickier which helps the marinate adhere to the cabbage leaves.
Ginger & Garlic - adds aroma to the kimchi recipe and helps with the flavour.
Apple or Korean Pear - traditionally sugar is added in kimchi paste, but I like to use either apple or Korean pear in the marinate.
Onion - use white or red onion in the paste. It gives the moistness the kimchi paste require.
Soy Sauce - Traditionally kimchi has salted shrimp and fish sauce. But I made it entirely vegetarian using soy sauce so everyone can enjoy.
Kimchi Marinate (Seasoning or Paste)
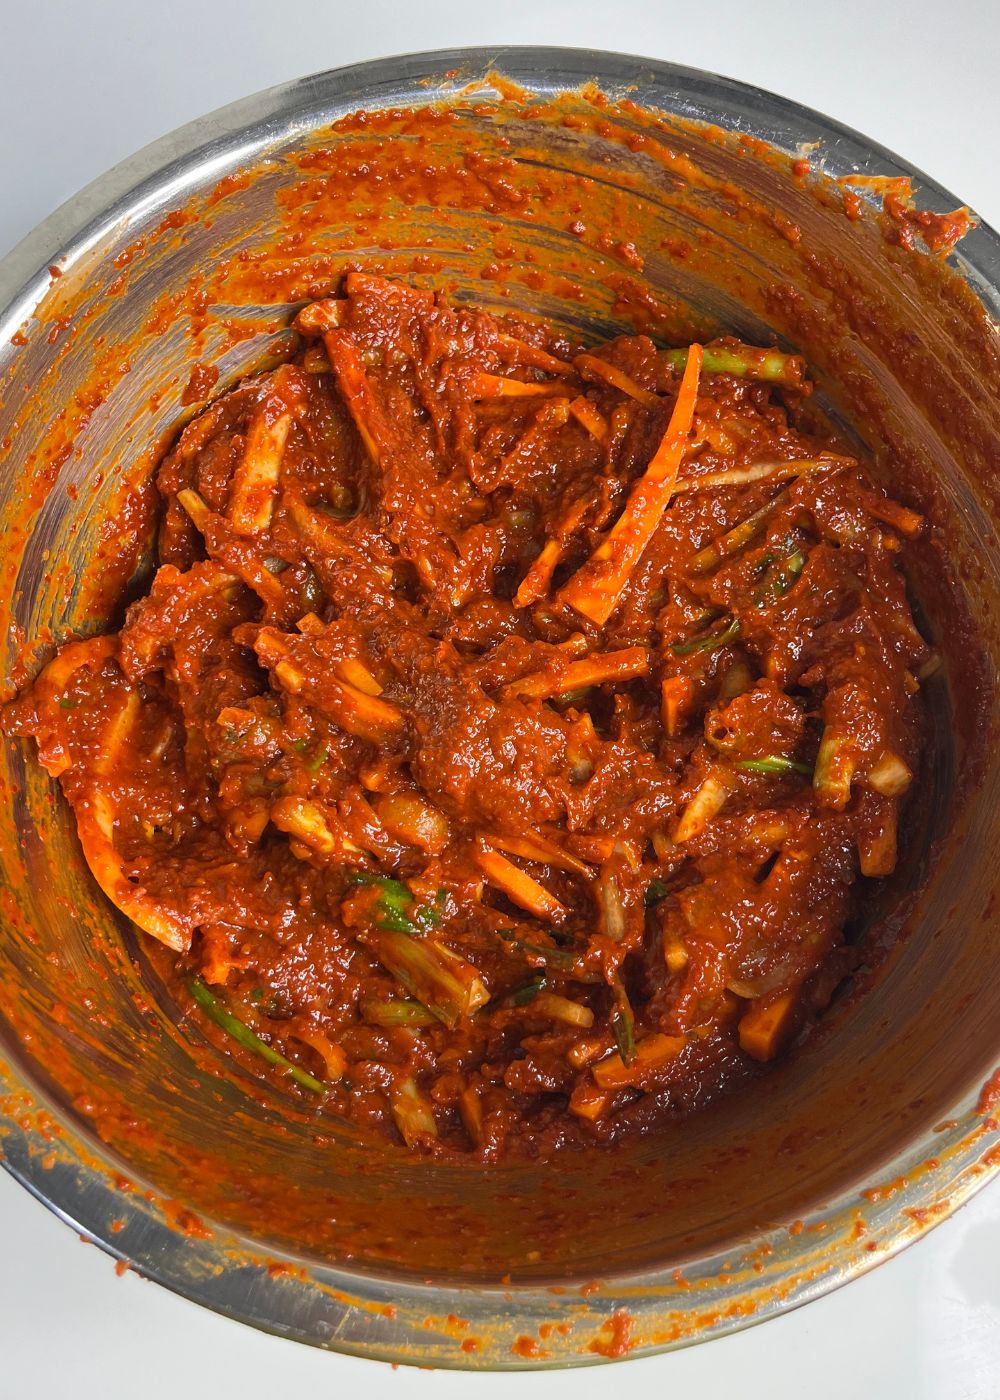
Homemade kimchi requires two important steps. Preparing napa cabbage and getting the kimchi paste or marinate perfect. I use apple, onion, ginger, garlic, gochugaru, soy sauce in the marinate.
I mixed glutinous rice flour and water and cooked together till a paste is formed. Rice flour paste helps with the fermentation, it makes the paste stickier which helps the marinate adhere to the cabbage leaves.
Traditionally kimchi has salted shrimp and fish sauce which adds the umami taste and helps in fermentation. But I made it entirely vegetarian using soy sauce so everyone can enjoy. Always taste add adjust, chilli, soy sauce in the marinate.
If you are planning to add vegetables like radish, carrots or green onions, slice them into thin julienne and add them into the marinate. This helps the vegetables to evenly distribute between the cabbage leaves.
Varieties of Kimchi Recipe
There are so many variations of kimchi is available. Some of the popular ones are source wiki
- Baechu-kimchi (배추김치) spicy napa cabbage made from whole cabbage leaves
- Baechu-geotjeori (배추겉절이) unfermented napa cabbage.
- Dongchimi (동치미) a non-spicy watery kimchi
- Kkakdugi (깍두기) spicy cubed Korean radish strongly-scented kimchi containing fermented shrimp
- Oi-sobagi (오이소박이) cucumber that can be stuffed with seafood and chili paste, and is a popular choice during the spring and summer seasons
- Pa-kimchi (파김치) spicy green onion which is kimchi.
- Yeolmu-kimchi (열무김치) is also a popular choice during the spring and summer, and is made with yeolmu radishes, and does not necessarily have to be fermented.
- Gat-kimchi (갓김치), made with mustard leaves.
How to Make Kimchi (Stepwise Pictures)
Preparing Cabbage
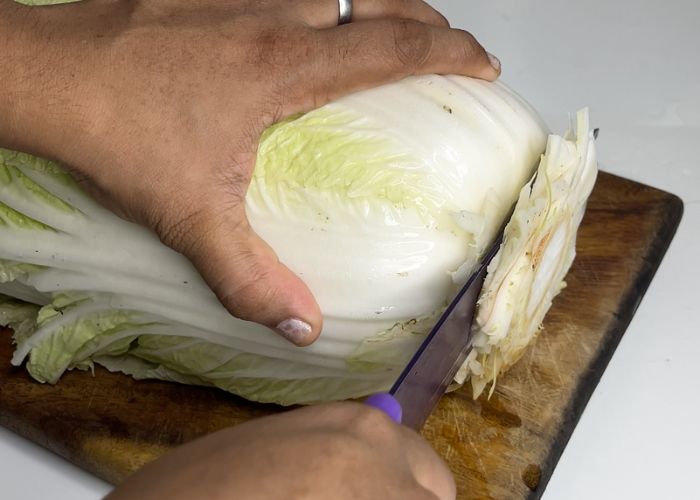
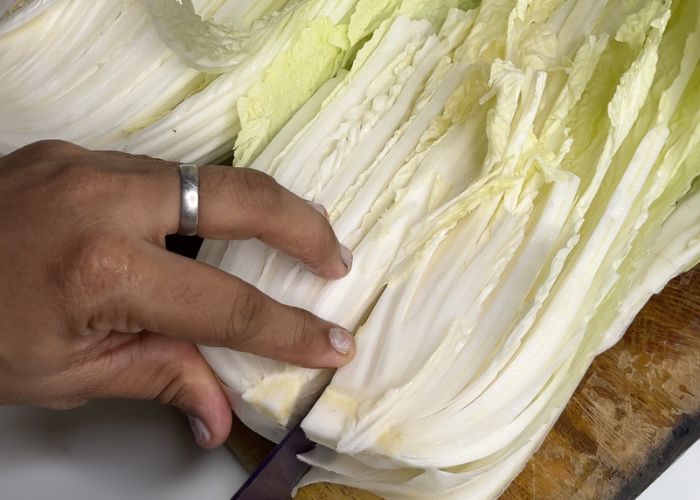
1)Take napa cabbage, cut the base stem.
2)Now cut napa cabbage in half and split it open.
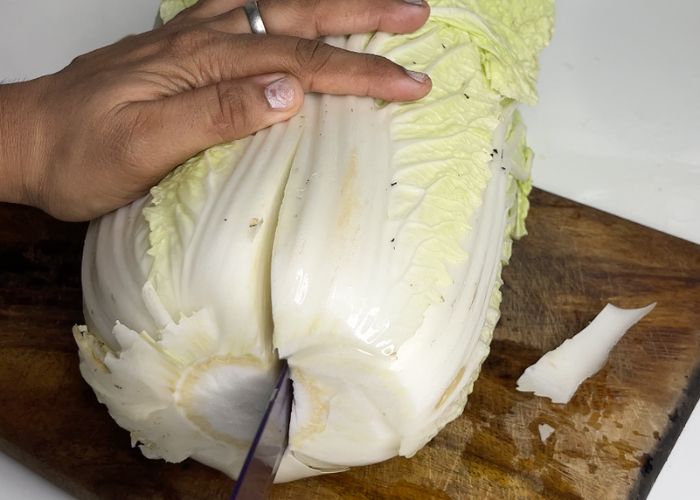
3)You can use your hands to tear open cabbage in half.
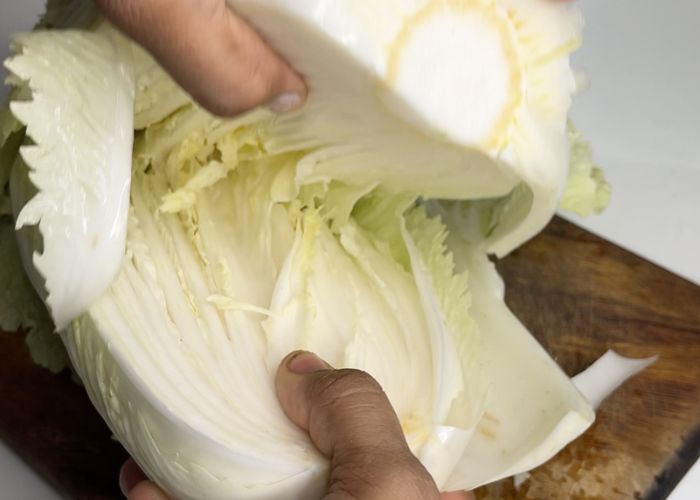
4)Now cut each half in quarter.
5)Split it open.
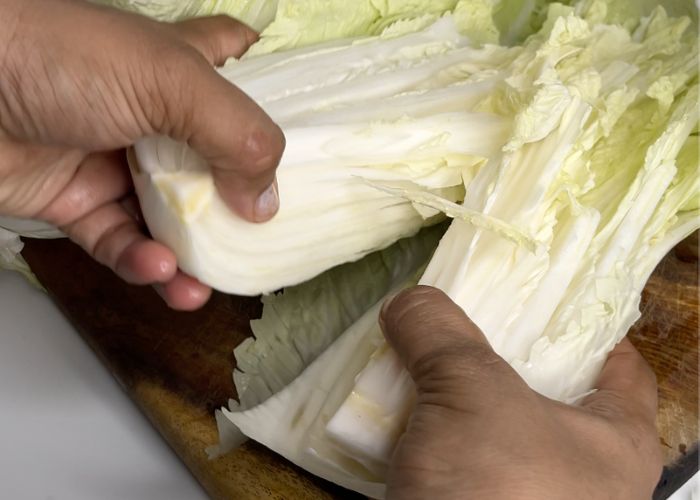
6)Now you have 4 portions of napa cabbage.
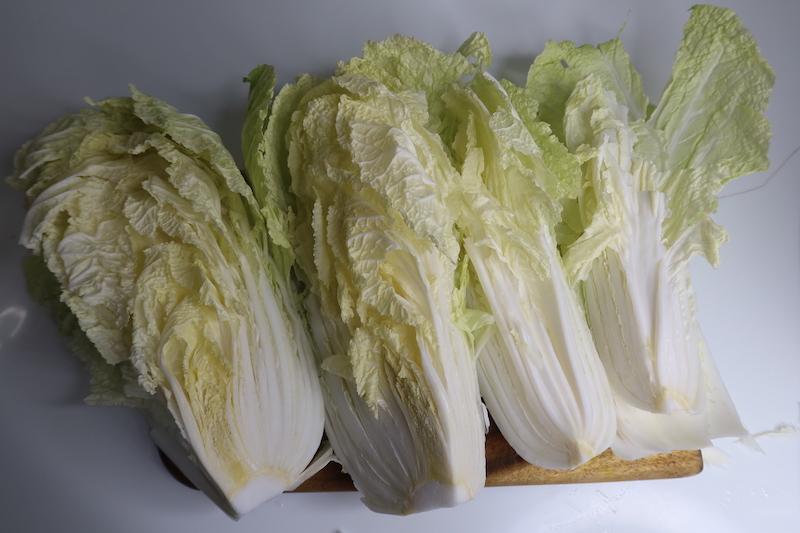
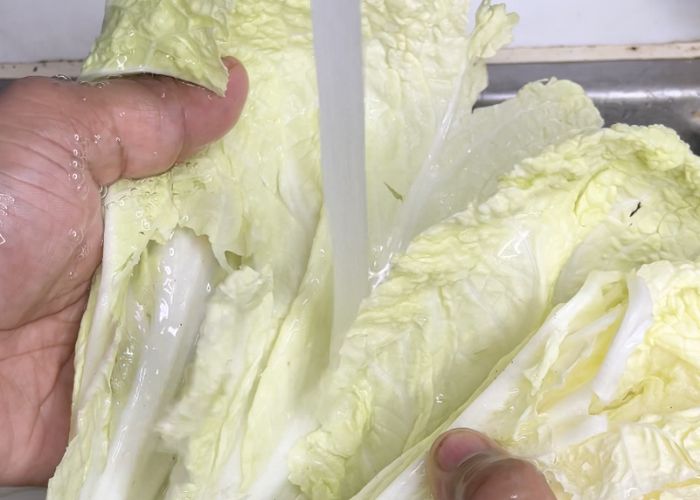
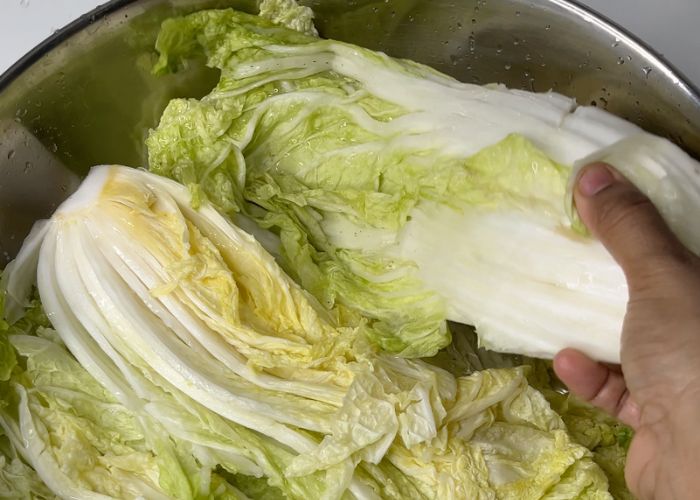
7)Now take this in a large bowl and wash them throughly. Make sure you wash in-between the leaves. Now take them in a large bowl.
Salting Cabbage
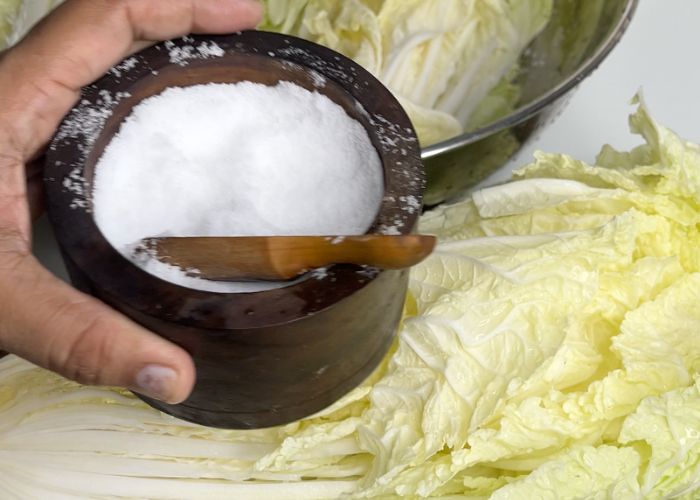
8)I used fine sea salt for salting. You can use slightly coarser salt as well. You need around a cup of salt.
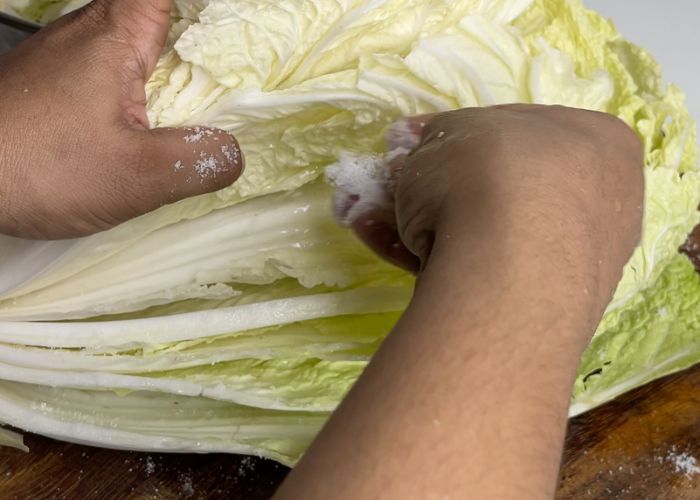
9)Lift each leaves from the cabbage and sprinkle salt generously over the cabbage leaves. Gently rub the salt over the leaves and place it in the large bowl.
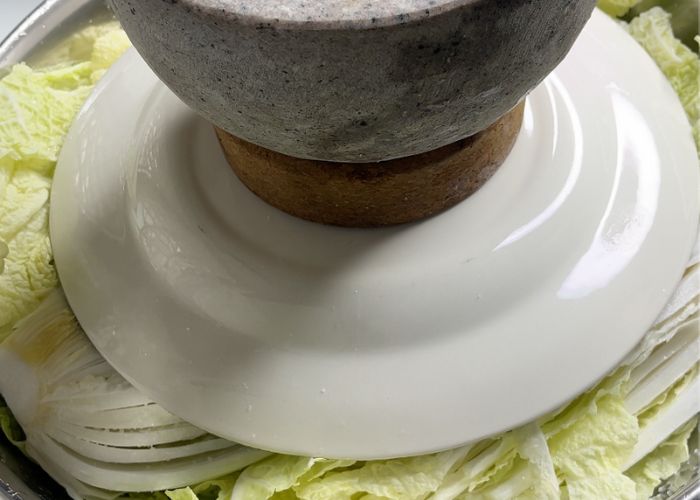
10)Now invert a plate on top of the cabbage and place a heavy object over the plate to weigh the cabbage down. This helps them to release more water. Now allow the cabbage to rest for 1 hour.
11)After 1 hour the cabbage must have got soft, flip the cabbage halves so the other side can brine.
Place the plate and the heavy object again and let it rest for 1 more hour.
12)Now you can see the amount of water the cabbage has given.
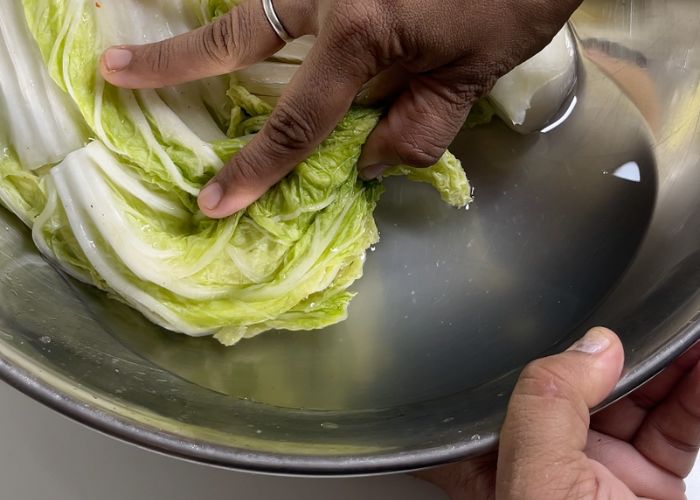
13)To check whether the cabbage is ready, gently fold them it should be bendable like shown in the image.
Washing Cabbage
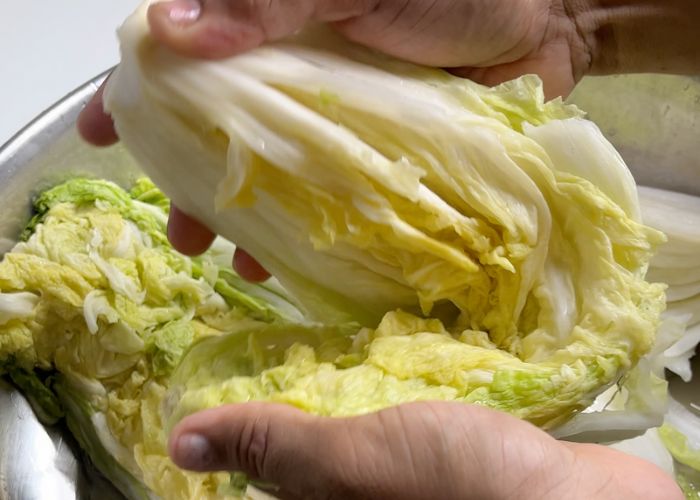
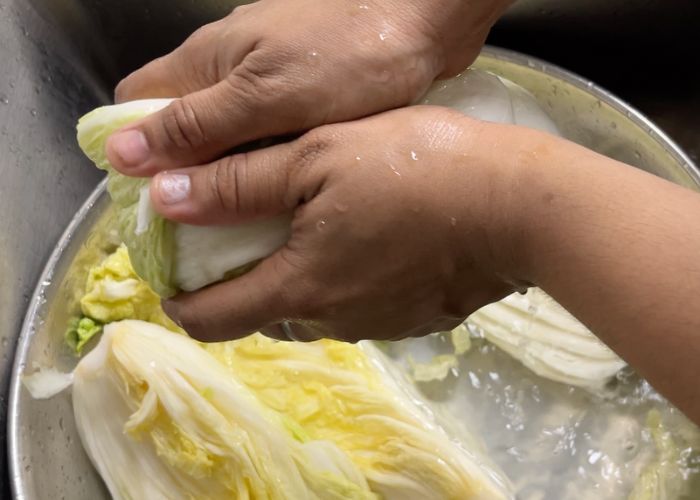
14)Now take the brined cabbage and wash them throughly in running water. This removes the excess salt. Make sure to lift each leaves and wash them well.
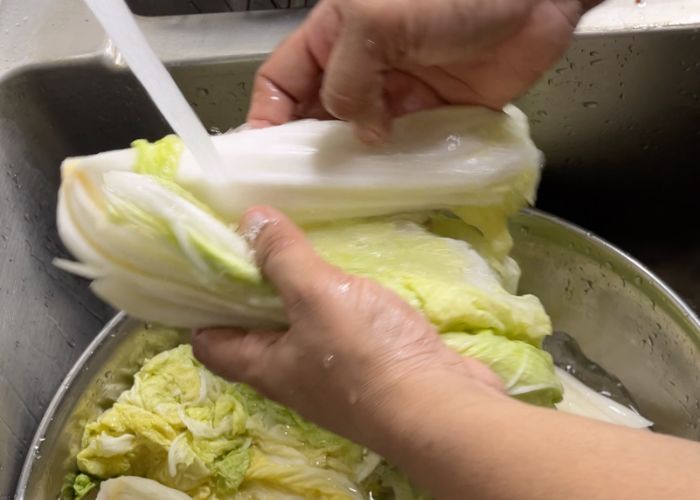
15)Now gently squeeze them well using your hands to remove the water from the cabbage.
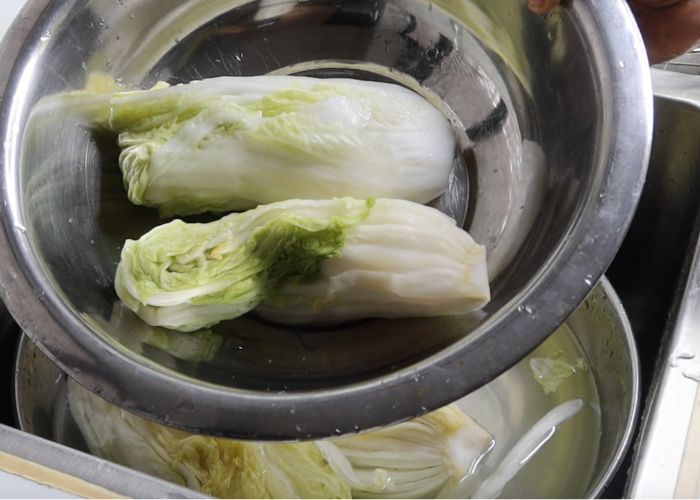
16)Place the cabbage in a bowl and set aside.
Rice Flour Paste
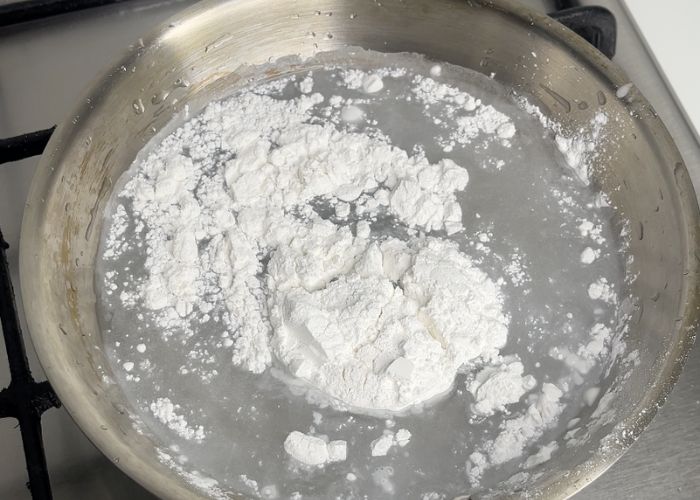
17)When the cabbage is brining, you can prepare the kimchi paste. First make the rice flour paste, Take water and rice flour in a pan and cook them on low heat till it thickens.
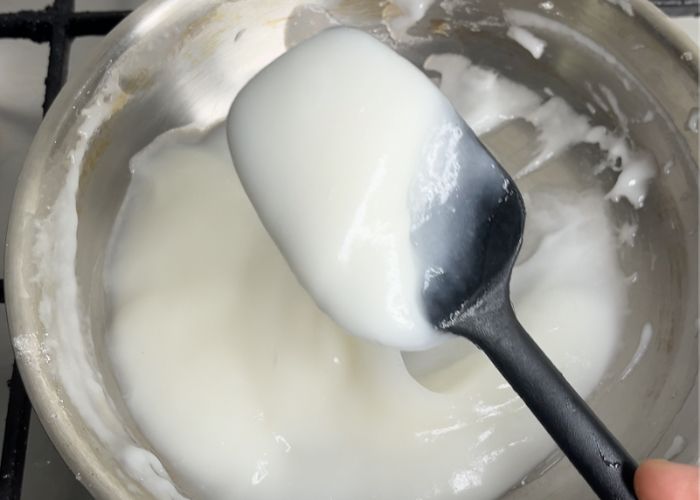
18)Allow the cooked rice flour paste to cool completely.
Kimchi Paste
19)Now take onion, garlic, chopped apple, peeled ginger in a food processor.
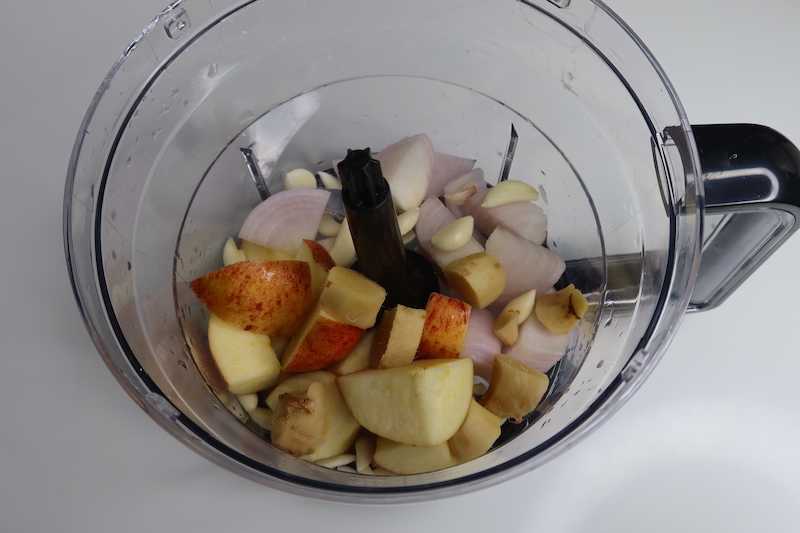
20)Now add in gochugaru, soy sauce in the blender and puree them to a coarse paste.
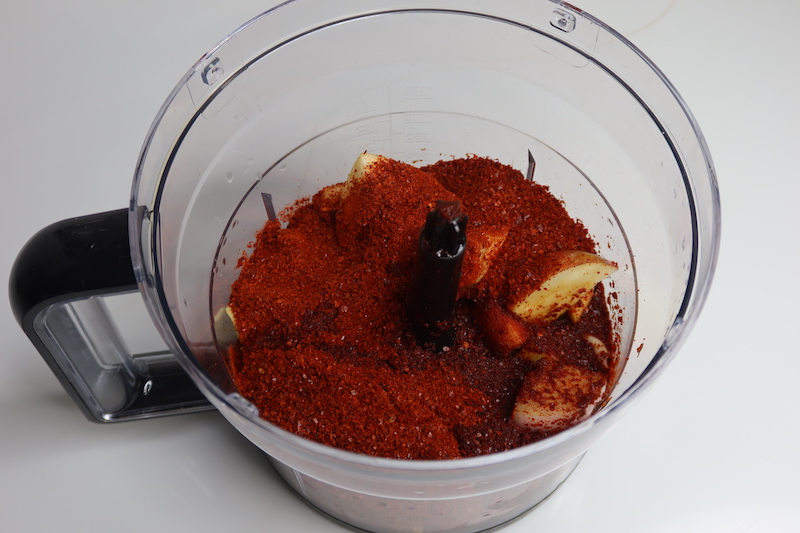
21)Don't add too much water when grinding. You can add little water if needed. The kimchi paste has to be thick.

22) Take prepared radish, carrot, green onions, cooked rice flour paste, ground chilli paste in a bowl.
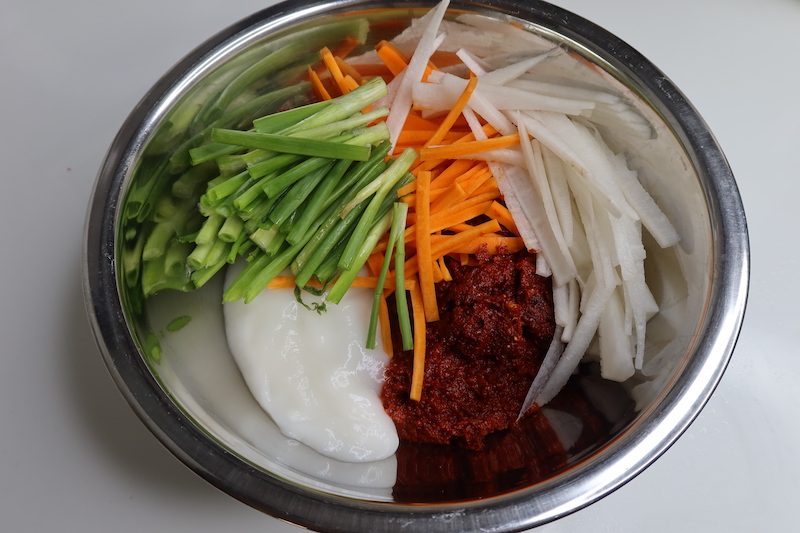
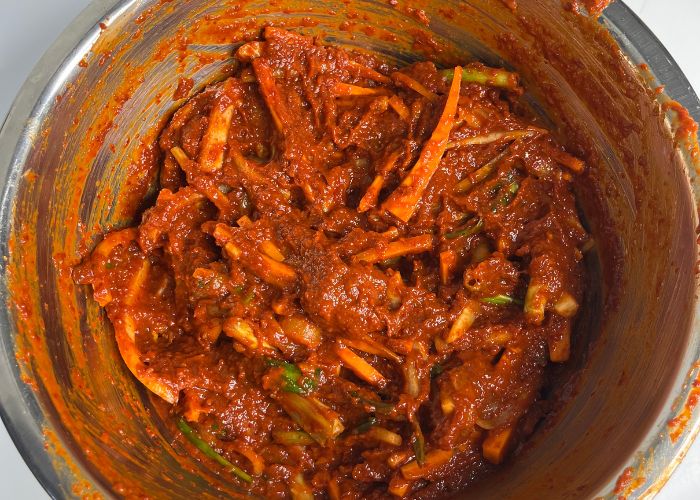
23) Mix well using your hands. I like to wear disposable gloves for mixing.
Assembling Kimchi
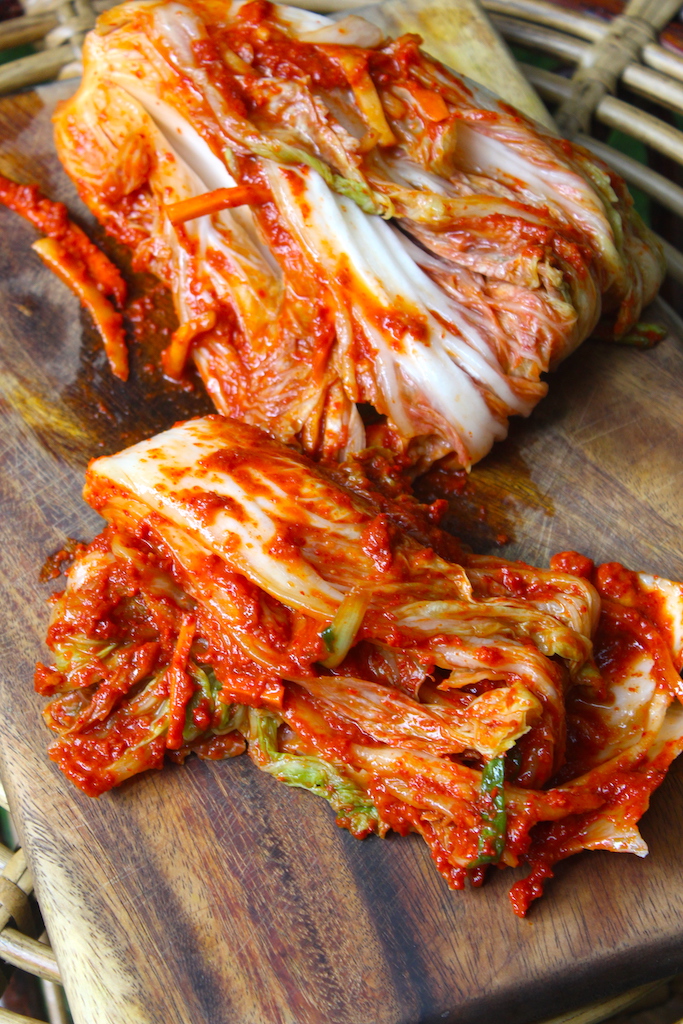
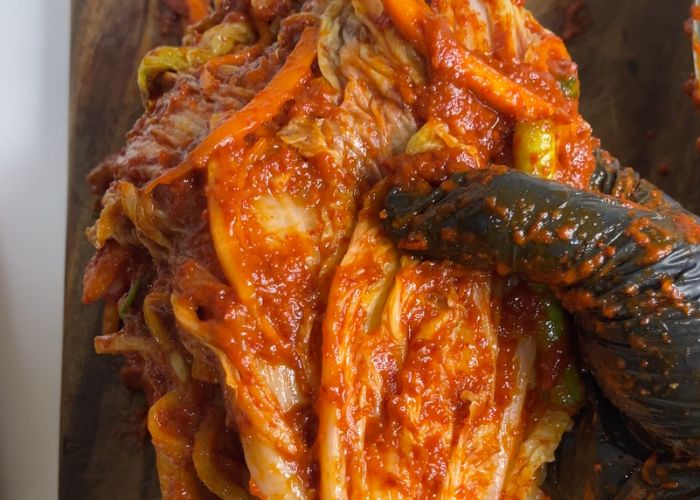
24) Take your cabbage quarter, apply the mixed chilli paste between each leaves of the cabbage.
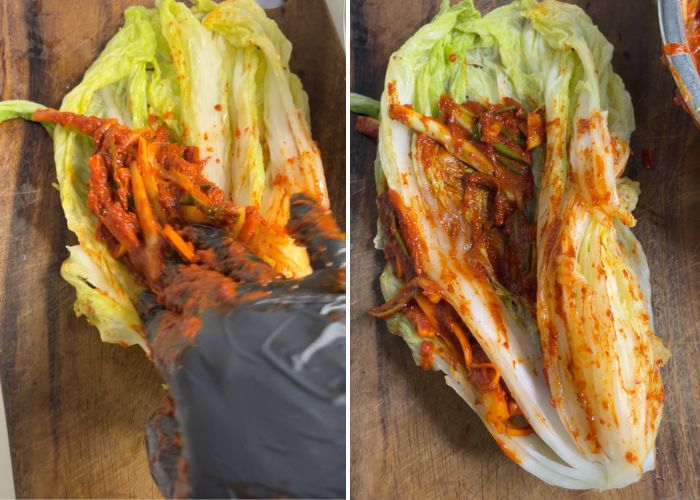
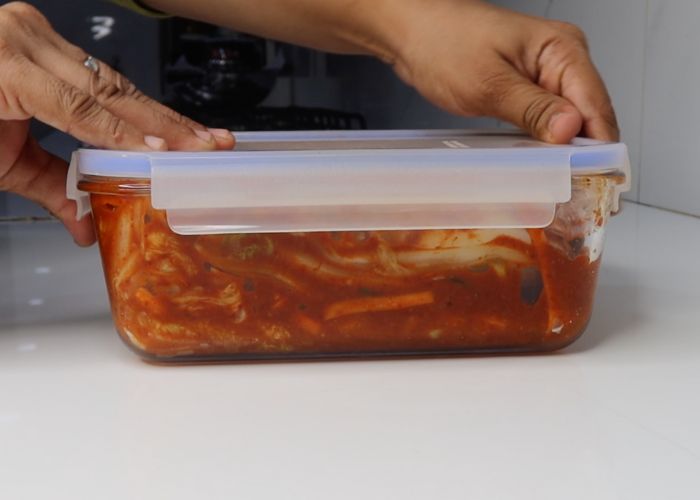
25)Once everything is applied, place it in a clean glass container and pack them tightly by pressing on top gently.
Storing kimchi
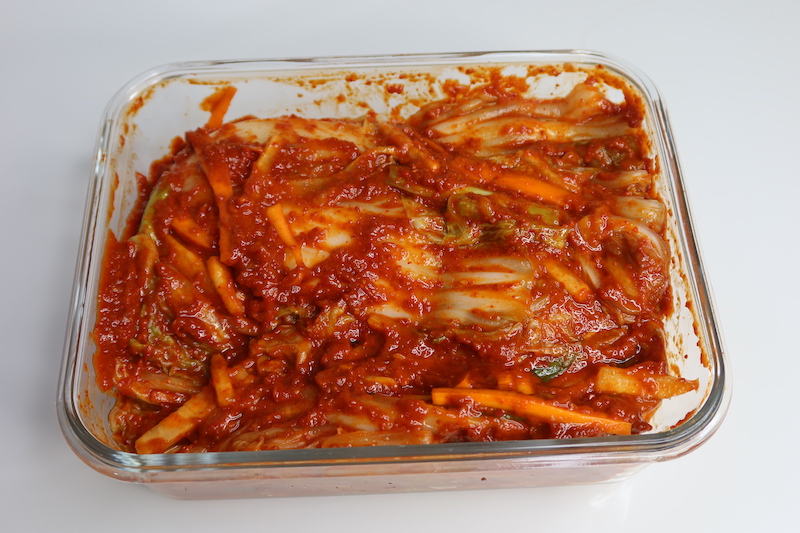
26)Once all the kimchi is in the container. Press firmly so it is tightly packed, make sure to leave some space on top because kimchi will leave some of its water content.
27)Cover the container tightly with plastic wrap which prevents the oxidation in kimchi.
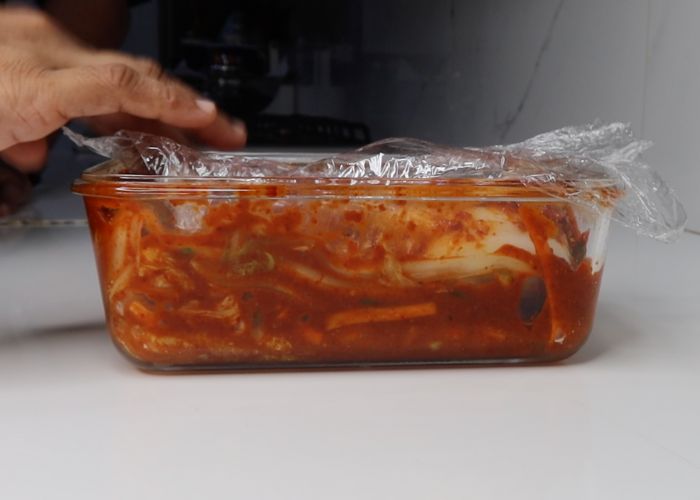
28)Cover the container with lid and store in fridge.Kimchi can be served fresh immediately after making. Allow to ferment the kimchi for at least one day before serving. or Enjoy it after 1 week for best taste. Kimchi can be left to ferment for 4 to 5 days if you need it more sour.
Expert Tips
- Use napa cabbage for making kimchi. try to choose fresh napa cabbage for making kimchi. Use regular cabbage instead of napa cabbage if you can find them.
- You can skip adding sliced carrots, green onions, radish along with the cabbage.
- use slightly coarse gochugaru for flavour and colour.
- if you prefer the taste of fish sauce, you can use fish sauce instead of soy sauce.
- Instead of apple, you can add 2 tablespoon of sugar or brown sugar in the marinate.
- white onion or green onion can be used in the marinate.
- Make double the amount of sauce if you need more juices in your kimchi.
- Instead of glutinous rice flour, you can use regular rice flour or sweet rice flour.
- For storing kimchi, you can keep it in glass container with tight lid or use kimchi grade plastic storage container.
- Cover the kimchi with plastic wrap so the cabbage is covered with plastic wrap. This helps in preventing oxidation.
- Kimchi can be served fresh immediately after making. Allow to ferment the kimchi for at least one day before serving. or Enjoy it after 1 week for best taste. Kimchi can be left to ferment for 4 to 5 days if you need it more sour.
Storage and Serving Suggestions
Kimchi can be served with plain rice, soup and other side dishes. You can make soup, fried rice too. You can store it in fridge for upto a month.
FAQ
1)What does kimchi taste like?
Kimchi can be sour and spicy. That said, those jars hold tangy, salty, spicy fermented cabbage that's packed with flavor and umami. Because it's naturally fermented, it's a probiotic powerhouse.
2)Is kimchi good for you?
Kimchi has numerous health benefits. Because it's a fermented food, it boasts numerous probiotics. These healthy microorganisms may give kimchi several health benefits. It may help regulate your immune system, promote weight loss, fight inflammation, and even slow the aging process.
3)Can we make instant kimchi using regular cabbage?
Yes you can make kimchi using regular cabbage. but traditionally it is made using napa cabbage.
4)Is kimchi vegan?
Usually they add fermented shrimp, fish sauce in kimchi. But this particular recipe is completely vegan.
5)How many varieties of kimchi recipe is present?
There are so many variations of kimchi is available. Some of the popular ones are source wiki
- Baechu-kimchi (배추김치) spicy napa cabbage made from whole cabbage leaves
- Baechu-geotjeori (배추겉절이) unfermented napa cabbage.
- Dongchimi (동치미) a non-spicy watery kimchi
- Kkakdugi (깍두기) spicy cubed Korean radish strongly-scented kimchi containing fermented shrimp
- Oi-sobagi (오이소박이) cucumber that can be stuffed with seafood and chili paste, and is a popular choice during the spring and summer seasons
- Pa-kimchi (파김치) spicy green onion
- Yeolmu-kimchi (열무김치) is also a popular choice during the spring and summer, and is made with yeolmu radishes, and does not necessarily have to be fermented.
- Gat-kimchi (갓김치), made with Indian mustard
How long to ferment kimchi?
You can enjoy immediately. But leaving it to ferment at least for a day will allow the flavours to develop. You can ferment kimchi upto 5 days or more. The longer you ferment the more sour it gets.
Love Korean Cuisine, Enjoy More


📖 Get Recipe

Traditional Kimchi Recipe (Napa Cabbage Kimchi)
Equipment
Ingredients
- 1 head Napa Cabbage
- 1 large Carrot peeled and juliened
- 1 large Radish peeled and juliened
- 5 no Green Onions cut in thirds
- 1 cup Salt
For Kimchi Seasoning
- 1 large Onion
- 1 large Apple
- 10 cloves Garlic
- 4 tablespoon Ginger
- ½ cup Soy sauce
- 1 cup Gochugaru
- ¼ cup Glutinous Rice Flour
- ¾ cup Water
Instructions
- Preparing Cabbage - Take napa cabbage, cut the base stem. Now cut napa cabbage in half and split it open. Now cut each half in quarter. Now take this in a large bowl and wash them throughly. Make sure you wash in-between the leaves. Now take them in a large bowl.
- Salting Cabbage - Lift each leaves from the cabbage and sprinkle salt generously over the cabbage leaves. Gently rub the salt over the leaves and place it in the large bowl. Now invert a plate on top of the cabbage and place a heavy object over the plate to weigh the cabbage down. This helps them to release more water. Now allow the cabbage to rest for 1 hour. After 1 hour the cabbage must have got soft, flip the cabbage halves so the other side can brine. Place the plate and the heavy object again and let it rest for 1 more hour. To check whether the cabbage is ready, gently fold them it should be bendable like shown in the image.
- Washing Cabbage - Now take the brined cabbage and wash them throughly in running water. This removes the excess salt. Make sure to lift each leaves and wash them well. Now gently squeeze them well using your hands to remove the water from the cabbage. Place the cabbage in a bowl and set aside.
- Making Rice Flour Paste - When the cabbage is brining, you can prepare the kimchi paste. First make the rice flour paste, Take water and rice flour in a pan and cook them on low heat till it thickens. Allow them to cool completely.
- Kimchi Paste - Now take onion, garlic, chopped apple, peeled ginger in a food processor. Now add in gochugaru, soy sauce in the blender and puree them to a coarse paste. Take prepared radish, carrot, green onions, cooked rice flour paste, ground chilli paste in a bowl and mix well using your hands. I like to wear disposable gloves for mixing.
- Assembling Kimchi - take your cabbage quarter, apply the mixed chilli paste between each leaves of the cabbage. Once everything is applied, place it in a clean glass container and pack them tightly by pressing on top gently.
- Storing - Once all the kimchi is in the container. Press firmly so it is tightly packed, make sure to leave some space on top because kimchi will leave some of its water content. Cover the container tightly with plastic wrap which prevents the oxidation in kimchi. Cover the container with lid and store in fridge.
Video
Notes
-
- Use napa cabbage for making kimchi. try to choose fresh napa cabbage for making kimchi. Use regular cabbage instead of napa cabbage if you can find them.
- You can skip adding sliced carrots, green onions, radish along with the cabbage.
- use slightly coarse gochugaru for flavour and colour.
- if you prefer the taste of fish sauce, you can use fish sauce instead of soy sauce.
- Instead of apple, you can add 2 tablespoon of sugar or brown sugar in the marinate.
- white onion or green onion can be used in the marinate.
- Make double the amount of sauce if you need more juices in your kimchi.
- Instead of glutinous rice flour, you can use regular rice flour or sweet rice flour.
- For storing kimchi, you can keep it in glass container with tight lid or use kimchi grade plastic storage container.
- Cover the kimchi with plastic wrap so the cabbage is covered with plastic wrap. This helps in preventing oxidation.
- Kimchi can be served fresh immediately after making. Allow to ferment the kimchi for at least one day before serving. or Enjoy it after 1 week for best taste. Kimchi can be left to ferment for 4 to 5 days if you need it more sour.
How Long to Ferment Kimchi before serving
- Allow to ferment the kimchi for at least one day before serving.
- Kimchi can be left to ferment for 4 to 5 days if you need it more sour.
- Taste the kimchi daily to achieve the right sourness. Then transfer them to fridge to stop the fermentation.
Serving & Storage
Kimchi can be served with plain rice, soup and other side dishes. You can make kimchi soup, kimchi fried rice too. You can store kimchi in fridge for upto a month.Tried this Recipe
Mention @yummytummyaarthi or tag #yummytummyaarthi!If you have any questions not covered in this post and if you need help, leave me a comment or mail me @aarthi198689@gmail.com and I'll help as soon as I can.
Follow me on Instagram, Facebook,Pinterest ,Youtube for more Yummy Tummy inspiration.
IF YOU MAKE THIS RECIPE OR ANYTHING FROM YUMMY TUMMY, MAKE SURE TO POST IT AND TAG ME SO I CAN SEE ALL OF YOUR CREATIONS!! #YUMMYTUMMYAARTHI AND @YUMMYTUMMYAARTHI ON INSTAGRAM!


Pia
Is there any substitute for Korean chilli flakes?
Aarthi
Use regular chilli flakes
Misrii
Hi Aarthi,
You have described the method of making it in a very simple way. I will definitely try this recipe.
Thanks for sharing.
Shailesh Lekhwar
Nice recipe
🤗
Hii thank u for this recipe I have a small doubt can we add any other ingredients along with the onion to ferment
Thank u for ur hardwork that u put so that these recipes can be reached to us
Aarthi
yes you can use radish, carrots.
Anita
Hi Aarthi, can please suggest some gochugaru brand to buy in India?