
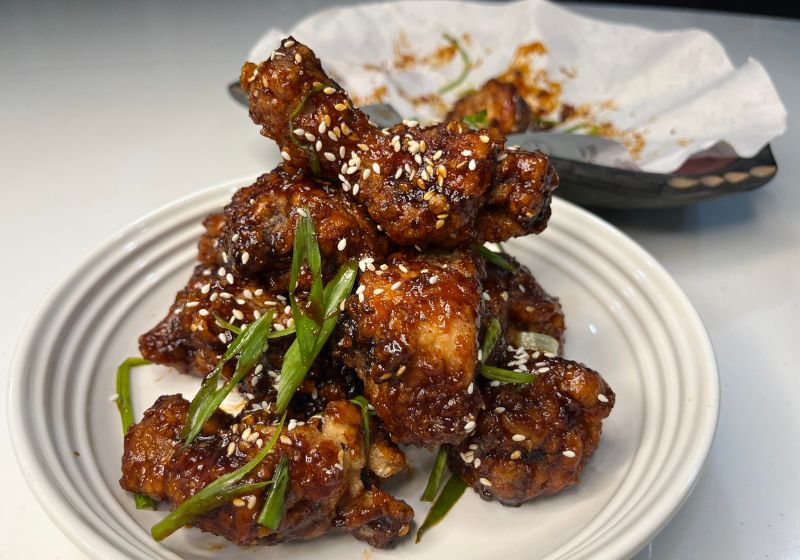
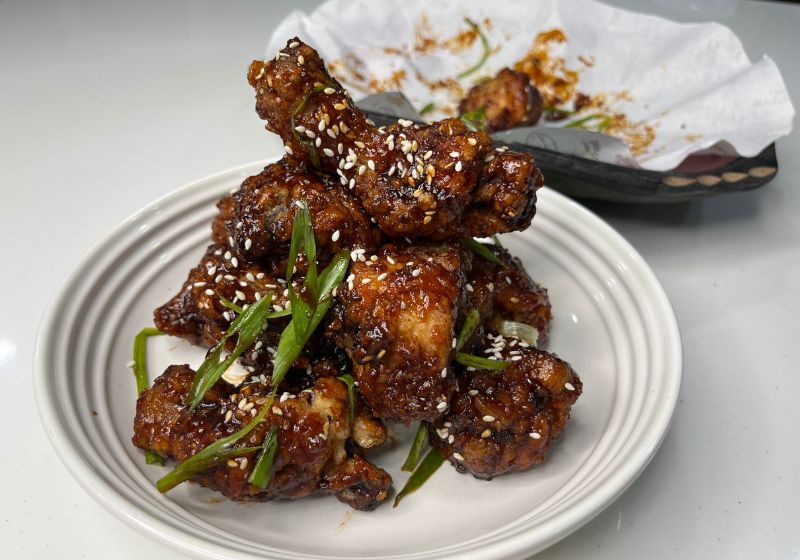
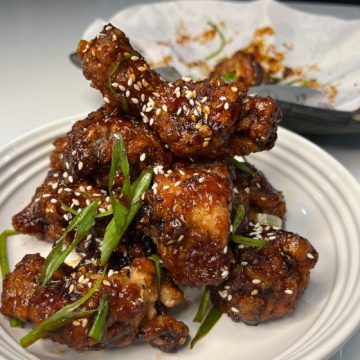
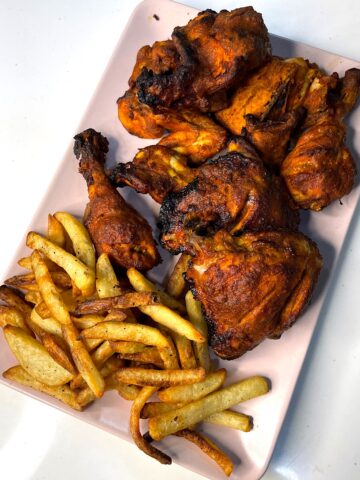
Korean Fried Chicken is a popular street food made with crunchy fried chicken tossed in a spicy, sticky and sweet sauce. This recipe is easy and results in crispy chicken even after tossing in the sauce. I have included few tips and tricks to make the best crispy Korean fried chicken made from scratch. Enjoy hot fried chicken with cold drink , danmuji & chilli oil noodles for a satisfying meal. Learn how to make Korean chicken with step by step pictures and video.
Korean Fried Chicken
Korean fried chicken is my recent favourite, love the spicy, sweet, garlic sauce coated crispy chicken any time of the day. I have been trying out different versions for the past few years and I can tell you this particular recipe is the Best Ever Korean Fried Chicken.
About Korean Fried Chicken
Crispy Korean Fried Chicken is a popular snack or appetizer in Korea and now getting popular all over the world. It is a favorite dish served in most of the street food stall across Korea & other Asian countries.
There are many varieties of fried chicken available. Some of the popular ones are Yangnyeom Chicken, dakgogi-twigim, chikin and many more. Basically crispy starch coated fried chicken is coated in a sticky spicy & sweet sauce.
The sauce is made with basic korean sauces and lots of garlic. The chicken is dredged in cornstarch and fried till crispy. The chicken is tossed in the sauce and served hot. The main tip for crispy fried chicken that stays crispy longer is "Double frying" the chicken.
Korean fried chicken is best served hot with your favorite beverage. The popular Korean drink of choice is Beer.
Similar Chicken Recipes
Watch Korean Fried Chicken Video
Korean Sauce Ingredients

Gochujang - also known as Korean red pepper paste. It is the key ingredients for the creating the sticky sauce for the chicken. You can easily find them in your local Asian super market or online.
Tomato Ketchup - ketchup balances the red pepper paste and gives a street food style taste.
Soy Sauce - adds umami taste to the sauce.
Vinegar - you can opt to rice vinegar or apple cider vinegar. It cuts all the sweetness from the sugar and balances the taste.
Sweetener - sugar, corn syrup, rice syrup, honey & brown sugar are some of the options you have. I used sugar and corn syrup.
Garlic - make sure you add lots of garlic and finely chop them so it distributes evenly when tossing the sauce over the chicken.
Sesame Oil - toasted sesame oil adds nutty flavour to the chicken.
Korean Fried Chicken Ingredients
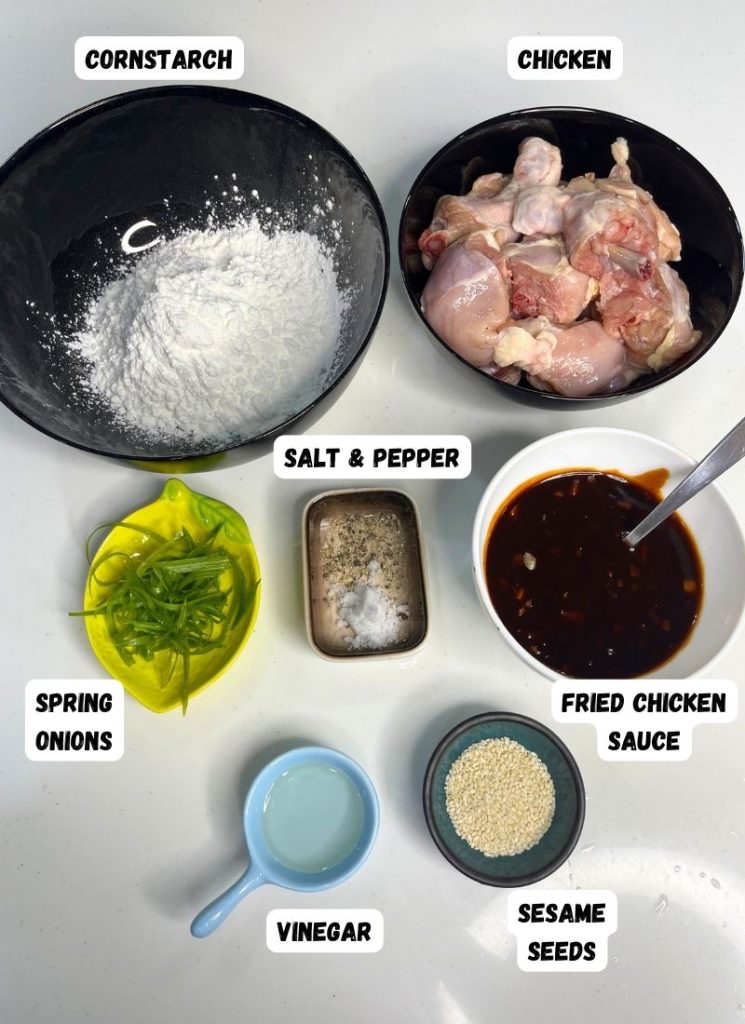
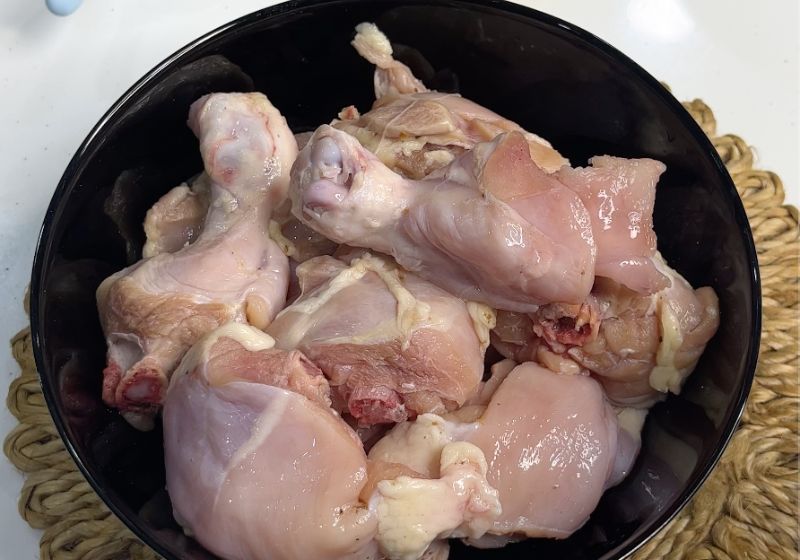
Chicken - use skin-on and bone-in chicken for making this. It makes the chicken incredibly juicy and flavourful.
Fried Chicken Sauce - make sure you taste the sauce and adjust it as per your liking because this sauce makes your dish bang on!
Cornstarch - cornstarch is ideal for coating chicken. But you can use potato starch too.
Seasonings - basic seasoning salt, pepper and vinegar is used to flavour chicken.
Garnishing - final garnish of sesame seeds and spring onions take your chicken to a whole new level.
How do you Keep Fried Chicken Crispy for a Long time?
There are few ways you can keep fried chicken crispy longer. First here are few things which I do to serve my fried chicken crispy. If you follow this order when you make korean fried chicken, your frying experience will be smooth and you can serve fried chicken crispy and hot.
- Start by marinating the chicken. The longer it marinates the better it gets. Brining chicken can help keep chicken juicier.
- Make sauce. You can make the sauce a day ahead and store in fridge.
- Coat the chicken in batches with the starch.
- First set of frying can be done in batches. Remove the chicken once fried and store in a bowl covered till you serve.
- When you are about to serve, increase heat to high in the oil and double fry the chicken till crispy. This second frying will take less time only.
- Once chicken is fried, toss with sauce in a bowl and serve immediately.
Korean Fried Chicken in 5 Easy Steps
Marinating Chicken
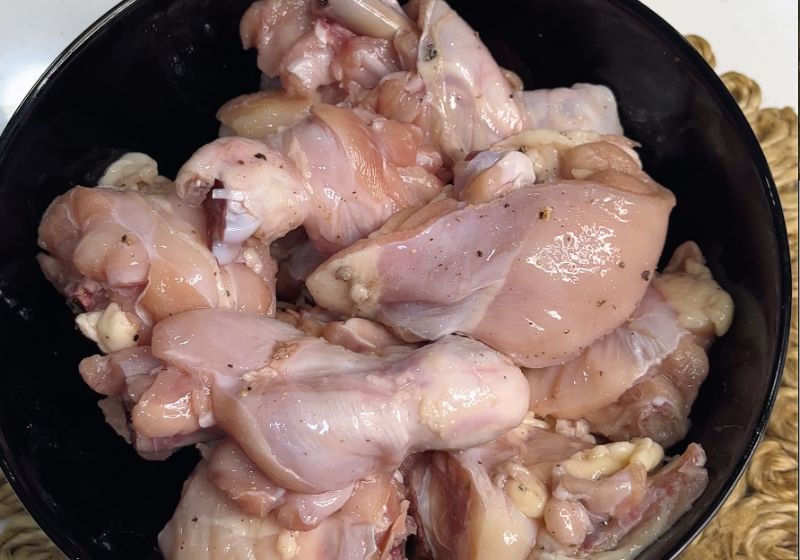
Take chicken in a bowl, add salt, pepper & vinegar. Mix well and set aside to marinate for 30 minutes.
Make Sauce
Mix sauce ingredients in a bowl. Heat sesame oil, add garlic and saute for few seconds. Pour in your sauce and cook for 1 to 2 minutes till glossy and shiny. Set aside.
Coating Chicken with starch
Take cornstarch in a bowl, add chicken in and squeeze it to coat with cornstarch. Squeezing will make them create flaky exterior. Set aside for few minutes.
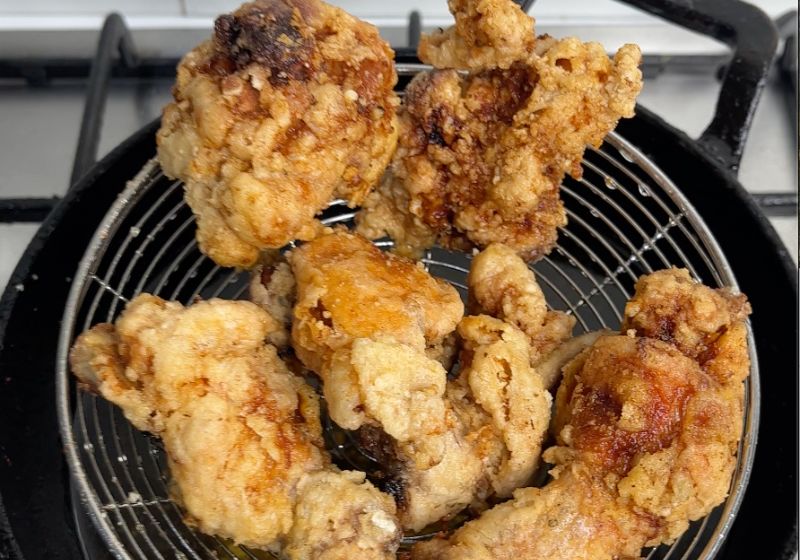
Double Frying Chicken
Heat oil for deep frying. Drop chicken in and fry on medium high heat for 4 to 5 minutes, strain the chicken. Now increase the heat, Add the chicken back in the oil and fry for another 5 to 6 mins till crispy. Strain and set aside.
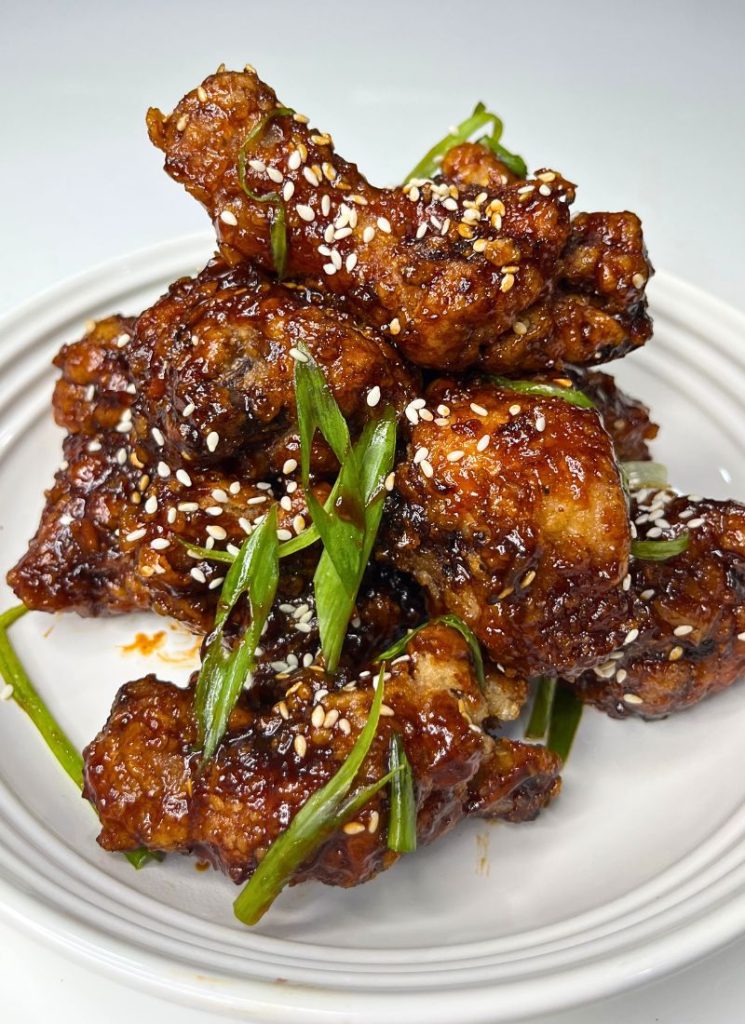
Coating chicken with sauce
Take fried chicken in a bowl, add sauce over it and toss well to coat. Serve with a garnish of spring onions and sesame seeds.
How to Make Korean Fried Chicken (Stepwise Pictures)
Marinating Chicken
1)Take chicken in a bowl. Use bone-in and skin-on chicken for maximum crispness. Wash chicken really well and completely strain it so there is no moisture. Take chicken in a bowl.
2)Add in salt, black pepper powder & vinegar. If you want you can add grated ginger and garlic as well.
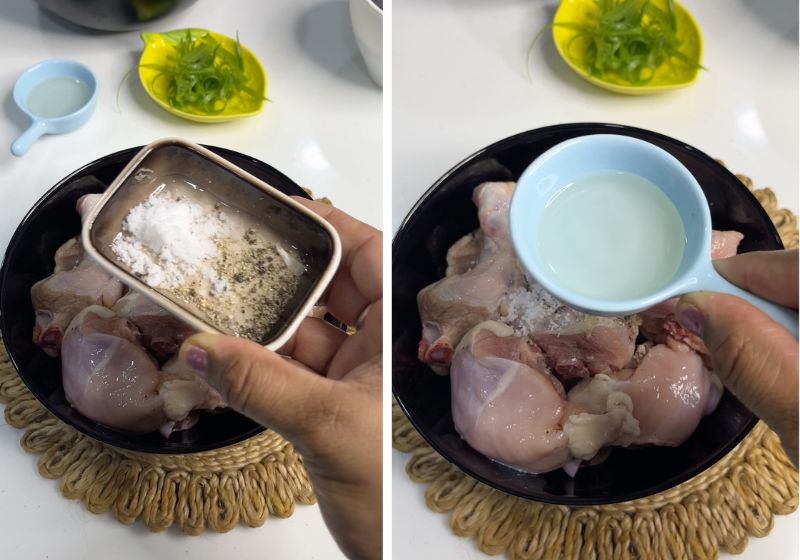
3)Mix chicken with salt, pepper and vinegar. Let it marinate for 30 minutes.
Make Fried Chicken Sauce
4)Take gochujang in a bowl. Gochujang is korean red pepper paste. Add in tomato ketchup in the same bowl.
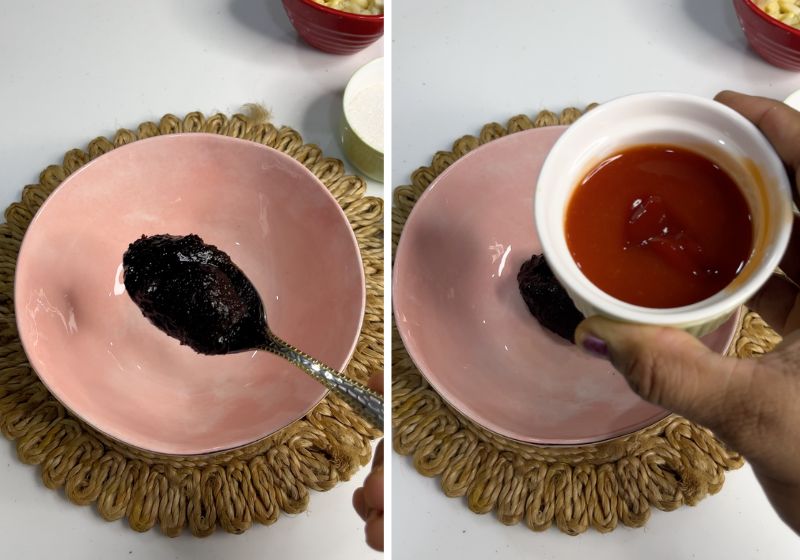
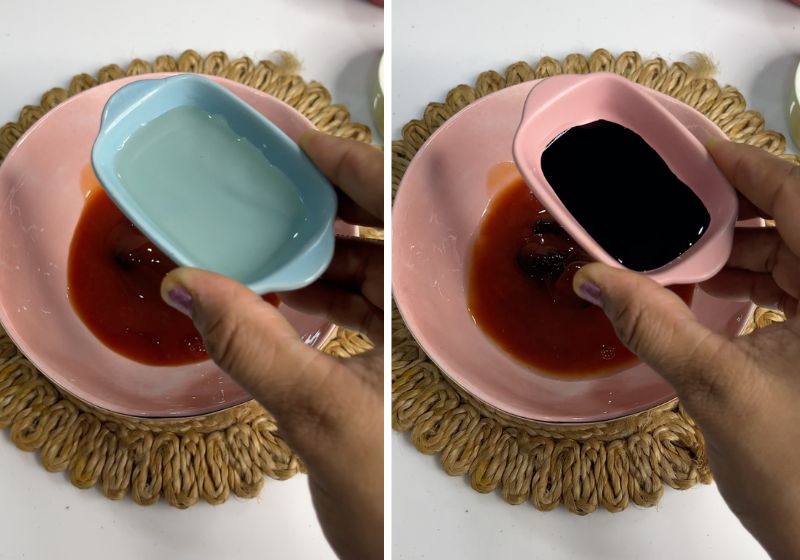
5)Add in vinegar and soy sauce.
6)Now as part of sweetener. I am using corn syrup. You can add honey, maple syrup or rice syrup instead of corn syrup.
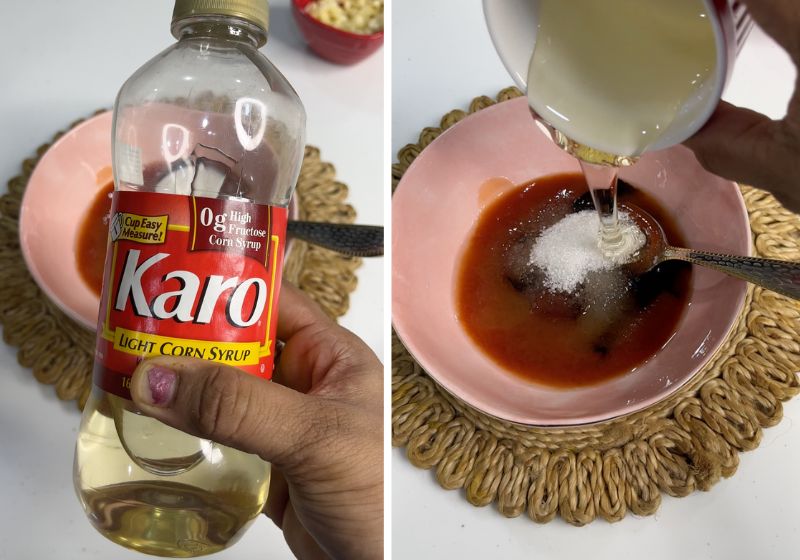
7)Add in sugar and some water. Instead of white sugar you can add brown sugar.
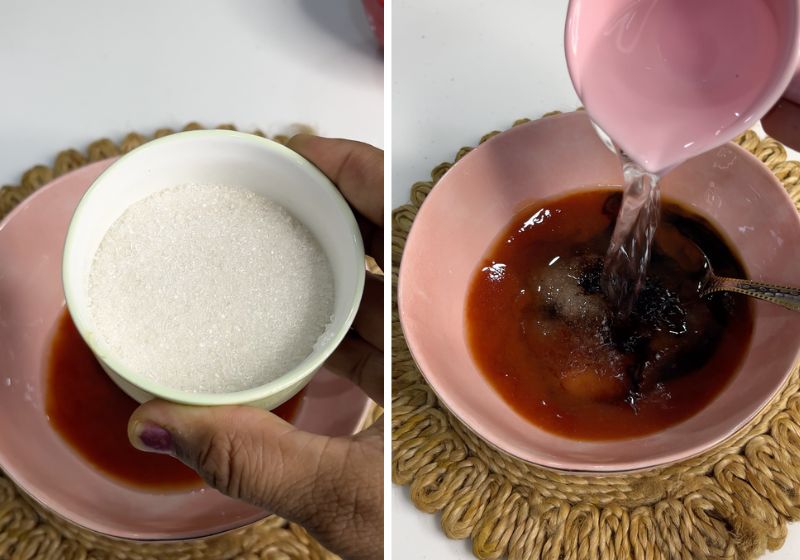
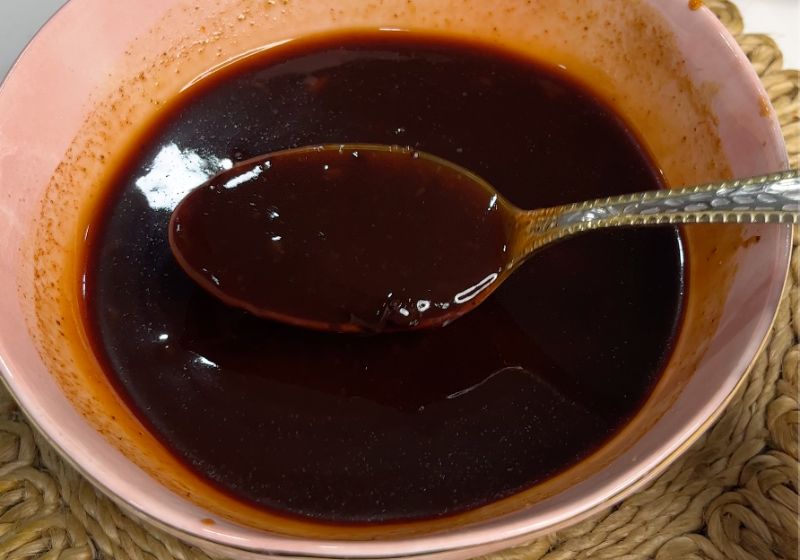
8)Mix the sauce together.
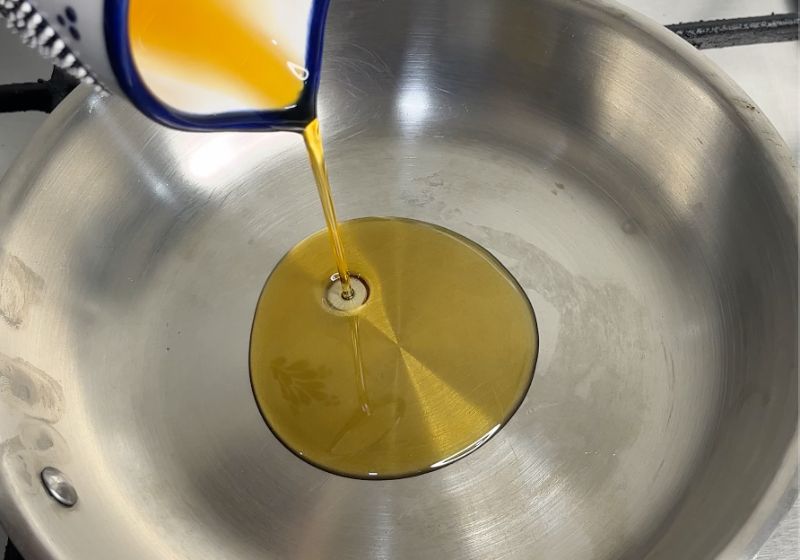
9)Heat sesame oil in a pan. Instead of sesame oil, you can use regular oil.
10)Add in finely chopped garlic.
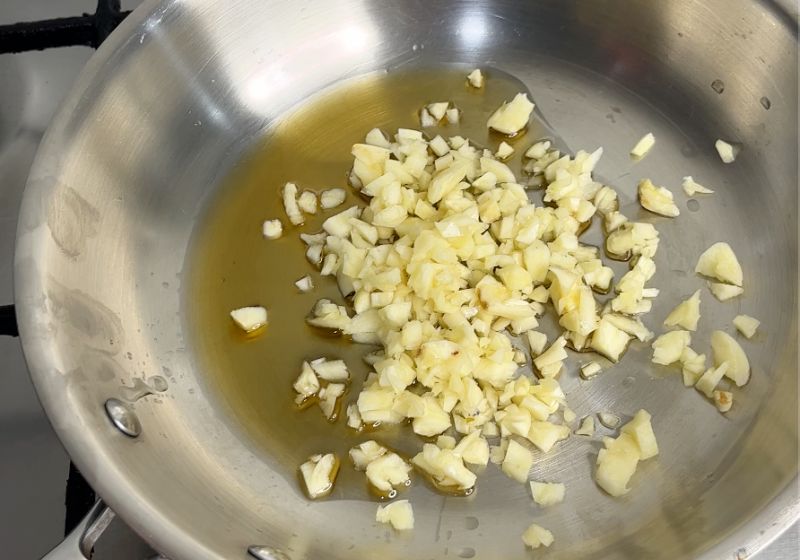
11)Saute garlic in oil on low medium heat till light golden.

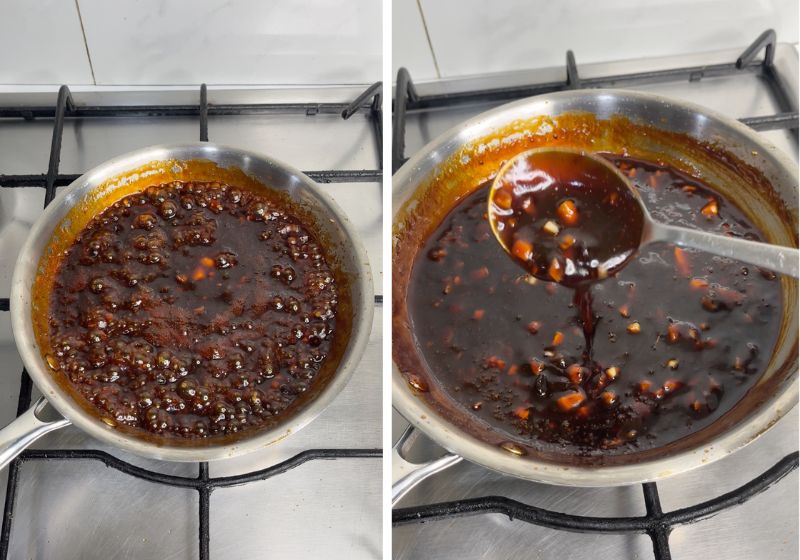
12)Once garlic is fried. Add in the sauce and mix well with the garlic.
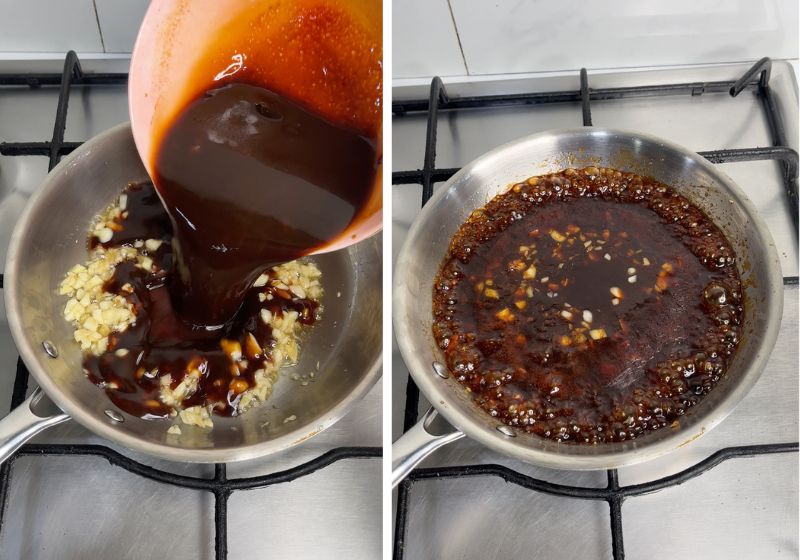
13)Let the sauce bubble up and cook on medium heat till it gets glossy and shiny. The sauce has to be thick and shiny.
Coat Chicken in Cornstarch
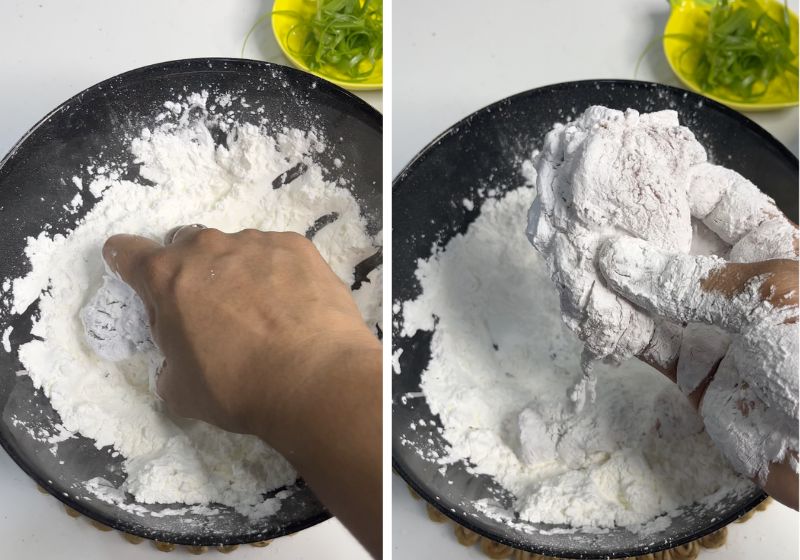
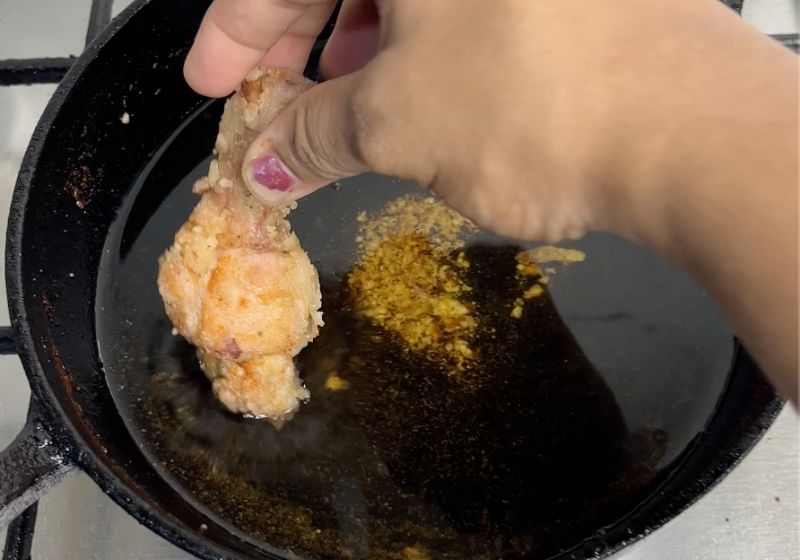
14)Take cornstarch in a bowl. Add in chicken in the cornstarch and coat it really well.
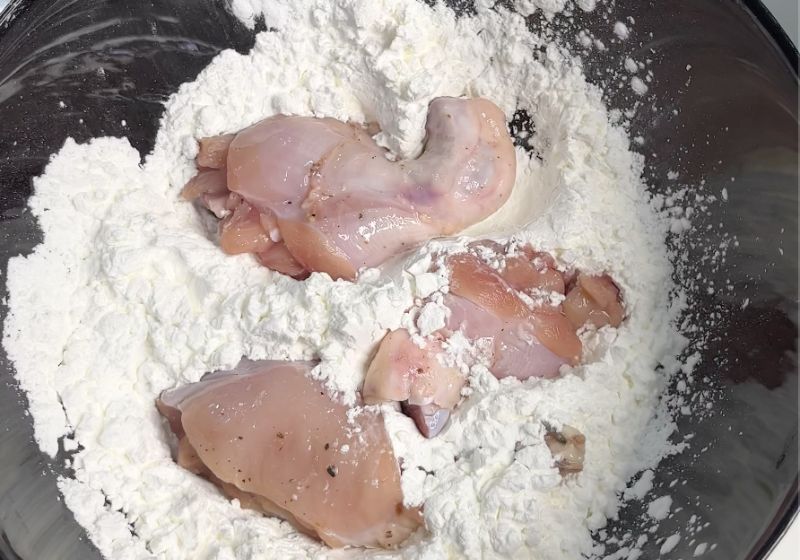
15)To get the crispy coating. Squeeze chicken with cornstarch using your hands, this creates the crispy exterior. Once it is coated with cornstarch, set aside in a plate.
Pro Tip: Instead of cornstarch you can use potato starch.
Frying Chicken
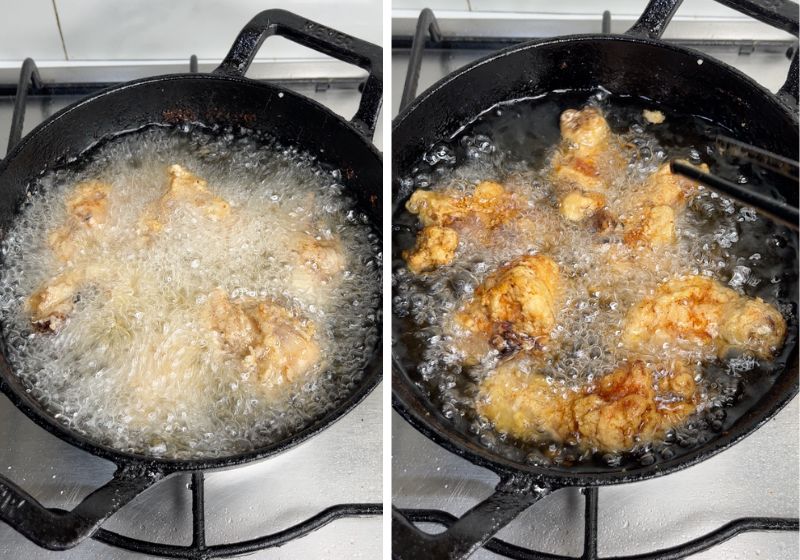
16) Drop chicken in hot oil (in batches) and fry for 3 to 5 minutes depending on the size of the chicken. This time the chicken will be cooked ¾th.
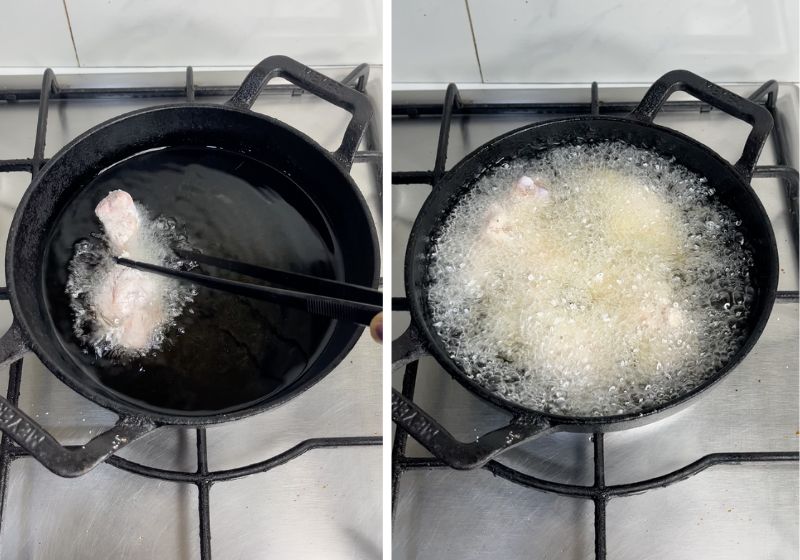
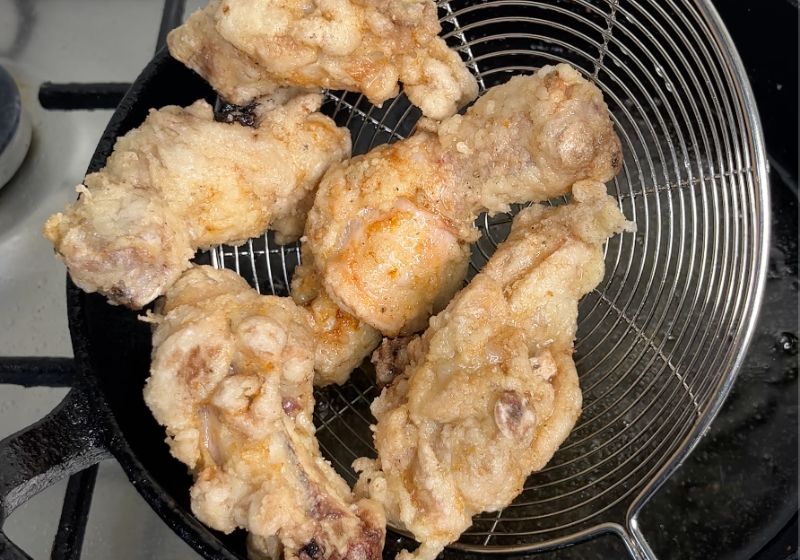
17)Once the chicken is half fried, strain it from oil using a slotted spoon and set aside in a bowl. The chicken will not be super crispy at this point. We are going to fry the chicken again.
Now drop few more chicken in and fry the entire batch the same way.
Double Frying Chicken
18) Now for super crispy crunchy chicken, we are going to double fry the chicken. Drop the chicken in hot oil and fry on high heat for few more minutes till chicken is cooked completely and it gets super crispy. This double frying technique is important for crispy fried chicken.
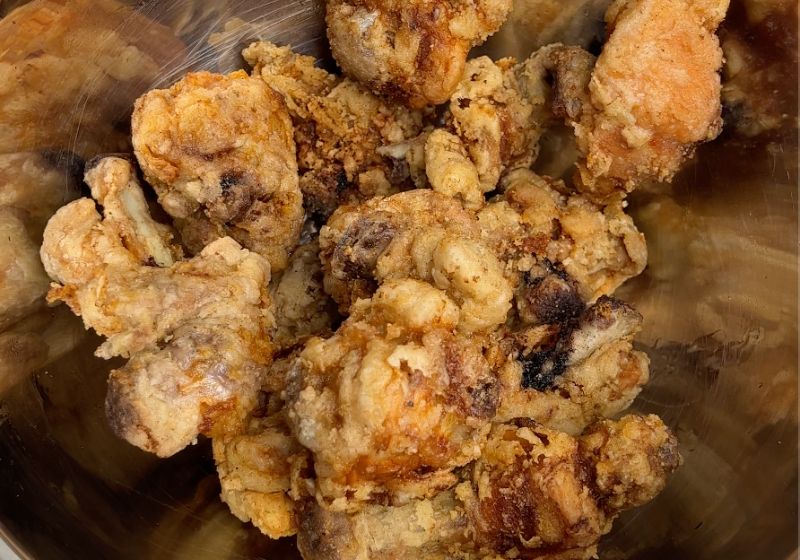
19)Fry the chicken till golden and crispy.
Coating Chicken with Sauce
20) Take your super crispy fried chicken in a bowl.
21)Spoon generous amount of sauce over the chicken.
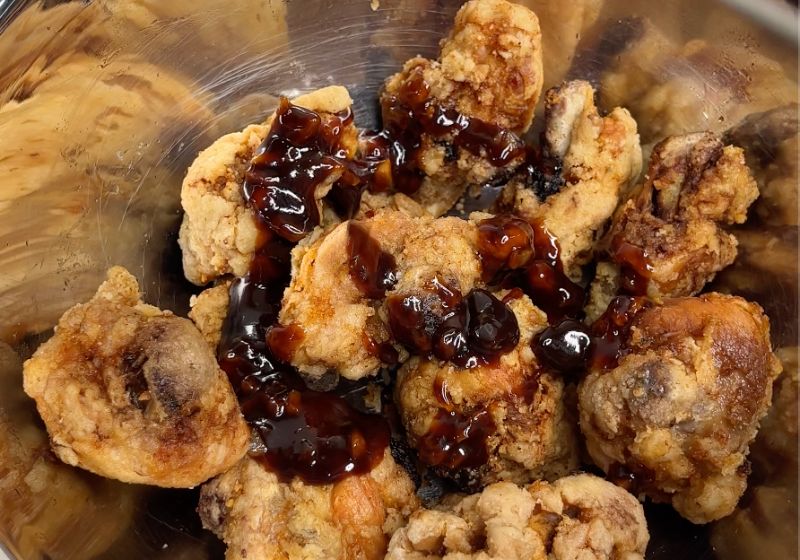
22)Toss well to coat the chicken with the sauce.
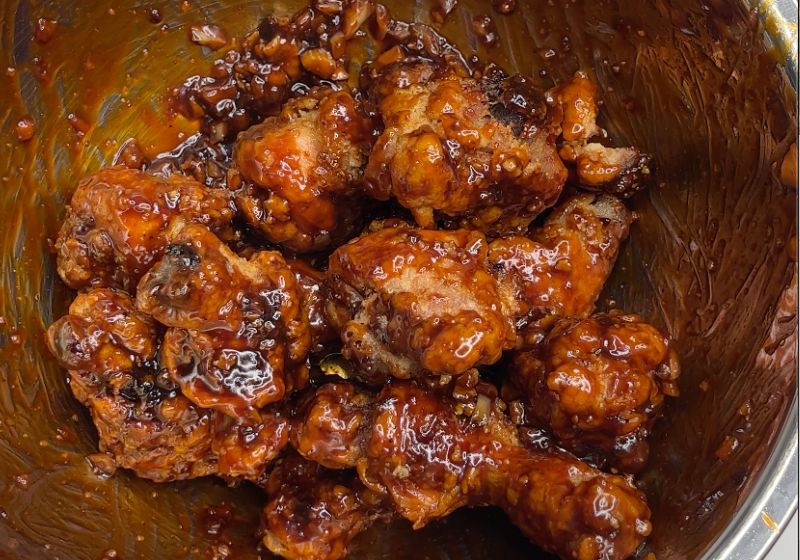
23)Sprinkle the chicken with sesame seeds, top with spring onions and serve.
Expert Tips
About Chicken
Use one whole chicken that is cut into pieces. You can cut chicken however you prefer. The only thing that changes is the frying time. Make sure your chicken has bone-in and skins still intact for maximum crispness. I used chicken without skins, still it tasted great. Marinate chicken for better flavour absorbtion.
Getting Sauce Right
The taste of fried chicken totally depends on the sauce. So taste and adjust the sauce as per your liking. Don't be shy with the garlic, it adds maximum flavour.
Coating Chicken the correct way
Use cornstarch or potato starch for coating chicken. In my experience I found that potato starch makes crispy super crispy. Press the chicken in the starch to create flaky texture which turns out so crispy when fried.
Double Frying for Maximum Crispness
Double frying is key. Fry the chicken on medium heat till it is cooked. The increase the heat to high and fry till crispy texture. This makes it super crispy.
More Fried Chicken
- Korean Chicken Mandu Recipe
- Ayam Goreng (Malaysian Fried Chicken)
- Buttermilk Fried Chicken
- Black Pepper Chicken Fry Recipe
- Peri Peri Fried Chicken Recipe
- Pan Fried Lemon Garlic Chicken Recipe
More Korean Recipes to Try


📖 Get Recipe
Korean Fried Chicken | Korean Chicken Recipe
Equipment
Ingredients
For Marinating Chicken
- 1 kg Chicken (skin-on & bone-in)
- Salt and pepper to taste
- 1 tablespoon Vinegar
For Fried Chicken Sauce
- 2 tablespoon Gochujang
- ¼ cup Tomato Ketchup
- 1 tablespoon Vinegar
- 1 teaspoon Soy Sauce
- 3 tablespoon Sugar
- ¼ tablespoon Corn syrup or Honey
- ¼ cup Water
- 3 tablespoon Garlic finely chopped
- 1 tablespoon Toasted Sesame Oil
For Fried Chicken
- 1 cup Cornstarch
- Oil for deep frying
- 1 teaspoon Sesame Seeds for garnishing
- 1 tablespoon Spring Onions for garnishing
Instructions
- Take chicken in a bowl. Add salt, pepper and vinegar. Mix well and leave aside to marinate for 30 minutes.
- Take sauce ingredients in a bowl except sesame oil and garlic. Mix well till smooth. Heat sesame oil in a pan, add finely chopped garlic and stir fry for few seconds. Pour in the sauce and cook on high heat for 2 to 3 minutes till shiny and glossy. Remove and set aside.
- Take cornstarch in a bowl, add chicken in and squeeze it to coat with cornstarch. Squeezing will make them create flaky exterior. Set aside for few minutes.
- Heat oil for deep frying. Drop chicken in and fry on medium high heat for 4 to 5 minutes, strain the chicken. Now increase the heat, Add the chicken back in the oil and fry for another 5 to 6 mins till crispy. Strain and set aside.
- Take fried chicken in a bowl, add sauce over it and toss well to coat. Serve with a garnish of spring onions and sesame seeds.
Video

Notes
-
- Marinate the chicken as mentioned.
- Double frying the chicken makes it super crispy and stays crispy longer.
- Toss the chicken in the sauce just before serving so it stays crispy for a longer time.
- Make the sauce in advance. You can store in fridge upto a week.
- Always use a larger pot for frying so the chicken has plenty of room to fry.
Nutrition
Tried this Recipe
Mention @yummytummyaarthi or tag #yummytummyaarthi!If you have any questions not covered in this post and if you need help, leave me a comment or mail me @aarthi198689@gmail.com and I'll help as soon as I can.
Follow me on Instagram, Facebook,Pinterest ,Youtube and Twitter for more Yummy Tummy inspiration.
IF YOU MAKE THIS RECIPE OR ANYTHING FROM YUMMY TUMMY, MAKE SURE TO POST IT AND TAG ME SO I CAN SEE ALL OF YOUR CREATIONS!! #YUMMYTUMMYAARTHI AND @YUMMYTUMMYAARTHI ON INSTAGRAM!


jk
Can this be made with paneer? What modifications would you recommend?
Anonymous
Do we fry in two batches or fry one batch two times?
shankar das
I followed the formula exactly. I utilized chicken wings. My entire family concurred they were the best wings we've ever eaten. Simply an astounding formula.
Much appreciated