
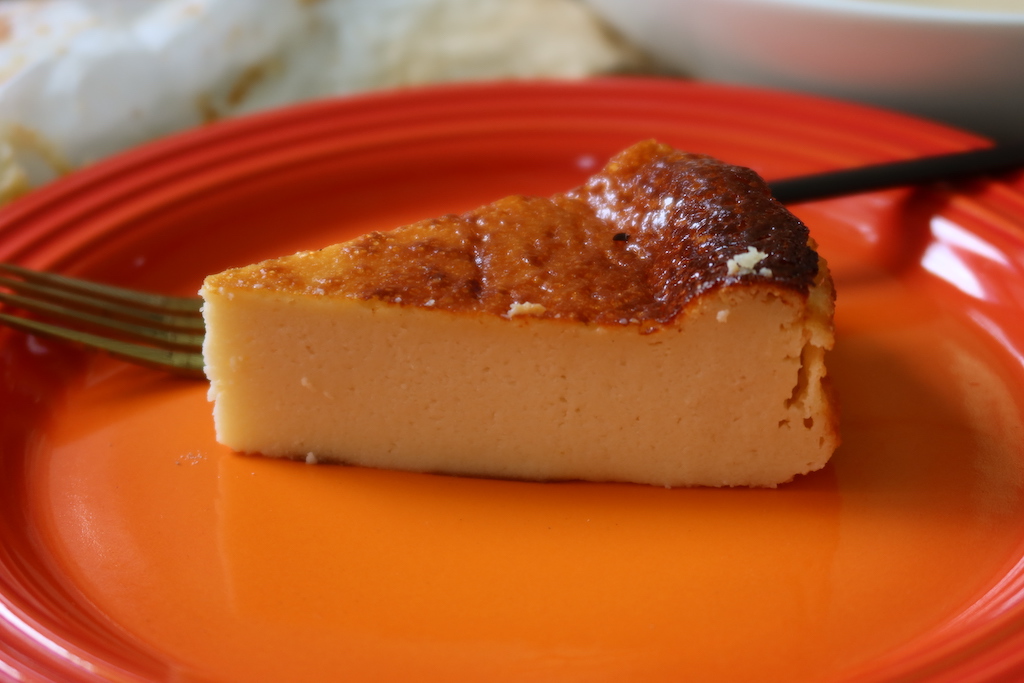
Basque Cheesecake also known as Burnt Cheesecake is all over the internet. This addictive trending cheesecake is super easy to make. It is crustless cheesecake that is cooked at very high heat which results in rustic appearance and an almost burnt surface. The cheesecake batter is made in a blender and a fail proof recipe. Learn how to make Basque cheesecake with step by step pictures and video.
Basque Cheesecake
Last night I was craving for some cheesecake. I thought of making my no bake cheesecake. But I realised the trending recipe circulating all over the internet which is Basque Cheesecake or Burnt Cheesecake.
So decided to give it a try. It took me 45 minutes to make this cheesecake from start to finish. The cheesecake itself is super creamy and so freaking amazing. More over the cheesecake batter is made in a blender which makes it super cool and easy.
Jump to:
What is Basque Cheesecake?
Many people think Basque cheesecake means burnt cheesecake. But actually Basque Cheesecake is originated from a Basque, a region in Spain. The recipe uses ingredients that is traditionally used in a cheesecake.
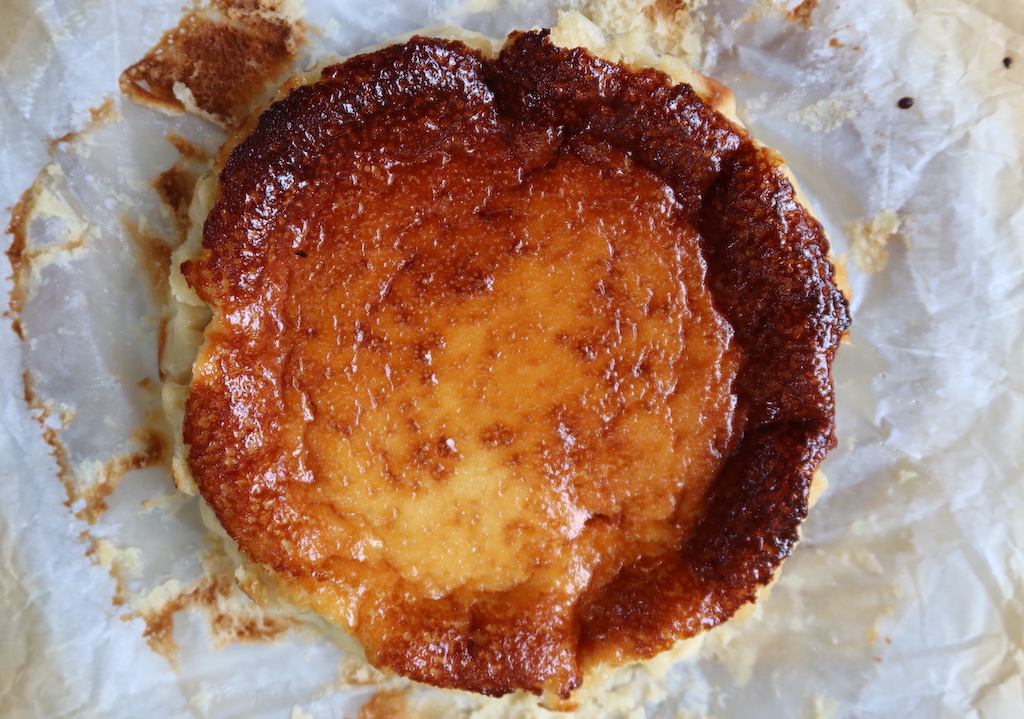
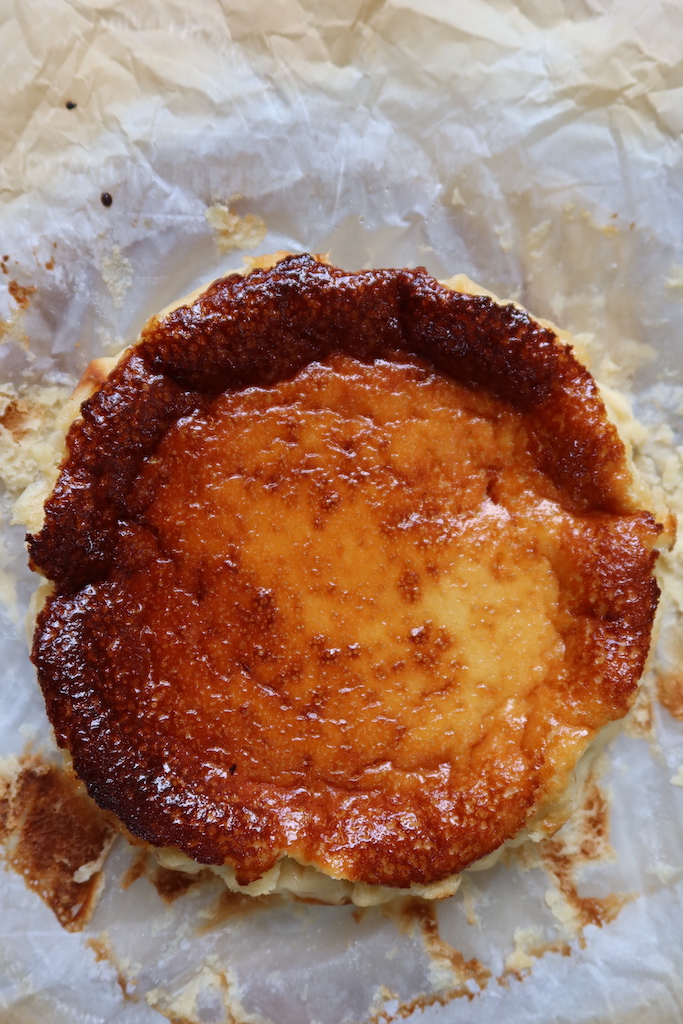
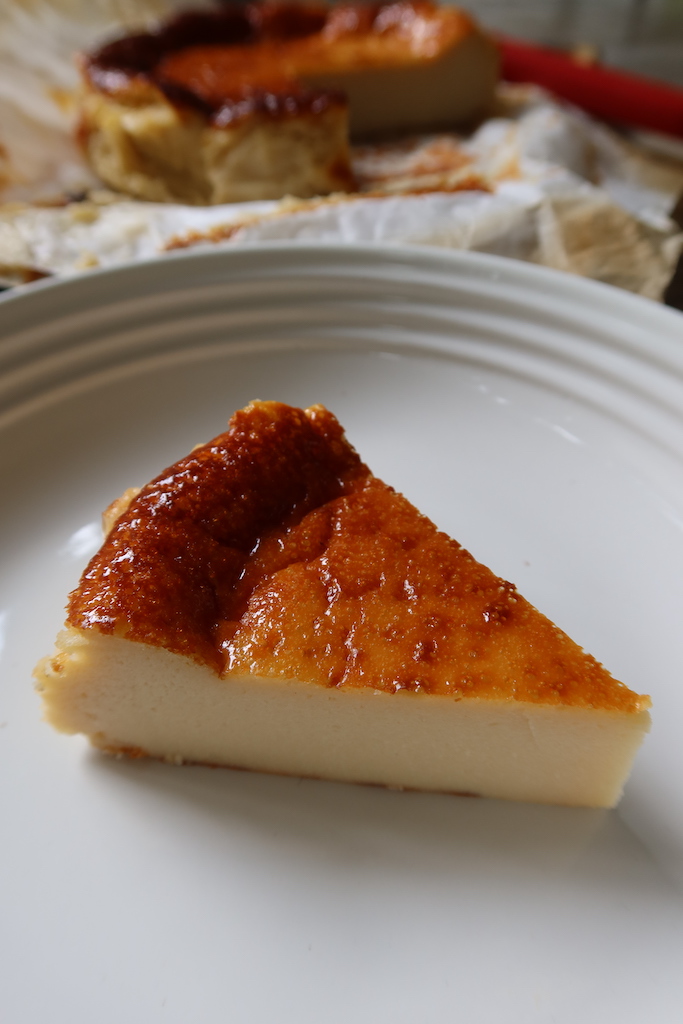
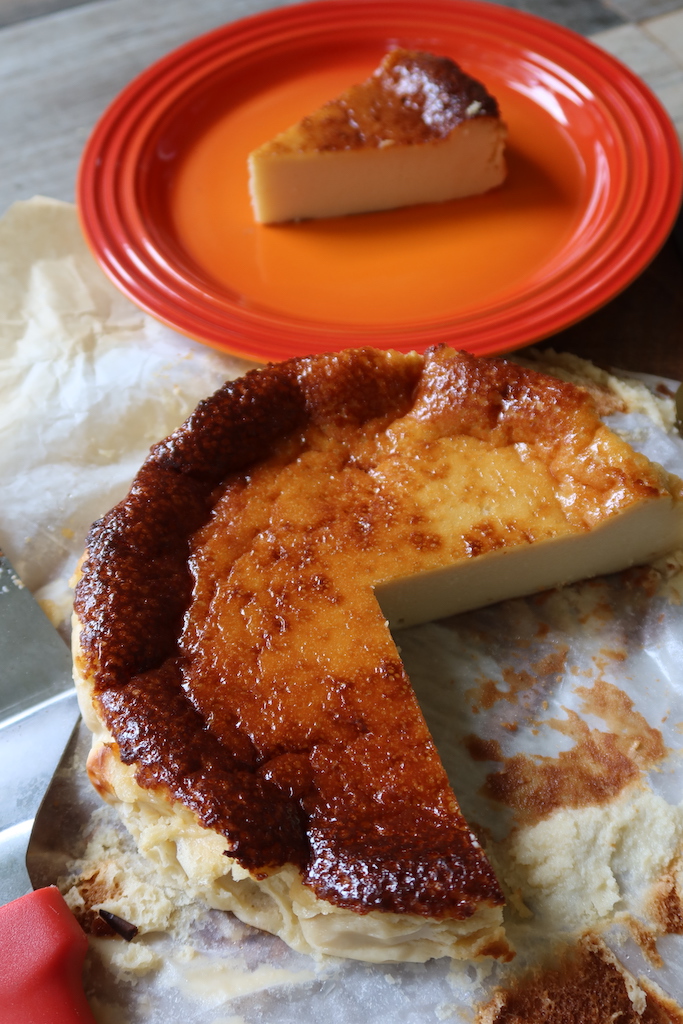
Except this cheesecake is easy to make that regular cheesecake. It is a crustless cheesecake that is cooked at very high heat. This results in its rustic appearance with cracked edges and an almost burnt surface.
Similar Cheesecake Recipes
About Easy Blender Basque Cheesecake
Basque cheesecake is originated in Basque a region in Spain. This cheesecake is also known as burnt cheesecake which has a dark caramel colour topping and silky smooth creamy textured cheesecake texture inside.
Basque cheesecake is made with cream cheese, eggs, sugar, cream, flavourings. The recipe is very easy and simple, all you need is to grind this in a blender and bake it in a cake pan.
This is a crustless cheesecake so you don't have to worry about making a biscuit base. Also the filling is made in a blender in an instant. Unlike regular baked cheesecake which is baked in a bain-marie, this cheesecake batter is poured in a parchment lined baking pan and baked straight in the oven.
You can make tons of variations to this cheesecake which I have shared in this blog post. Make sure to read the entire blog post.
Basque Cheesecake Ingredients
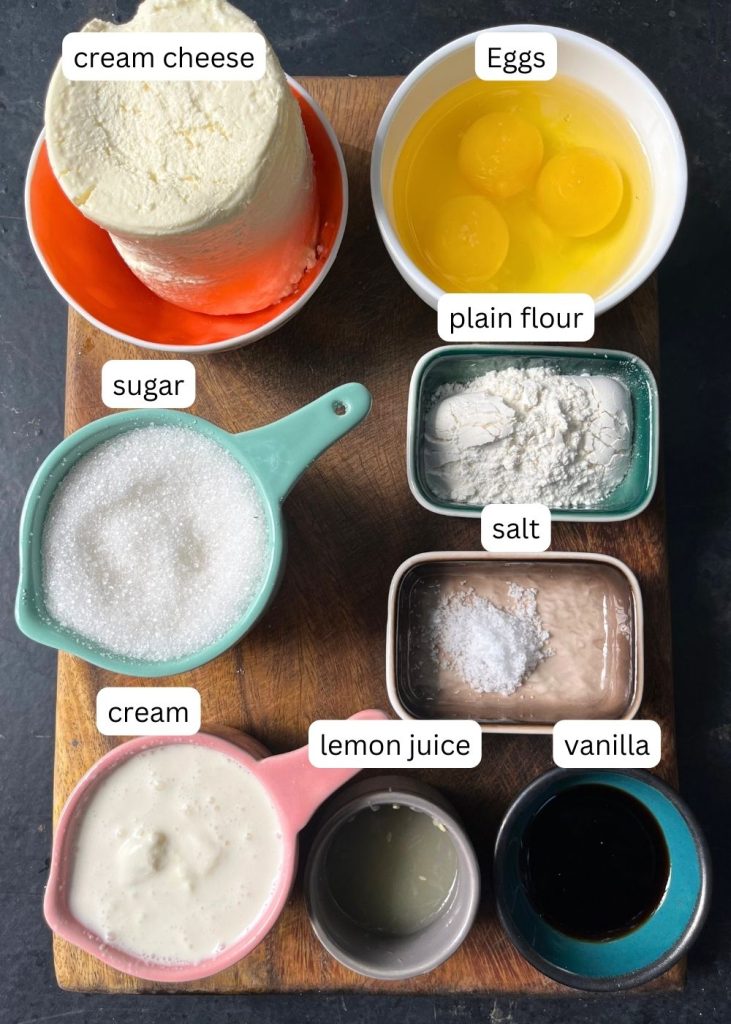
Cream Cheese - make sure to use good quality cream cheese. Use cream cheese at room temp which is very very important. Remove cream cheese from fridge at least two hours before making this.
Sugar - Sugar in this totally depends on your taste. You can reduce the sugar upto ½ cup, if you are planning to serve this with some kind of sauces.
Eggs - eggs makes the cheesecake set, since this cake is made a blender, it is easy.
Cream - use cream that is full fat for rich flavour.
Lemon Juice & Salt - vanilla and salt helps to balance the taste of the cheesecake. So never skip it.
Vanilla Extract - vanilla is one of the main flavouring of the cheesecake. Try to use pure vanilla extract.
Optional - you can add lemon zest, orange zest, rum, cocoa powder.
Make Basque Cheesecake Taste Better
- Cream Cheese: use cream cheese at room temp which is very very important. Remove cream cheese from fridge at least two hours before making this. For instant softening of the cream cheese i microwave them for 10 to 20 seconds in microwave.
- Never Over Beat: Don't over blend the cheesecake batter. If you over blend eggs, the cheesecake may rise when baking, but collapses as it cools.
- Too Much Flour: never add too much flour, add just a little. if you add too much flour, the cheesecake may get dense.
- Baking Temperature: bake cheesecake at high temp for the caramel colour. Don't over bake the cake, else it may get dense.
- Cooling time: rest the cake at least 2 hours before slicing. You can chill the cake in fridge.
Flavours of Basque Cheesecake
You can make Basque cheesecake in tons of flavour combinations. Basic flavours like chocolate, vanilla, pistachios, almonds to weird combos like miso caramel, gochujang and more. You can experiment with the flavour combos and enjoy these cheesecakes.
However My favourite Basque cheesecake is the classic one which I have shared here. And here are few flavours you can try.
Marbled Basque Cheesecake - you can make two flavours of cheesecake filling that you love and swirl it in a single cake pan and bake. Lets your ideas flow and make delicious marbled cheesecake.
Chocolate Basque Cheesecake - addition of cocoa powder and melted chocolate cake make this Basque cheesecake rich and chocolaty. In this recipe, you can add 1 tablespoon of cocoa, 2 tablespoon flour and ½ cup melted chocolate when making batter for rich chocolate Basque.
Coffee Basque - 1 tablespoon of instant coffee powder can be added for a mild coffee flavoured cheesecake.
Matcha Cheesecake - 1 tablespoon of sifted matcha can be added in the batter for delicious green tea flavoured cake.
Step by Step Pictures
Pre-preparation
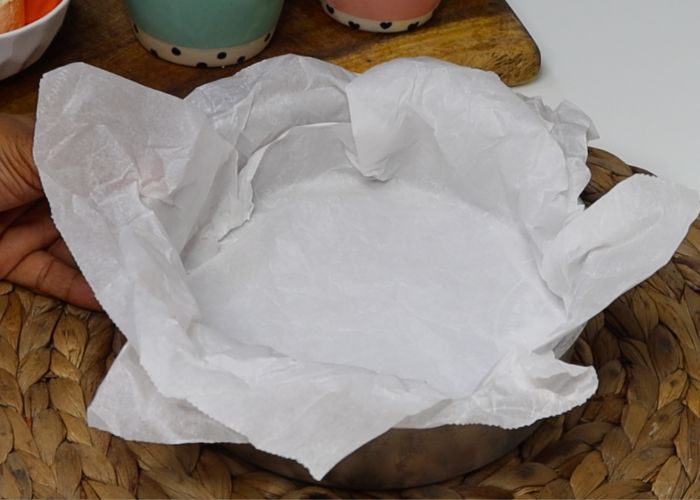
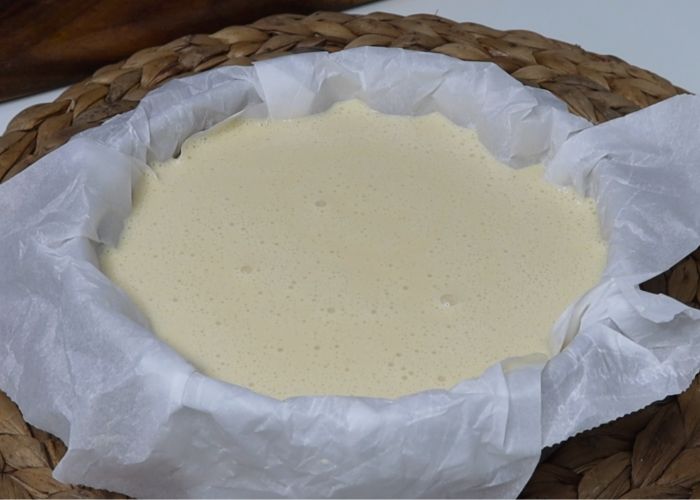
1)Preheat oven to 230 degree C | 446 degree F. Line a 7 inch round cake pan with two layers of parchment paper. Crush the paper with your hands and then line the pan roughly. So the pan gets lined evenly with the parchment paper.
Blending Cheesecake Batter
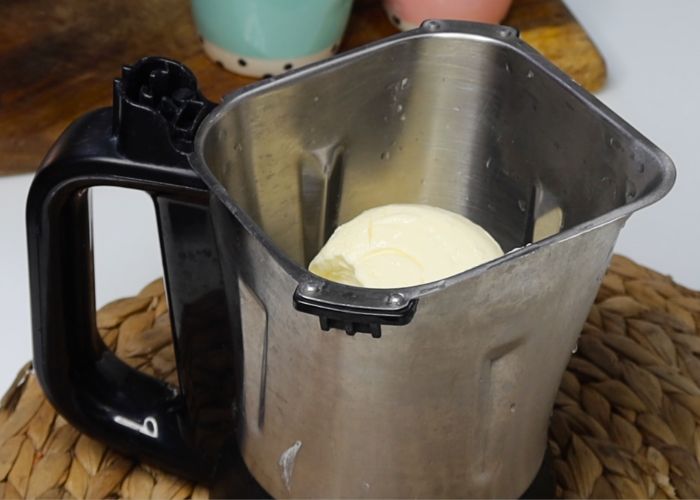
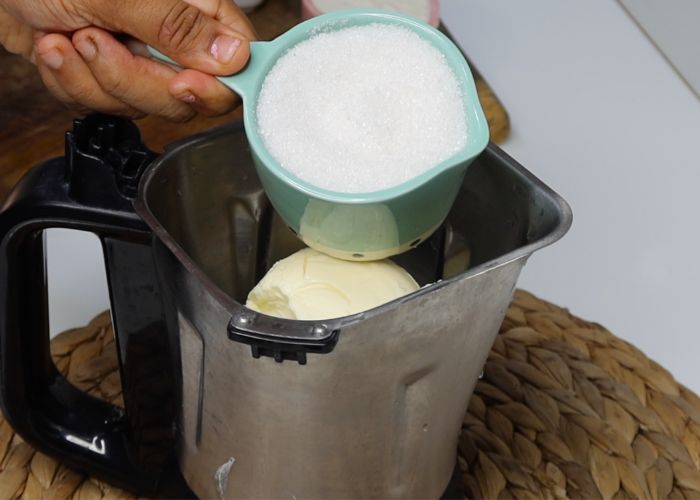
2)The cheesecake batter is made in a blender. You are going to add all the ingredients into the blender.
Use cream cheese at room temp which is very very important. Remove cream cheese from fridge at least two hours before making this. Take cream cheese in a blender.
3)Add in sugar. I used ¾ cup of sugar. You can reduce the sugar and use ½ cup instead.
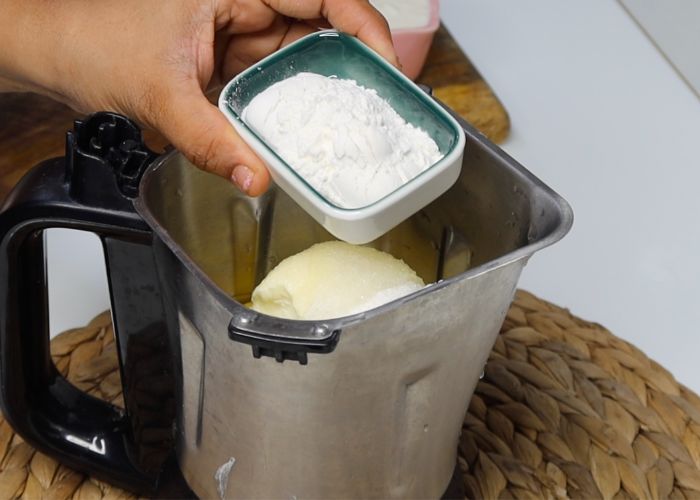
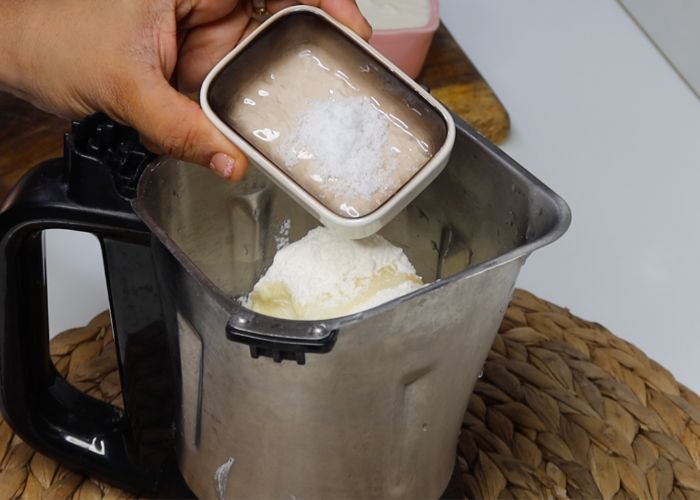
4)Add in plain flour. Measure and add plain flour, don't use too much flour which may make the cheesecake dense.
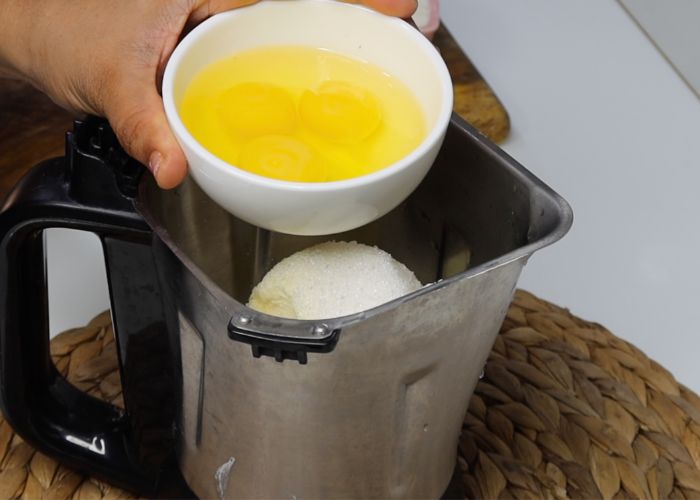
5)Add in eggs.
6)Now for the flavourings. Add in pure vanilla extract.
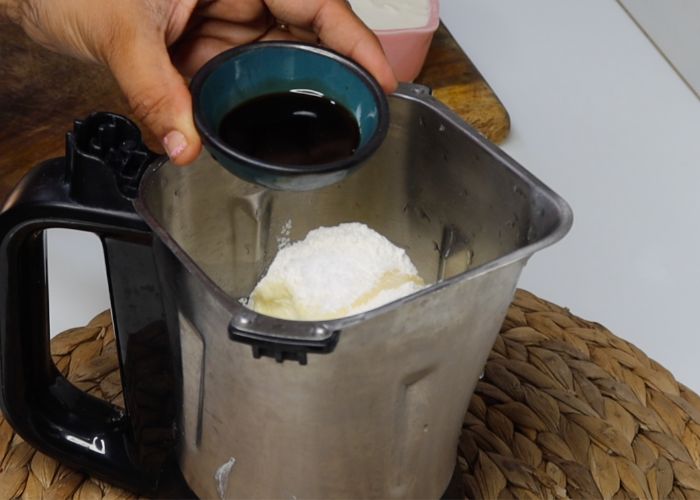
7)Add salt to taste. This is very important. It helps balance the taste of cheesecake.
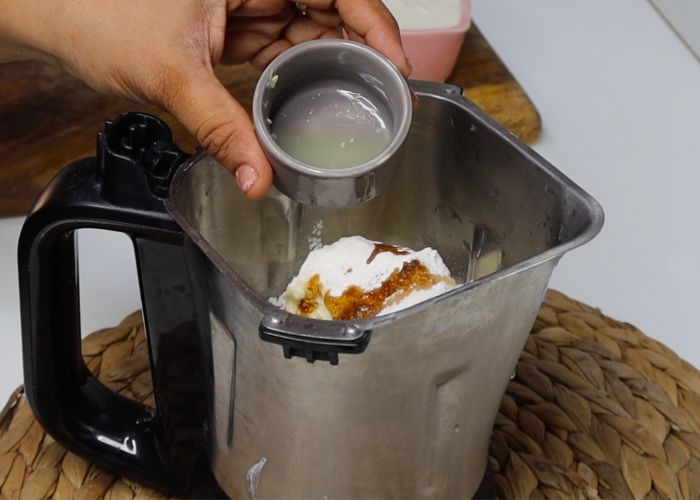
8)Add in lemon juice. This is very important. It helps balance the taste of cheesecake.
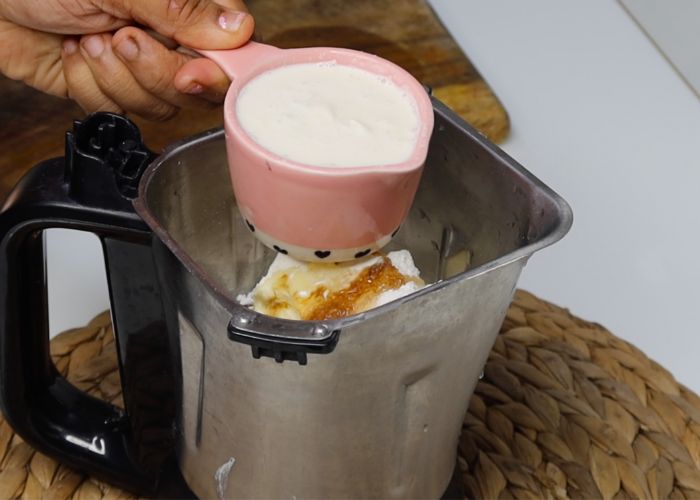
9)Now add in ½ cup of heavy cream.
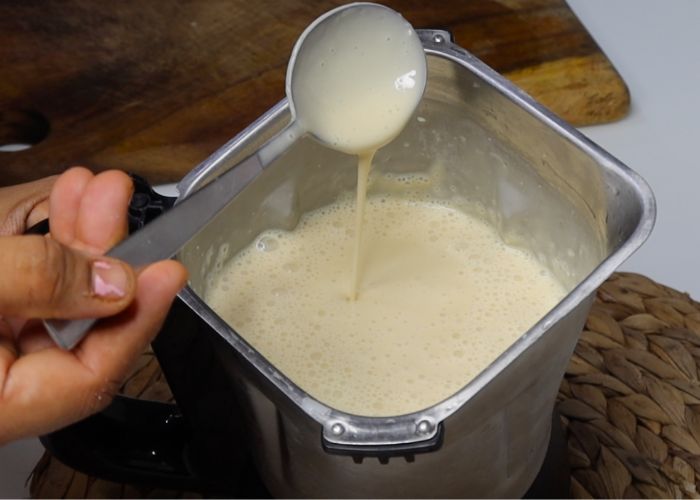
10)Blend this whole thing till creamy and smooth.
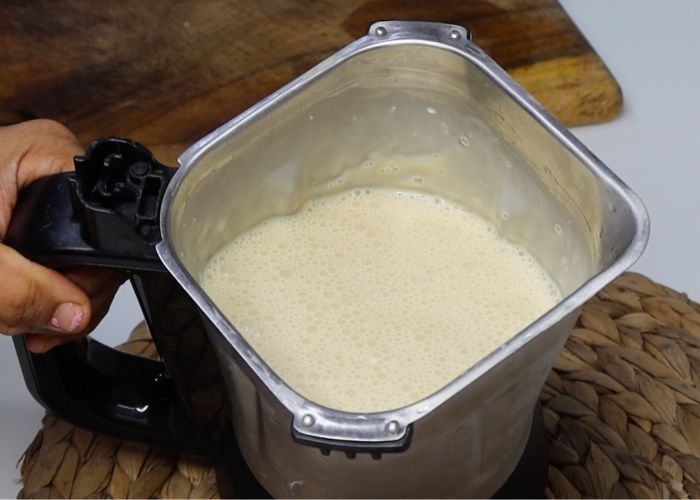
11)The texture is smooth and creamy.
Baking Cheesecake
12)Pour the batter into the lined pan and bake for 30 to 35 minutes in a preheated oven.
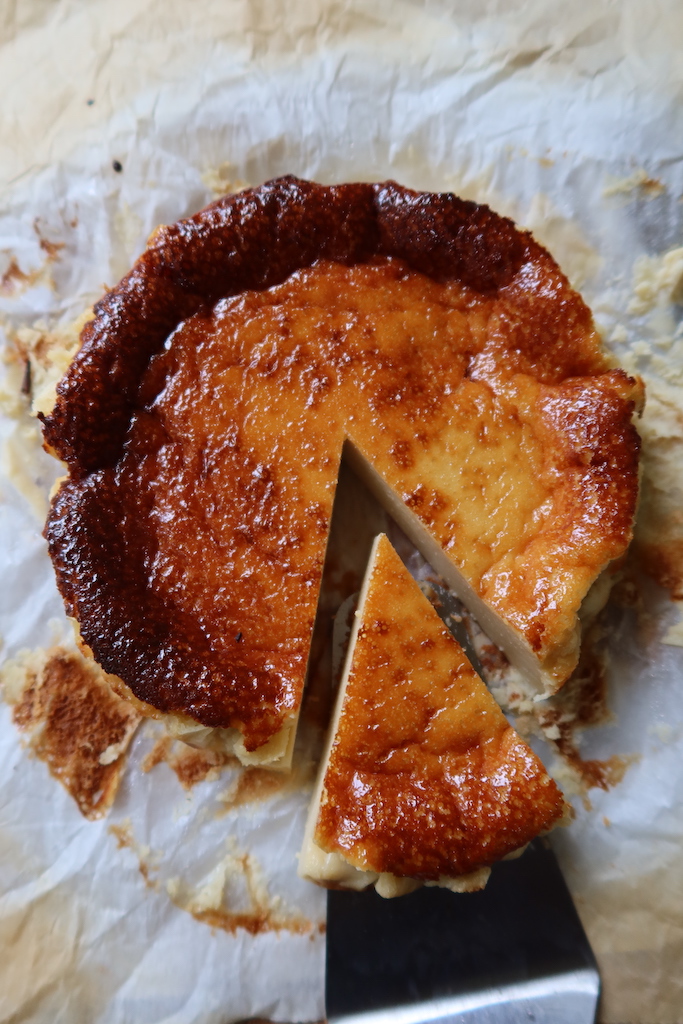
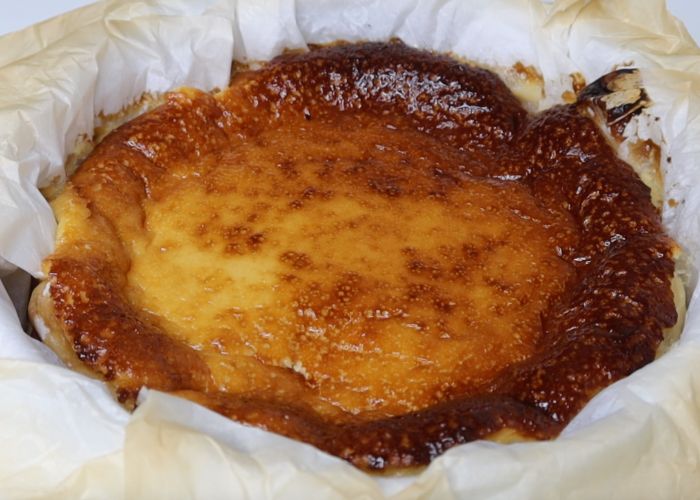
13)Remove the cheesecake from oven. It may look puffy and risen when you take out. But as it cools the cheesecake collapses and settles. The top of the cheesecake will have a beautiful dark golden colour. The cheesecake should have a jiggle when you take it out of the oven.
14)Let the cheesecake cool for 30 mins at room temperature. Now pop the cake in fridge and let it set for 2 hours. Slice and serve.
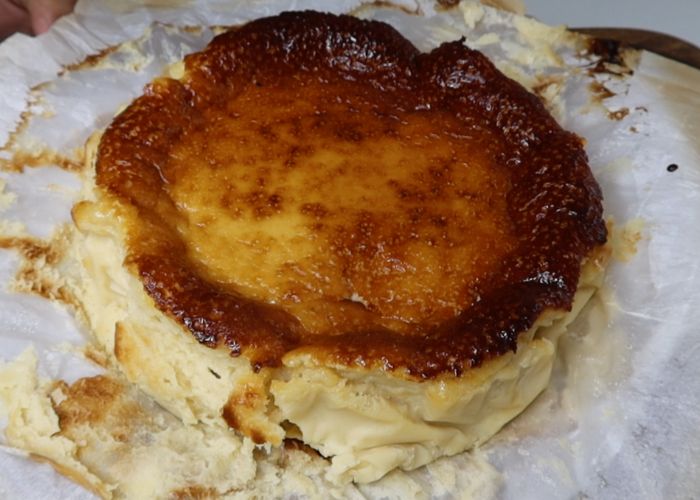
15)Slice and serve.
Expert Tips
- Use cream cheese at room temperature so it gets creamy and you don't get a lumpy cheesecake.
- Don't over blend the batter, else the cheesecake may rise high in oven and collapse a lot.
- You can add in grated orange zest or lemon zest in the cheesecake batter.
- You can add ½ cup of sugar if you need less sweet cheesecake.
- Bake the cheesecake at higher temperature so it gets nice charred colour on top.
- Let the cheesecake cool for 2 hours in fridge before slicing so it will set perfectly.
- Make sure you line the pan with parchment paper so some parchment over hangs the pan.
- Bake the cheesecake at higher temperature so it gets charred and caramelized on top.
Serving & Storage
- You can serve this cheesecake at room temperature. Serving cheesecake at room temperature will give creamy custardy cheesecake.
- Cheesecake can be popped into the fridge for few hours. Serving this cheesecake cold will give you a little dense and creamy cheesecake.
- You can store the cheesecake in fridge for 4 to 5 days.
Variations
Add orange zest, lemon zest for extra flavour.
FAQ
1)why is it called as basque?
This burnt basque cheesecake originates in Basque Country (hence the name). It's a crustless cheesecake that's starting to become a trend in the US.
2)what does basque burnt cheesecake taste like?
Basque cheesecake taste like caramelized cheesecake. The cheesecake is vanilla flavour and it taste like a caramel and toffee mixed in cheesecake.
3)What is the difference between Basque and regular cheesecake?
Basque is a crustless cheesecake so you don't have to worry about making a biscuit base. Also the filling is made in a blender in an instant. Unlike regular baked cheesecake which is baked in a bain-marie, this cheesecake batter is poured in a parchment lined baking pan and baked straight in the oven.
📖 Get Recipe
Basque Cheesecake Recipe (Easy Steps, Made in Blender)
Equipment
Ingredients
- 400 grams Cream Cheese (room temp)
- ¾ cup Sugar (you can reduce to ½ cup for less sweetness)
- 3 large Egg
- 3 tablespoon All Purpose Flour | Plain Flour
- ½ cup Cream
- 2 teaspoon Vanilla Extract
- ¼ teaspoon Salt
- 2 teaspoon Lemon Juice
Instructions
- Preheat oven to 230 degree C | 446 degree F. Line a 7 inch round cake pan with two layers of parchment paper. Crush the paper with your hands and then line the pan roughly. So the pan gets lined evenly with the parchment paper.
- Take all the ingredients in a blender and blend for 30 seconds to 40 seconds till it gets combined and looks creamy.
- Pour the batter into the lined pan and bake for 30 to 35 minutes in a preheated oven. Remove the cheesecake from oven. It may look puffy and risen when you take out. But as it cools the cheesecake collapses and settles. The top of the cheesecake will have a beautiful dark golden colour. The cheesecake should have a jiggle when you take it out of the oven.
- Let the cheesecake cool for 30 mins at room temperature. Now pop the cake in fridge and let it set for 2 hours. Slice and serve.
Video

Notes
- Use cream cheese at room temperature so it gets creamy and you don't get a lumpy cheesecake.
- Don't over blend the batter, else the cheesecake may rise high in oven and collapse a lot.
- You can add in grated orange zest or lemon zest in the cheesecake batter.
- You can add ½ cup of sugar if you need less sweet cheesecake.
- Bake the cheesecake at higher temperature so it gets nice charred colour on top.
- Let the cheesecake cool for 2 hours in fridge before slicing so it will set perfectly.
- Make sure you line the pan with parchment paper so some parchment over hangs the pan.
- Bake the cheesecake at higher temperature so it gets charred and caramelized on top.
- Add orange zest, lemon zest for extra flavour.
Serving & Storage
- You can serve this cheesecake at room temperature. Serving cheesecake at room temperature will give creamy custardy cheesecake.
- Cheesecake can be popped into the fridge for few hours. Serving this cheesecake cold will give you a little dense and creamy cheesecake.
- Store the cheesecake in fridge for 4 to 5 days.
Nutrition
Tried this Recipe
Mention @yummytummyaarthi or tag #yummytummyaarthi!If you have any questions not covered in this post and if you need help, leave me a comment or mail me @aarthi198689@gmail.com and I'll help as soon as I can.
Follow me on Instagram, Facebook,Pinterest ,Youtube for more Yummy Tummy inspiration.
IF YOU MAKE THIS RECIPE OR ANYTHING FROM YUMMY TUMMY, MAKE SURE TO POST IT AND TAG ME SO I CAN SEE ALL OF YOUR CREATIONS!! #YUMMYTUMMYAARTHI AND @YUMMYTUMMYAARTHI ON INSTAGRAM!


Giftbasketworldwide
Useful Content. Thanks a lot for the info!
Prema
Hi Aarthi akka,
I tried this recipe today with the same measurements. But when I sliced the cake after cooking for 2 hours, my cake looked little loose and little watery. Do u know why this would’ve happened ?
Prema
Cooling *