
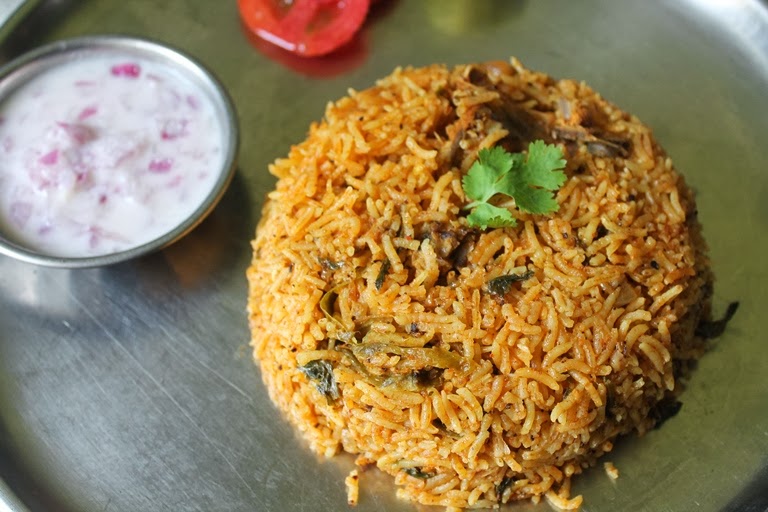
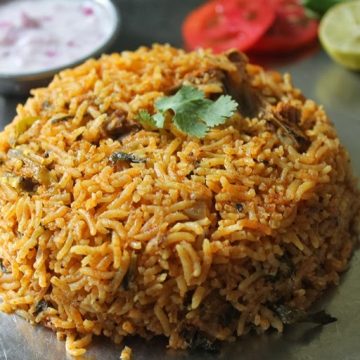
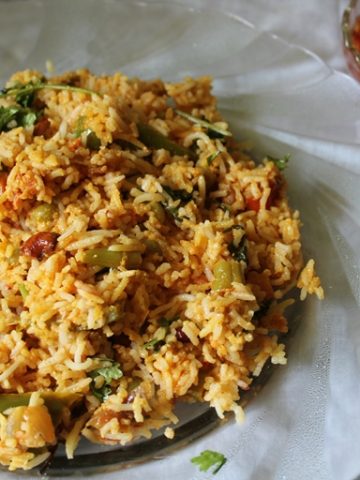
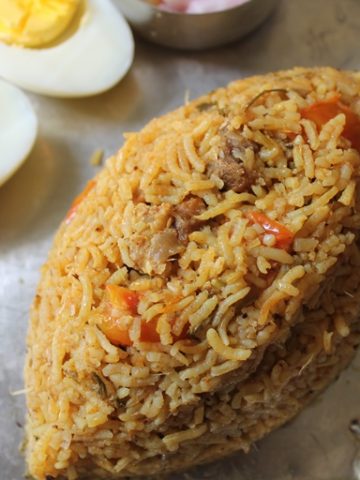
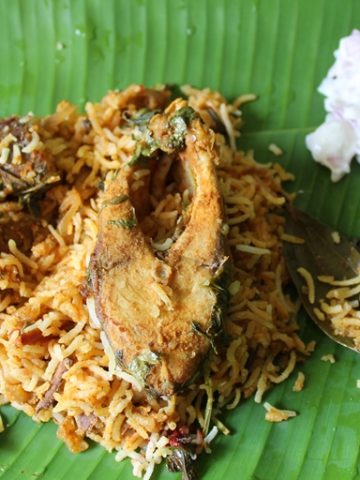
Chicken biryani Recipe, This is one of the most popular and favourite dish all over the world. It is one of the most loved rice and meat dish that originated from Indian sub-continent. Traditional chicken dum biryani which has a fragrance which is so inviting is made by layering rice and marinated chicken that is flavoured with whole spices, herbs like mint and coriander leaves, curd and ghee. Every household has their unique way of making this dish. Learn how to make the perfect aromatic chicken biryani with all my tips and tricks. Make sure you make some refreshing raita, mirchi salan or tomato salan.
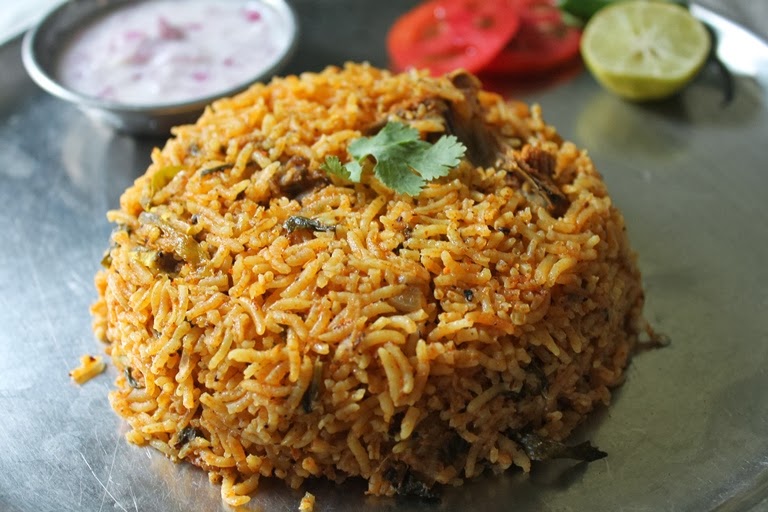
Chicken Biryani
Biryani takes in our Sunday lunch menu often. Each time I experiment different variations of it. Here I am documenting three different, successful, fail-proof method of making the classic traditional chicken biryani so you have the option to choose a recipe that suits your needs.
Jump to:
About Chicken Biryani
Biryani is one of the most loved dish all over the world. Biryani is made with marinated meat like chicken, mutton, fragrant basmati rice, whole spices, coriander leaves, mint leaves, fried onions, fried nuts and raisins and lots of ghee. It has an aroma that is so unique to the authentic biryani.
Chicken biryani is the popular variety of biryani which is made with tender pieces of chicken marinated with yogurt, spices, fresh garam masala, coriander, mint and lemon juice. Biryani can be made many different style.
The most authentic biryani is Chicken Dum Biryani and it cannot be matched by anything else. It is cooked in Dum Pukht which means the pot is sealed tight using wheat flour dough and lid. The whole pot is steam cooked over low flame. It is also known as kachi biryani.
My Chicken Biryani Recipe
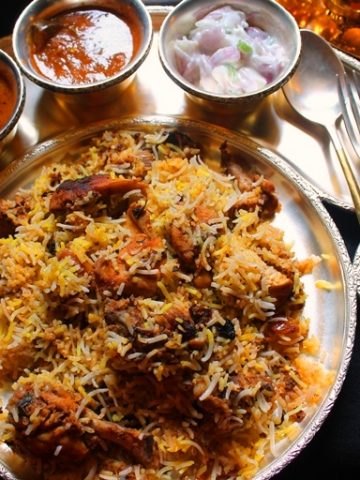
Chicken dum biryani involves different steps which can be elaborate and time consuming which I make only during weekends. But during busy weekdays when I crave for chicken biryani, I make them different ways using pressure cooker or instant pot.
The main flavouring for this biryani comes from the masala which we make. It is a homemade spice mix which smell so heavenly. Make sure you check my other biryani recipes starting from pressure cooker chicken biryani to hyderabadi mutton biryani. Best accompaniment for this biryani would be raita.
Chicken Biryani Ingredients
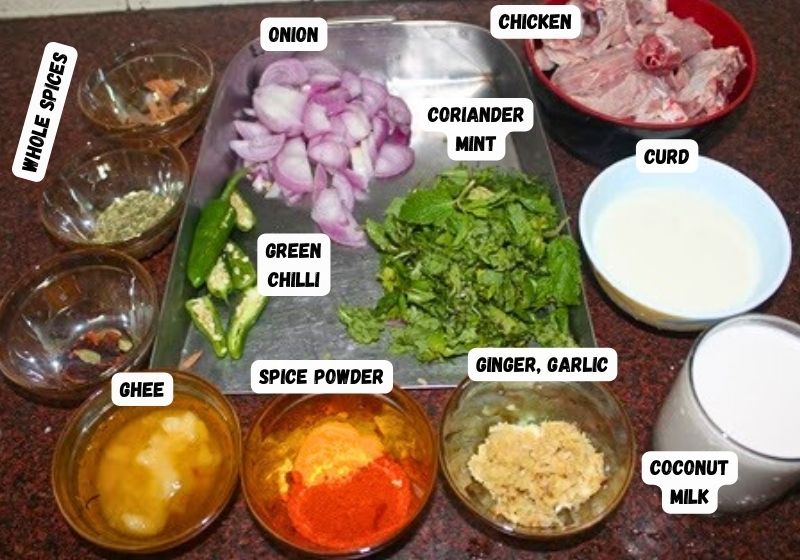
Basmati Rice - the most essential and important ingredient in making biryani is rice. Try to find the finest quality basmati rice that you can afford. Better the quality of rice, better the aroma will be. Instead of basmati you can use seera samba rice. check notes for details.
Chicken - for making biryani, use chicken with bone-in and skins-removed. Try and use medium size chicken for this recipe which cooks faster and stays juicy.
Onion - onions are used in making masala and fried till crispy to add finishing touch to the biryani. These fried onions are called as birista which adds sweetness to the biryani.
Ginger & Garlic - this duo of ingredients gives the biryani aroma. Fresh ginger and garlic is ground and used.
Whole Spices - cinnamon, cloves, fennel seeds, cumin seeds, bay leaf, cardamom is used. Whole spices are tempered in ghee and also these spices are dry roasted and ground to form fresh biryani masala which elevates your regular biryani to next level.
Fresh Herbs - lots of chopped coriander leaves and mint leaves adds the aroma.
Spice powders - a combination of chilli powder, coriander powder, turmeric powder, garam masala powder is used in biryani.
Curd - curd adds the tanginess which a biryani requires. it also makes the chicken super tender.
Ghee or Oil - you can use a combination of both for making biryani.
Optional Ingredients - optional ingredients like coconut milk, fried cashews, raisins, fresh ground masala (shared in stove top method) can be used.
Homemade Biryani Masala Powder
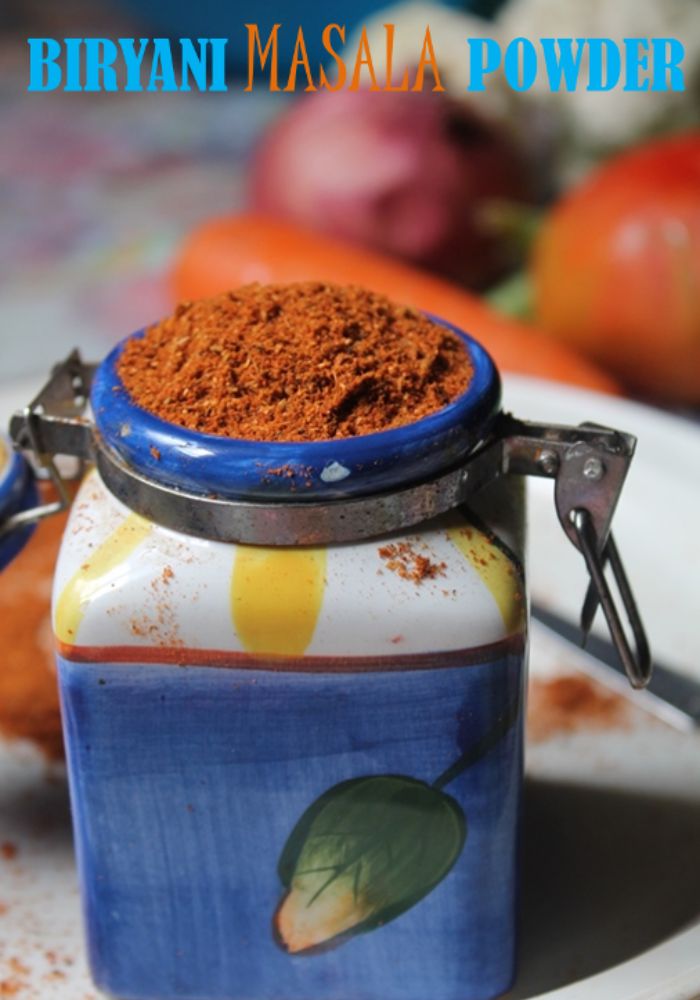
In this chicken biryani recipe I have used a combination of regular masala powders like chilli powder, coriander powder and garam masala powder. But instead of using these spices you can add biryani masala powder instead. I have shared a detailed recipe for homemade biryani masala. You have to dry roast all these whole spices and grind them to a powder.
Ingredients for Biryani Masala Powder
- 1 stick Cinnamon
- 2 teaspoon Fennel Seeds
- 1 teaspoon Cumin Seeds
- 2 Bay Leaf
- 5 Green Cardamom
- 1 Black Cardamom
- 4 Cloves
- 2 Mace
- 4 Kalpasi
- 3 tablespoon Coriander Seeds
- 4 Dry Red Chilli
- 1 Star Anise
- 1 teaspoon Whole Black Pepper
Why This Recipe Works?
Easy to Make - chicken biryani ingredients are readily available including onions, tomatoes, ginger, garlic, fresh herbs, whole spices, rice, chicken. These ingredients are our pantry and fridge staple. All the three methods shared in this recipe takes less than 1 hour to make.
Adaptable - chicken biryani is a emotion, whenever you are craving for a steaming plate of chicken biryani you should be able to make it easily. This recipe has three version of making the best flavourful biryani with easy instructions so anyone can cook.
Flavourful Biryani with Best Results - The fresh ground masala and whole spices make this biryani so flavourful so there is no more mushy rice.
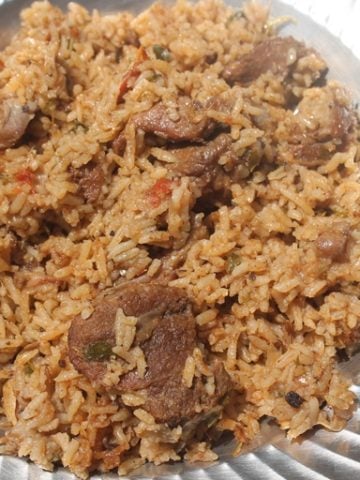
Step by Step Pictures
Marinating Chicken
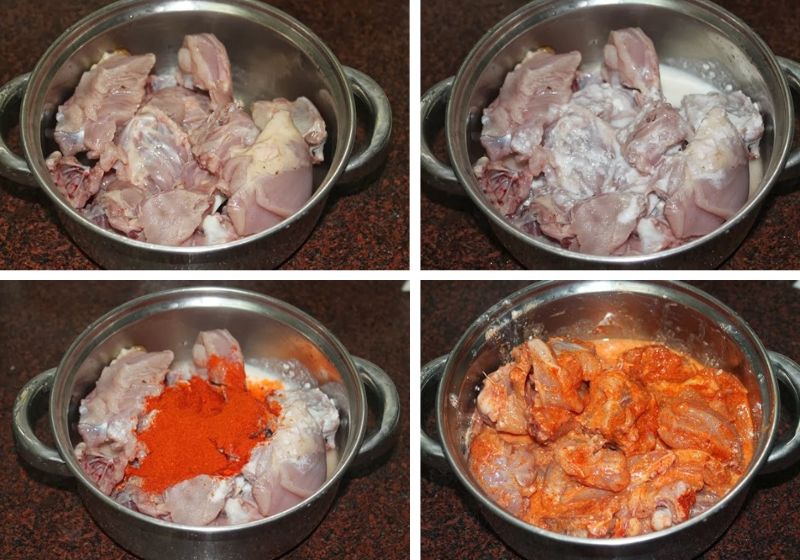
1)Take 500 grams of cleaned chicken in a bowl. I am using skinless and bone-in chicken. Make sure you cut the chicken into medium pieces which cooks fast and stays moist. To the cleaned chicken, add in curd, salt, chilli powder, garam masala powder and ginger garlic paste. Mix well and set aside to marinate for at least 30 minutes.
Soaking Basmati Rice
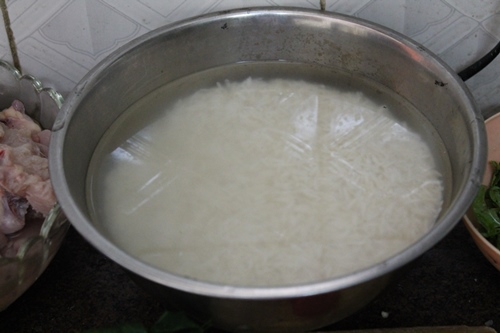
2) While the chicken is marinating. Wash 2 cups of basmati rice multiple times till water runs clear. Cover with fresh cold water and let it soak for 30 minutes.
Making Fresh Biryani Masala
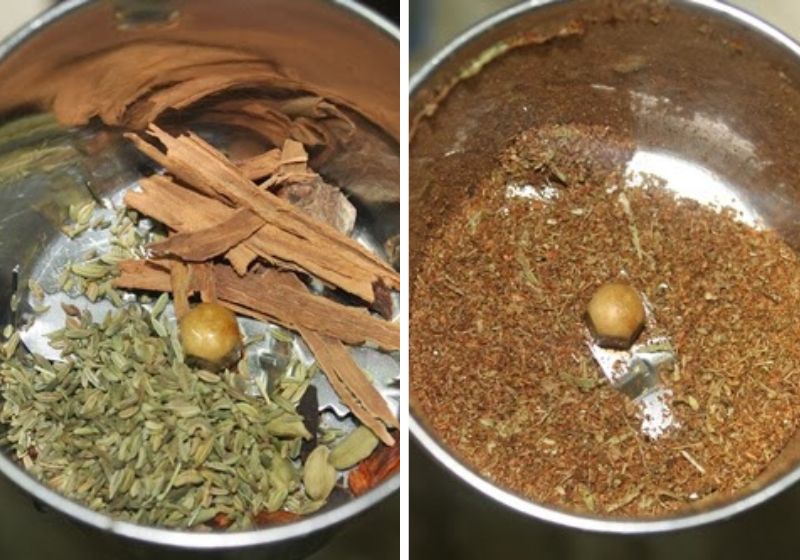
3)Take fennel seeds, cinnamon, cloves, cardamom, mace, star anise in a blender and powder till coarse. This is your fresh masala for biryani.
Pro tip: I didn't toast my whole spices before grinding. But you can dry roast the whole spices for few minutes in a pan and grind for more pungent flavour.
Making Biryani Base
4)Heat coconut oil and ghee in a kadai. Add in sliced onions and slit green chillies. Saute them till light golden in colour.
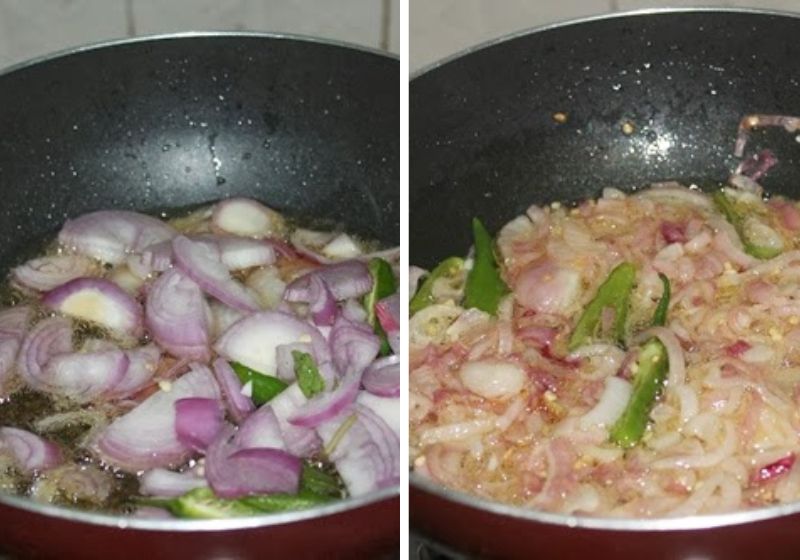
5)Add in freshly ground ginger and garlic paste. Saute the ginger and garlic till raw smell leaves. It will take around 2 minutes.
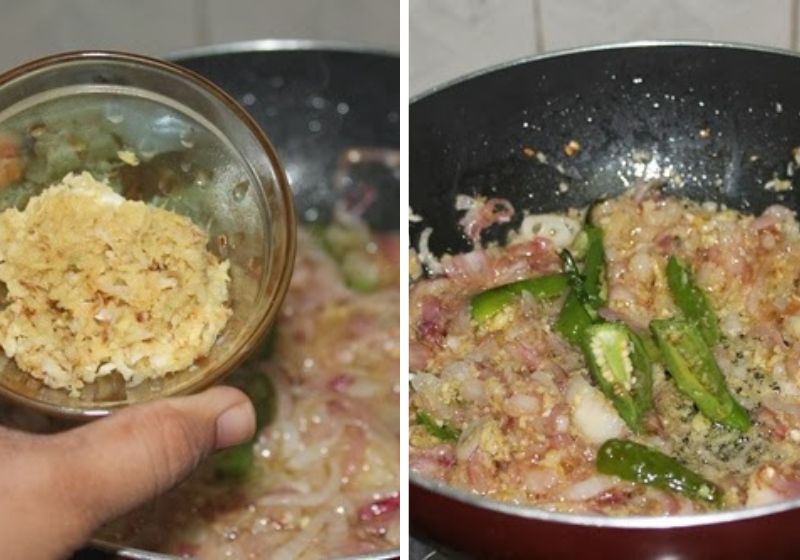
6)Add in chilli powder, coriander powder, turmeric powder and fresh garam masala powder.
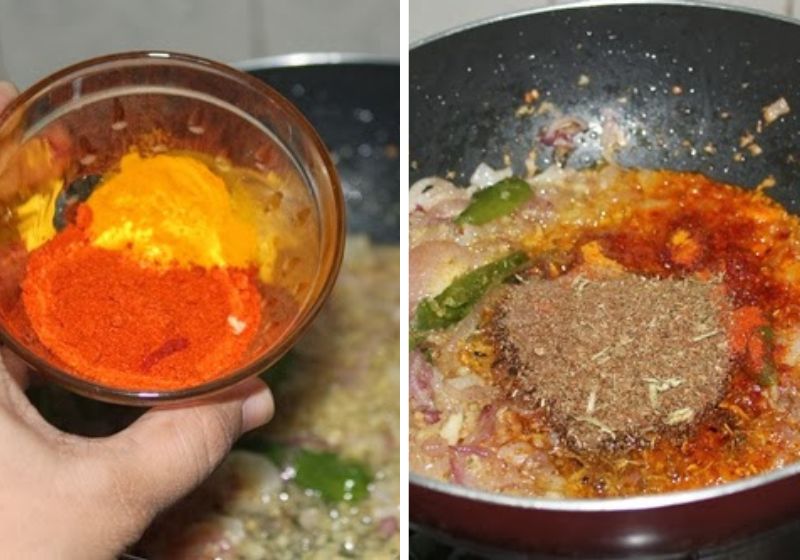
7)Saute the spice powders with onion for few seconds.
Cooking chicken
8)once masala is cooked, add in the marinated chicken.
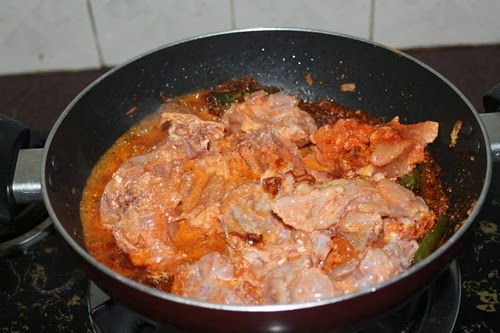
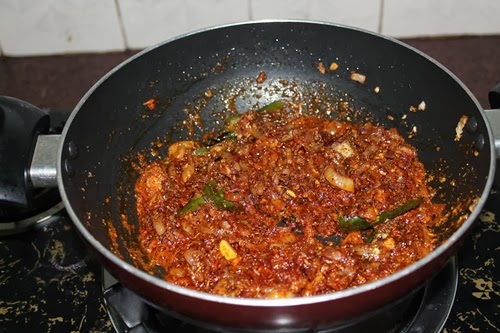
9)Saute the marinated chicken in the masala for at least 6 to 8 minutes. The chicken will be half cooked at this point.

10) Take this chicken masala in a heavy bottom pan.
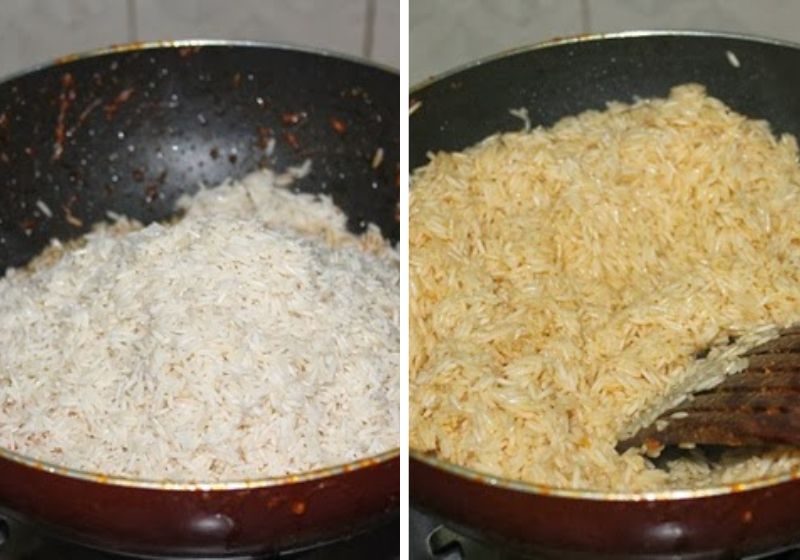
Roasting Rice
11)In the same pan in which you made the chicken masala. Add a tablespoon of ghee.
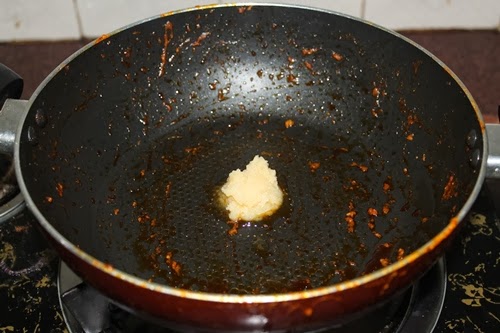
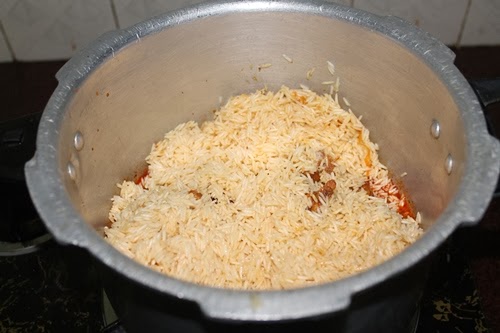
12)Add in the 2 cups of soaked strained rice. Roast the rice for few minutes till it turns toasty and light golden in colour.
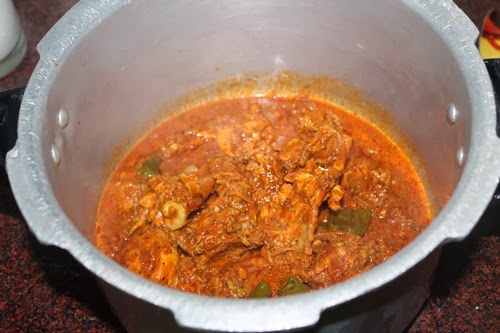
13)Add in the roasted rice over the chicken masala which is kept in the pan.
Cooking Chicken Biryani
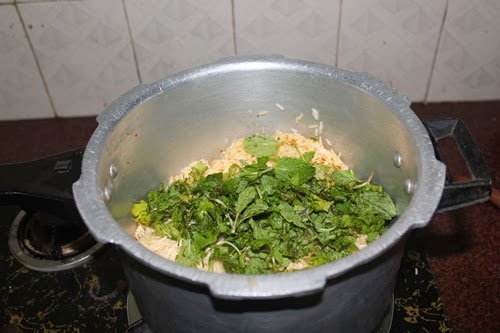
14)Add in chopped coriander and mint leaves.
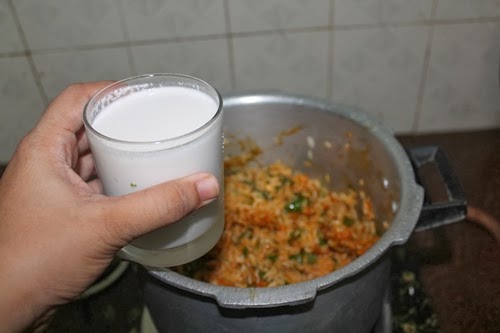
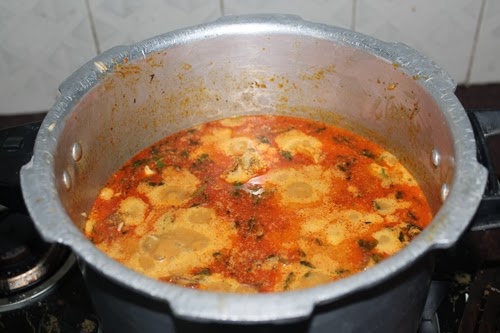
15)Pour in 1 cup of coconut milk. This is optional. You can use water instead of coconut milk.
16)Pour in 2 cups of water.
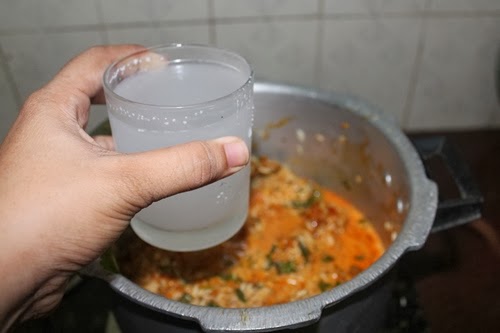
17)Add salt to taste.
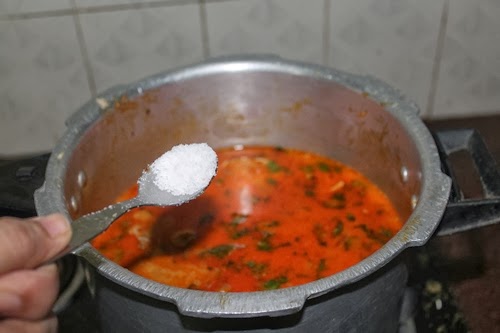
18)Bring this to a full boil. Once it starts boiling, allow it to boil for 5 minutes. Give it one good stir. cover with a tight fitting lid.
19)Reduce the heat to low and Cook on low heat for 15 minutes. Now the rice must be cooked. Turn off the heat and Let it stay for 10 minutes. Now gently fluff the rice with a fork.
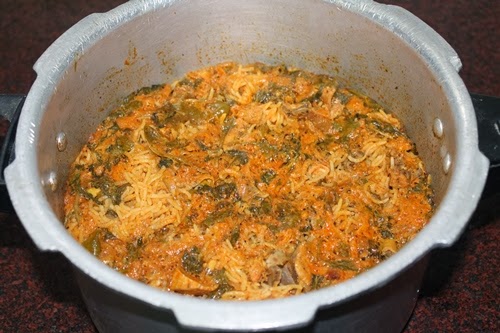
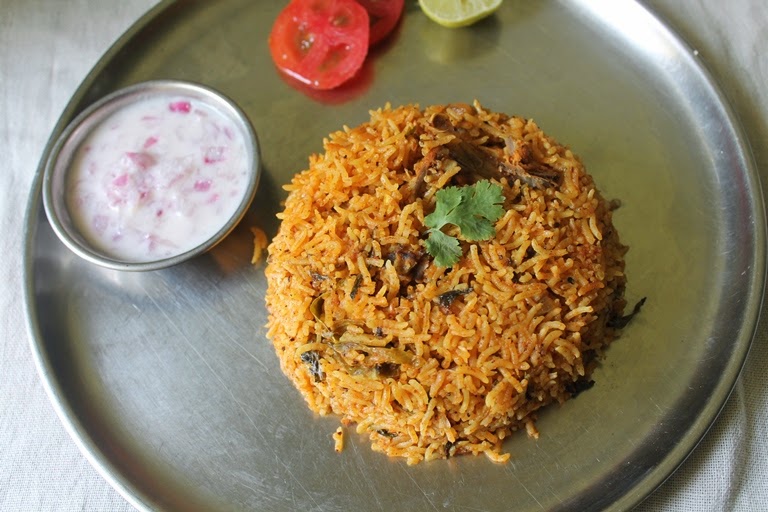
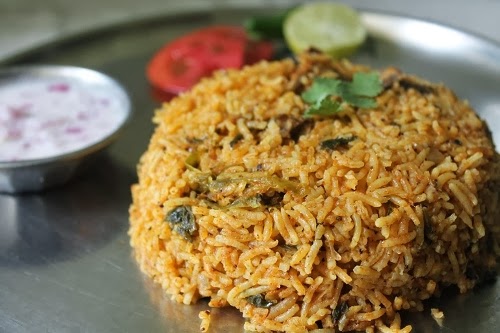
21) Serve.
Instant Pot Chicken Biryani
Many people prefer to use instant pot to cook chicken biryani or any rice dish these days. It is so easy to use and following this method to make any rice dish like pulao, biryani is fail proof.
- Marinate chicken as mentioned in any of the recipe. Wash and soak basmati rice for 30 minutes.
- Set instant pot mode to saute. Pour oil into the instant pot. Add in whole spices and let them sizzle. Add in onions and saute till golden. Add in chicken and saute for 5 to 10 mins. Add in strained rice, spice powders, salt and water and mix well.
- Now set the mode to pressure cook mode, set timer to 6 minutes. Let it cook. Once the timer is up, it will automatically change to keep warm | low. Leave the pressure to release manually for 11 minutes. Now lift the quick release vent so the excess steam can release.
- Open the instant pot and mix the rice gently. Serve.
Expert Tips
Which Rice to Choose?
Finest quality basmati rice is preferred for making biryani. High quality rice gives you better flavour and aroma for biryani. I prefer to use India Gate Classic, Daawat biryani rice for my biryani. Whichever rice you choose, make sure it is aromatic.
Always wash basmati rice multiple times until water runs clear. Soak basmati rice in water for at least 30 minutes. Washing and soaking rice removes excess starch from the rice, softens rice which in turn makes biryani fluffier.
Instead of basmati, you can opt for seera samba rice which is more traditional rice for making biryani in South India. One of the most popular thalappakatti biryani is made with seera sambar rice.
About Chicken
I prefer tender cuts of chicken for making biryani. Opt for chicken with bone-in and skins removed for moist chicken. Whenever I buy chicken for biryani, I ask the butcher to cut it into medium size (not so big - not so small) which make sure the chicken absorbs the flavour better.
Water Ratio for Rice
Many people struggle to get their biryani rice fluffy. Sometimes overcooking may result in rice getting mushy. It can be avoided by the correct water to rice proportion and proper cooking technique. Here are the water ratio for the rice.
Basmati Rice - Use 1.5 cups of water to 1 cup of basmati rice (soaked for 30 minutes). 1.25 cup of water to 1 cup of basmati rice (soaked for 1 hour)
Seera Samba Rice - For 1 cup of seera samba rice (soaked 30 minutes) use 2 cups of water.
📖 Get Recipe
Chicken Biryani Recipe (Easy, Step by Step Pictures + Video)
Equipment
Ingredients
For Marinating Chicken
- 500 grams Chicken bone-in
- ½ cup Curd
- 1 teaspoon Chilli powder
- 1 teaspoon Garam masala powder
- 1 tablespoon Ginger garlic paste
- Salt to taste
Fresh Garam Masala
- 1 tablespoon Fennel Seeds
- 1 stick Cinnamon
- 6 no Cardamom
- 2 no Mace
- 1 no Star Anise
- 2 no Cloves
For Biryani Base
- 2 tablespoon Ghee
- 3 tablespoon Coconut Oil
- 2 large Onion sliced thinly
- 3 no Green Chillies slit
- 3 tablespoon Ginger Garlic Paste
- 2 teaspoon Chilli Powder
- 2 teaspoon Coriander powder
- 1 teaspoon Turmeric Powder
For Roasting Rice
- 2 cups Basmati Rice
- 1 teaspoon Ghee
For Cooking Biryani
- ½ cup Coriander Leaves chopped finely
- ½ cup Mint Leaves chopped finely
- 1 cup Coconut Milk
- 2 cups Water
- Salt to taste
Instructions
- Marinate chicken with the given ingredients for 10 mins, You can leave it in the fridge overnight.
- Wash and soak basmati rice multiple times till the water runs clear. Soak them in cold water for 30 minutes.
- Grind the ingredients given for the fresh masala masala to a fine powder. Set aside.
- Now make the masala. Heat oil and ghee in a kadai. Add in onions, green chilli and saute till light golden. Now add in ginger garlic paste and saute for a min. Add in turmeric, chilli powder, coriander powder and the fresh garam masala.. Saute it for a min. Now add in the marinated chicken along with the marination. Saute it for 7 to 8 mins so the chicken gets coated with the masala.
- Transfer the masala to a pot. In the same kadai. Add a teaspoon of ghee and fry the soaked and strained rice for 5 mins or so. Once it is coated well with the ghee, add it into the pot over the chicken.
- Add in coriander leaves and mint leaves, coconut milk and water. Add salt to taste Now bring everything to a boil. Let it boil for 5 minutes. Reduce the heat to low and Cook on low heat for 15 minutes. Now the rice must be cooked. Turn off the heat and Let it stay for 10 minutes. Now gently fluff the rice with a fork. Open the pot and mix gently using a spatula or fork. Serve hot with raita.
Video

Notes
- Always choose finest quality ingredients for making biryani.
- Soaking basmati rice is important for getting fluffy biryani.
- Use bone-in chicken for better flavour.
- Make sure you cut chicken into medium pieces which absorbs the masala better.
Nutrition
Tried this Recipe
Mention @yummytummyaarthi or tag #yummytummyaarthi!If you have any questions not covered in this post and if you need help, leave me a comment or mail me @aarthi198689@gmail.com and I'll help as soon as I can.
Follow me on Instagram, Facebook,Pinterest ,Youtube and Twitter for more Yummy Tummy inspiration.


Srikitchen
may i know which brand basmathi rice u used? it looks perfect!
SINDOORI
oh this biriyani makes my mouth watery !!!!! wish you success and continue doing this great job 🙂 🙂
Shobana Vijay
Superb aathi.Pass that plate to me dear.
Regards
Shobas Delight
Sakunthala
அருமை... பிரியாணி பார்க்கும்போதே சாப்பிட வேண்டும் என்று தோன்றுகின்றது. உங்கள் அனைத்து பதிவுகளும் மிகவும் அருமை. வாழ்த்துகள்.
fxsunny
Thanks for sharing. Shouldn't the water be 4 cups...since you have 2 cups of rice? Or is this different coz of the pressure cooker?
roshni.m.s
I think when she cooked the chicken there was some gravy/ water that came out of chicken, which would compensate the other 1 + 3/4 cup water....usually for 2 cups of rice you add 3 + 3/4 cup of water because 4 cups of water can sometimes make the rice overcook...
fxsunny
Don't we need 4.cups of water, for 2 cups of rice? Thanks for sharing!
Priya Suresh
Briyani,the word itself makes me drool, wat a tempting one pot meal.
Unknown
சூப்பர் - வர்ற தீவாளிக்கு திண்டுகல் பிரியாணி போடுற போறோம்
Sunitha
I tried out this receipe Aarthi Sister🥰it come out very well & taste also so yummy Never had this taste Before especially in Briyani.Congrats !!All The Best Wishes💐👍
Coral crue
superb, i will try!
Anonymous
Hi Aarthi
Very nice recipe,good step by step procedure..But dear I want to tell one thing....The original thalappakatti briyani is with jeeraka samba rice,also the the briyani is dark brown color..I have tasted so many times...This ia a classical tamilnadu briyani recipe...
Anonymous
Tried your recipe and it turned great ehanks
Sowmya
Hi aarthi, Thank you for this wonderful recipe. I made this yesterday with jeera samba rice and it came out superbly. DH loved it and planing make it again. Thanks once again.
Anonymous
wow recipe.. gonna try next week..no need to add tomatoes huh ?
Aarthi
@AnonymousNo you dont have to add tomatoes
Anonymous
I have tasted dhinugal thalapakkattu briyani..color is dark brown & no chilli powder is added only green chillies...also they does with seeraga samba rice ...
subitha
Came out well aarthi.. 🙂 the taste was authentic.. 🙂
chithra siva
Hi arthi,Yesterday i tried this briyani ...It was awesome..My husband praised me a lot..Thank you so much..god bless u and ur family..
Anonymous
Hi arthi
U explain steps very well and it s a pleasure to see ur recipe. Clear and precise!! Keep it up! For the cooker, how many whistles do we need for the rice to be cooked?
Thanks
Anonymous
I tried this with jeera samba rice.it is very good receipe
Aarthi
@AnonymousCover the pressure cooker and let everything cook for 1 whistle. Simmer the flame and let it sit for 15 mins. Once 15 mins is over, switch off the flame and let the steam escape all by itself. Once the pressure is released. Open the cooker and fluff the rice with a fork.
Anonymous
semmaya irunthathu arthi . thank u 4 sharing this info .
sasi
I tried this today and it came our very well
Anonymous
for the first whistle the flame should be in low ,medium or high..do mention dat pls
Aarthi
@AnonymousFor the first whistle it should be on high
Xavier Amalraj
Yester day we made with your Idea Great Thank You....
Xavier Amalraj
We made it with your Idea Thank U.
Anonymous
Hi
Sorry to say this,u never taste dindigul thalapakatti briyani then how come u say this is dindigul thalapakatti briyani
Anonymous
Is it not necessary to add tomato for more taste
Aarthi
@Anonymousno need
Surinder Pal Singh
I made this last night. Came out very good. Sorry no pics - was not given time to take a pic.
Too good.
Joseph Kurian
Hello Aarthi,
I was planning to prepare this dish tomorrow. The description of recipe provided by you is excellent and self explanatory, Good work!
I'm writing to you also because, I am stuck with one doubt though, ie.. In the ingredients section you mentioned that the quantity of coconut milk shld b 1 Cup, but I observed that in one of your reply, to a comment (regarding the quantity of water), you mentioned about using 2 cups of coconut milk . Could you kindly clarify if its 1 cup or 2 cups?
Again, appreciate your effort in including the pics and for providing such a detailed description of the recipe.
Looking forward to ur reply, n Thanks in Advance,
-Joseph 🙂
dhivyadove
Vry useful...thank u aarthi
Aarthi
@Joseph KurianSorry that is a typo. Totally the water level including the coconut milk should be 3 cup for 2 cup of rice.
Basically, for 1 cup rice you have to use 1.5 cup of water content.
Aarthi
@fxsunnyBasically for 1 cup of rice there should be 1.5 cup of water content, since you are cooking this in pressure cooker.
I have used 1 cup of coconut milk and 2 cups of water for 2 cup of rice. So the total water content is 3 cup.
Hope this clear your doubts.
Joseph
@AarthiGot it! thanks again, very much appreciated.
urmimala ghatak
Turned out great! Thanks! Have tried several of your other recipes too...and they''ve all been good! Look forward to trying many more 🙂
renumahesh
Hi aarti I'm a very big fan of ur recepies
For a kind information I'm from dgl n near to thalapakati home
They use seerakasamba rice n mechery vellatukari for biryani n they won't use turmeric it changes the colour of the biryani n only crushed small onion they use for biryani n dhaniya powder n only green chillies for spice powder cinnamon cloves cardamom that's it
Anonymous
Hi, can I use carnation evaporated milk instead of coconut milk? Thank you
Aarthi
@Anonymousu can use..but coconut milk gives the flavour.
chinnamuru
I tried this it is came out very well thanks for sharing
Anonymous
Hi
Can someone tell how many ml a cup has. 160 ml makes a cup according to some measurements.
Aarthi
@AnonymousMy 1 cup measures 240 ml
sumaya
Wow.... yummmy.....😍
Naveen M
Yummy tummy super biriyani i try it very nice
Shalini
Wow yummy briyani...I tried it today and it turned out very well...am big fan of ur receipes...
ramya
awesome recipe aarthi 🙂 came out well 😀 my husband loved it 😀
Thasha Nair
Hello 😊 , can I transfer the rice into a rice cooker instead of pressure cooker and will it bring any changes ?
Aarthi
@Thasha Nairyes u can use rice cooker
Bharat Singh TN
Thank you... very good recipe... I prepared it today... Everyone liked it...
Bharath Kumar
I tried with the same instruction... Very good result... Thanks for ur wonderful guidance
nagamani kavitha
I have tasted thalappakatti biryani already. Your recipe is not proper thalappakatti biryani. In that they will use only jeeraga samba rice only and it will be in light brown colour.
Rifath Ali Khan
Tried your recipe Aarthi,superb is the word
revathi sunil
Hi aarthi,
Thanks for sharing this recipe.
I tried last week my husband n my friends family all are like this Biriyani very much.
This week again my husband ask me to do this Biriyani. Thank u 😊
revathi sunil
Hi aarthi,
Thanks for sharing this recipe.
I tried last week my husband n my friends family all are like this Biriyani very much.
This week again my husband ask me to do this Biriyani. Thank u 😊
Praveen Nair
Hello Aarthi ji .. I tried out the biryani today and it tasted very good.. I added some chicken masala powder and marinated the chicken.. it tasted nice. All in all a wonderful recipe..please keep posting
Divya
Hi Aarthi.. i strted following ur receipes since 2015 wen my son turned 6 months.. u r awesome.. i recommend all the new born moms to try recipe wen their kids turn 6 months. No more store bought junks for kids. And this briyani i tried last sunday. It turned out awesome..And ur periperi chicken is my all my favorite. keep posting. God bless.
Harini
Tried this for dinner today. It was super hit. I can't believe I made such a tasty biriyani. 😀 Thank you so much Aarthi !!
Shalini
Wonderful Recipe!
Raji
Hi aarthi...u have mentioned two cups of basmati rice...can u say app how many grams...that will be easy to measure
Rajini
Hi Aarthi,
Thanks for the recipe..
I just tried it today and the taste is great but the rice overcooked following exactly the same procedure.. 🙁
Any suggestions?
Fansta
Hai Aarthi sis is must that should use coconut milk or water is enough