
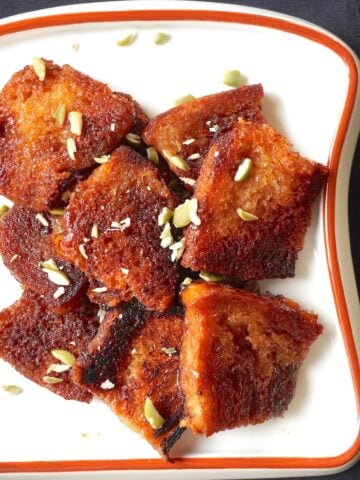
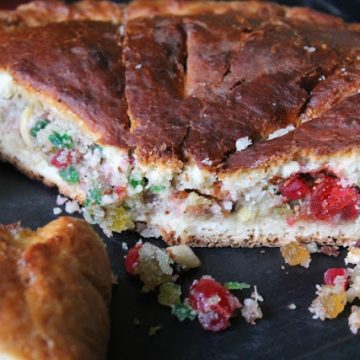
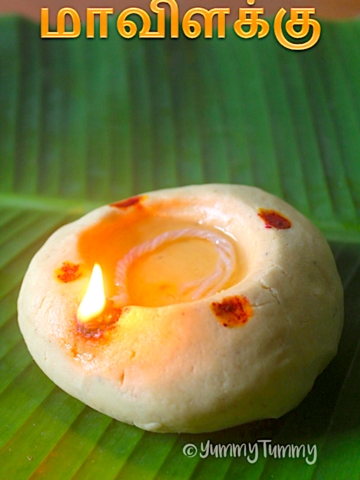
Dilkush Bread also known as Dilpasand or dilkhush is a fresh stuffed sweet bread made with fresh coconut and tutti fruity. This is a delicious and popular bakery style sweet bread made like a flat stuffed paratha. This is a nostalgic childhood recipe which is still popular in many parts of India like iyengar masala toast and butter bun. Learn how to make dilkush with step by step pictures and video.
Dilkush Recipe
Ok here I am with my family favorite recipe. Can you believe this got over within 1 hour of making it. Everyone was digging into it telling me that it taste exactly like bakery bought ones. Do i need anymore appreciation than this.
Jump to:
Amma is not a fan of bakery stuffs but she loves few recipes like butter bun, apple cake and this dilkush. This is one of her top favorite bread or bun recipe. I know that this dish will be most of your favorite one too, so I am sharing you the recipe.
About Dilkhush Recipe (Dilpasand)
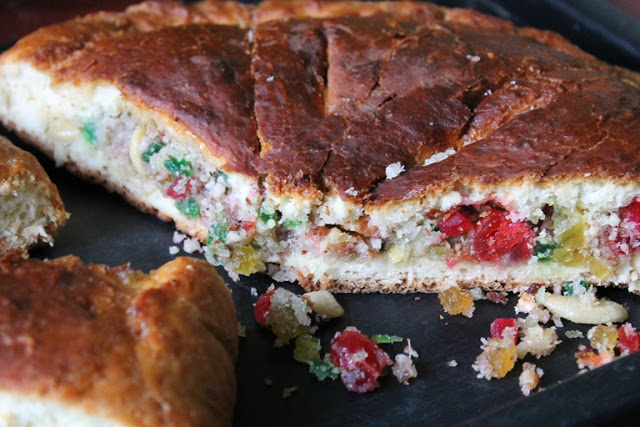
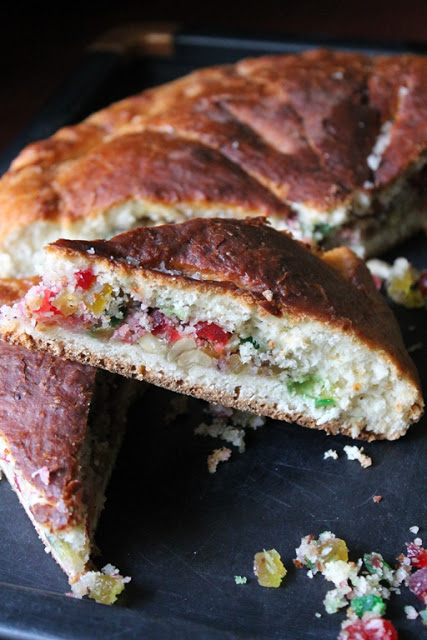
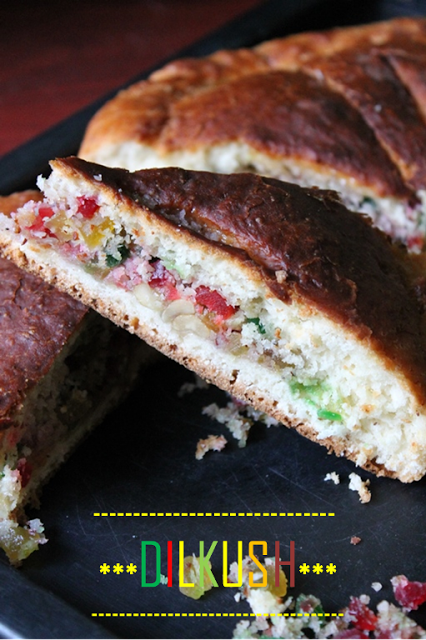
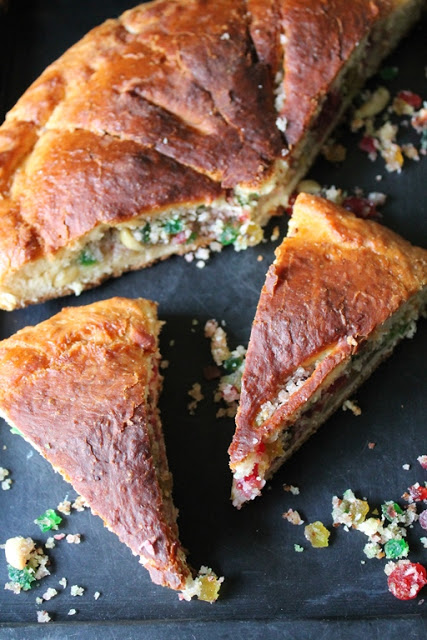
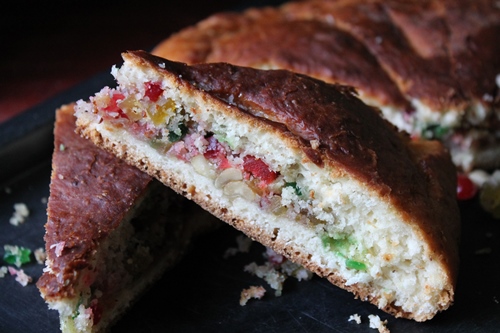
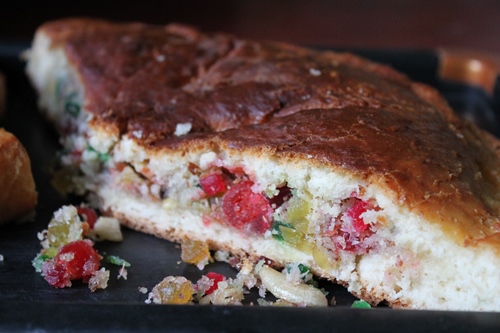
Dilkush is one of the most popular bakery sweet bread recipe made with coconut, tutti frutti, sugar and tutti frutti. The word dilkush means happiness or heart pleasing. This is basically a bread made with sweetened coconut and tutti fruit filling with lots of nuts, cherries and it has a lovely aroma of cardamom powder and melted butter, this yummy filling is stuffed into a sweet, soft, buttery bread similar to coconut sandwich.
The recipe is a buttery yeasted dough with a coconut filling. This recipe is particularly a no fail recipe, how ever you bake it, it turns out delicious. The main thing you should keep in mind is use good quality yeast and don't over bake, as it will make the bread turn hard. Other than this, if you follow the recipe, then it is a hit one.
I used fresh coconut in this recipe since desiccated coconut is not mostly available in everyone's pantry. But the one drawback in using fresh coconut is, this bread has to be stored in fridge else it may spoil.
Similar Recipes
Watch Dilkhush Recipe Video

Dilkush Recipe (Dilpasand) Ingredients
Dilkush is made in two steps. First you have to make the buttery dough. Then you have to make the coconut filling. The filling is stuffed inside the dough and baked till soft.
These are the ingredients for making the dough. I used an eggless yeasted dough for the outer bread dough.
All Purpose Flour - I used basic plain flour for making the bread dough. But you can use wheat flour, the outer layer may be slightly dense if you use wheat flour. But still it will taste great.
Instant Dry Yeast - I used instant dry yeast for making the bread dough. You can directly add the yeast into the flour and knead the dough. But if you are not sure about the quality of the yeast, you can activate yeast separately and make the dough.
Sugar - sugar is used in the bread dough as sweetener. But you can easily use honey instead of sugar.
Salt - salt helps enhance the taste of the bread and other baked goods.
Warm Milk - make sure you use warm milk in the dough, so the yeast activates and the dough rises well.
Butter - butter makes the bread or outer dough tender and soft.
Ingredients for Coconut Filling
Coconut - I used fresh coconut in this recipe since desiccated coconut is not mostly available in everyone's pantry. But the one drawback in using fresh coconut is, this bread has to be stored in fridge else it may spoil.
Tutti fruity - is a candied fruit that is available in the market. It comes in different colours, you can add whichever you prefer.
Cashews - I used cashews for crunchy texture, you can use any finely chopped nuts.
Candied Cherries - it adds colours and another chewy element. You can use any candied fruits instead of this.
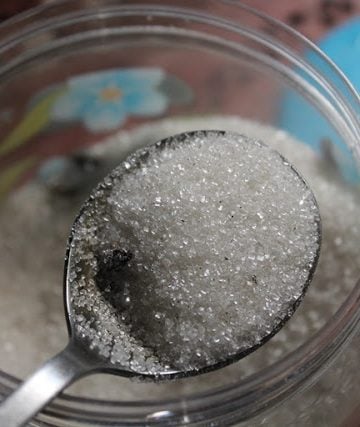
Sugar - this is blend with coconut to make the filling sweet.
Butter - melted butter is added in the filling which enhances the taste and texture of the filling. It also moistens the filling.
Cardamom - this is the main flavouring of the bread. If you don't prefer the flavour of cardamom you can use vanilla.
How to make Bakery Style Dilkush (in 4 easy steps)
The Dough
I used a basic yeast sweet dough for making dilkush. It is made with plain flour, sugar, yeast, milk, salt and butter. You can knead the dough in a stand mixer or using hands.
The Filling
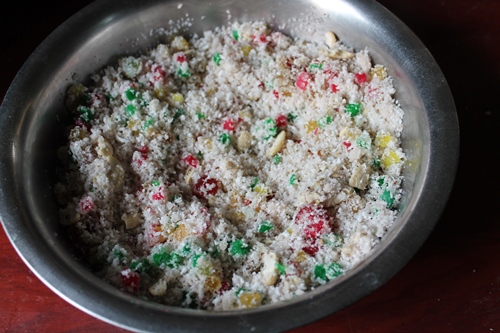
I used fresh coconut for the filling, you can use desiccated coconut in the filling. Use a combo of tutti frutti, nuts, dried fruits and cardamom in the filling.
Stuffing the Bread
Making dilkush can be easy. Divide dough into two portion, roll both of them. Fill the base with coconut filling. Cover with other rolled dough and seal the edges.
Baking and serving
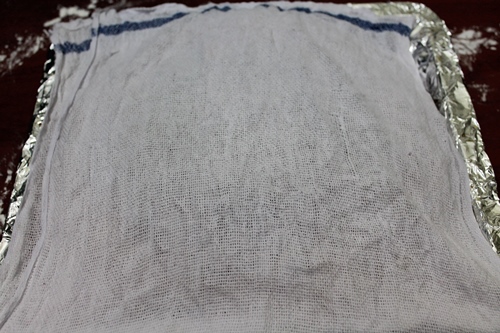
You can brush top with milk or egg wash before baking for beautiful golden colour. Once it is baked, remove from oven and brush the top with some melted butter. Cover the top with a damp cloth so the crust will become soft.
How to Make Dilkhush (Stepwise Pictures)
Making Dough
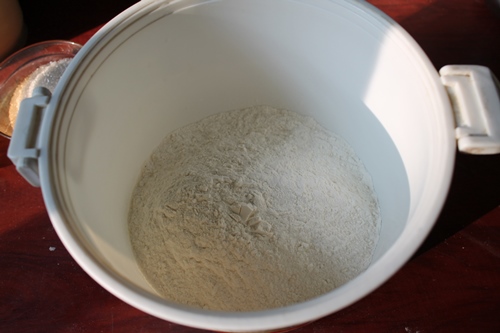
1)Start by making the dough. I am making a basic yeasted sweet bread dough. For that take plain flour in a bowl.
Pro Tips: But you can use wheat flour, the outer layer may be slightly dense if you use wheat flour. But still it will taste great.
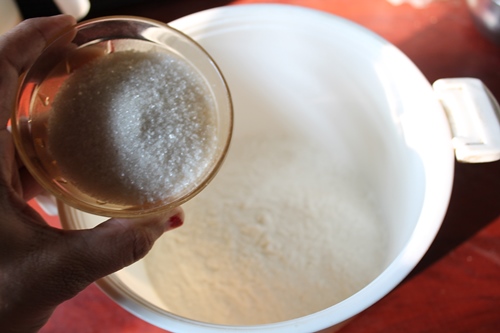
2)Add sugar into the flour.
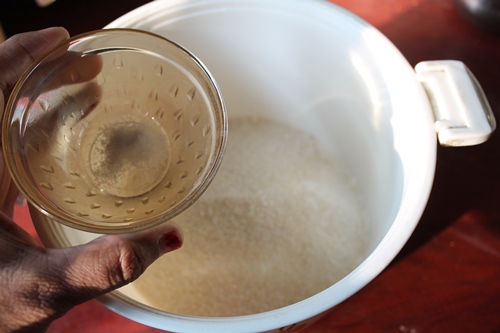
3)Add salt to the flour.
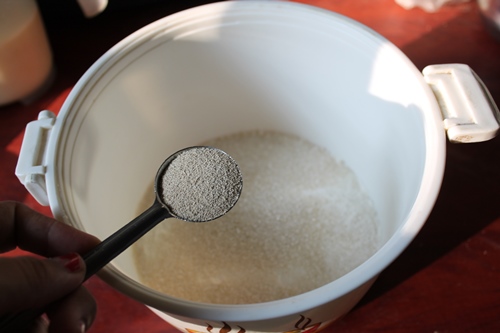
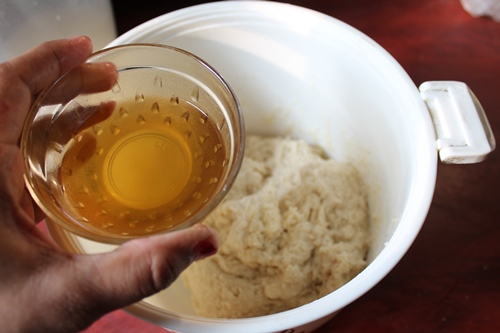
4)Add in dry yeast. I used it directly into the flour, you can activate the yeast in warm milk or water before adding in the dough too. Mix the dry ingredients into the flour.
5)Add in warm milk into the flour and knead to a soft dough.
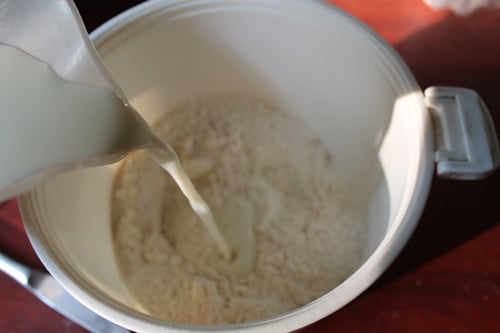
6)Knead it into a soft dough. You can add more milk if needed.
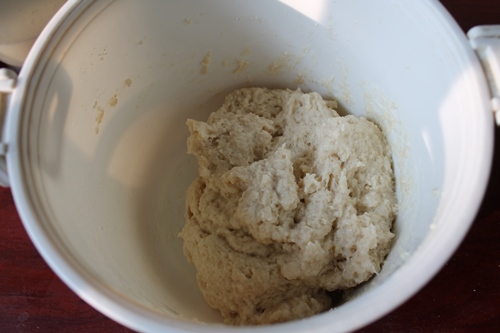
7)Add in melted butter into the bread dough and knead it really well till soft.
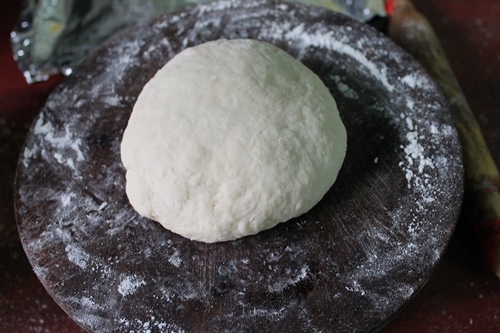
8)Knead the bread dough really well.
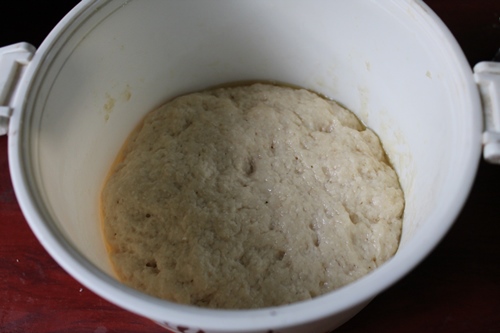
9)Cover the dough with a lid and allow it to ferment or double in size for 1 hour.
Make filling
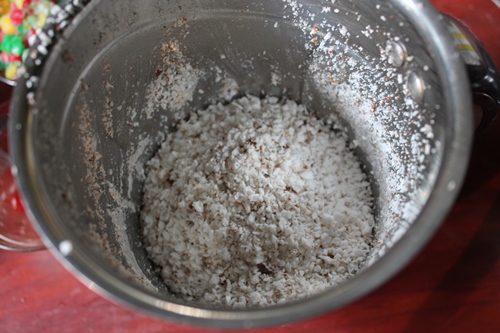
10)Take coconut in a blender. I am using fresh coconut, but you can use desiccated coconut.
11)Add in sugar in a blender.
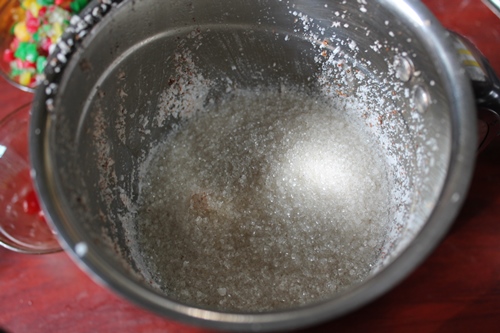
12)Blend coconut with sugar till combined.
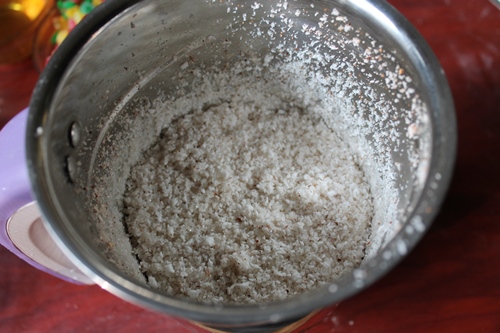
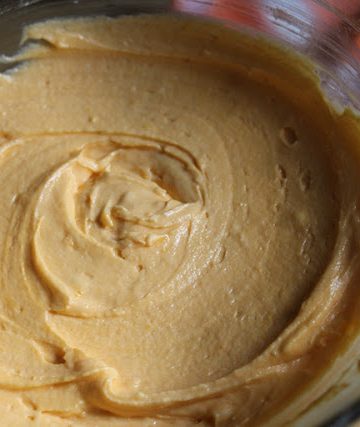
13)Take the finely ground coconut in a bowl.
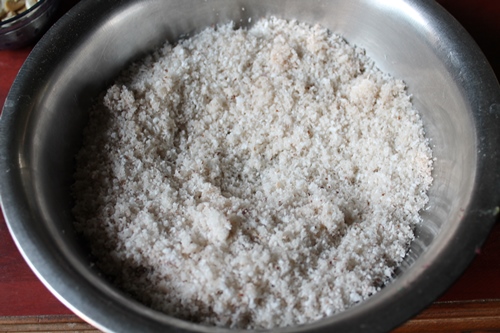
14)Add cardamom for flavour.
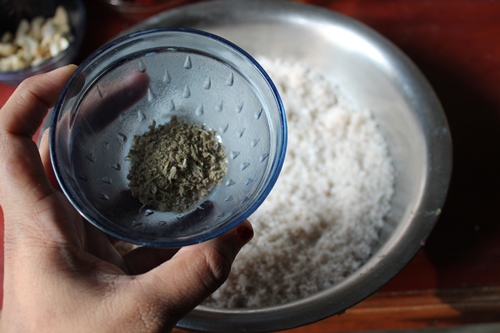
15)Add in nuts. You can use chopped nuts of choice.

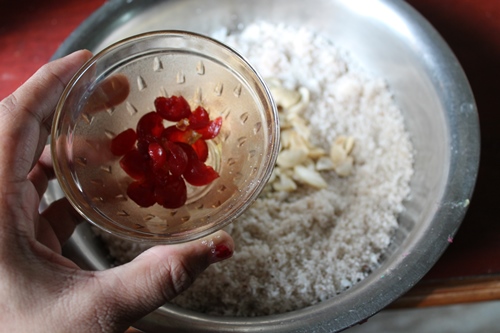
16)Add in candied dried cherry into the coconut.
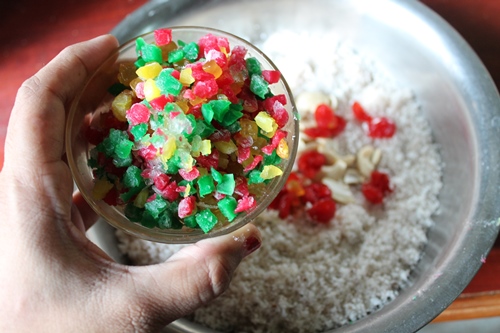
17)Add in tutti frutti.
18)Add in melted butter.
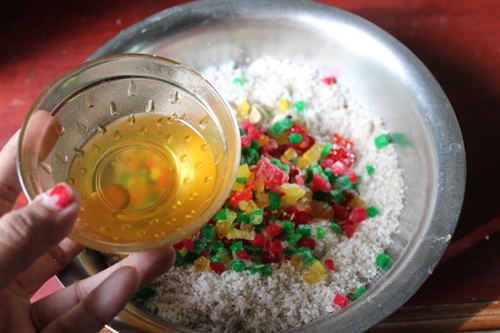
19)Mix this really well.
Shaping Dilkush
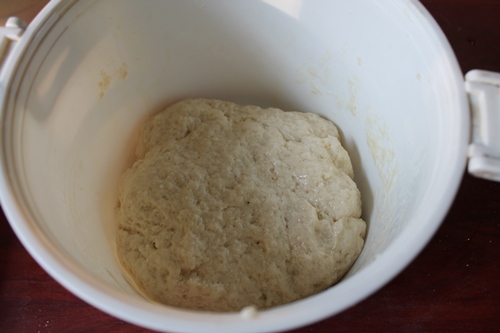
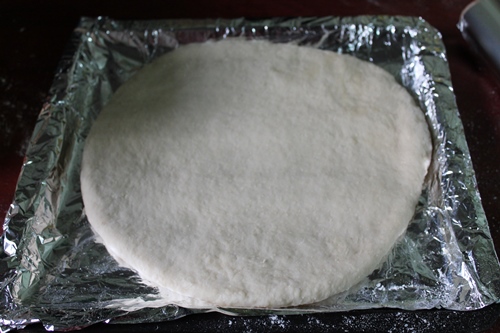
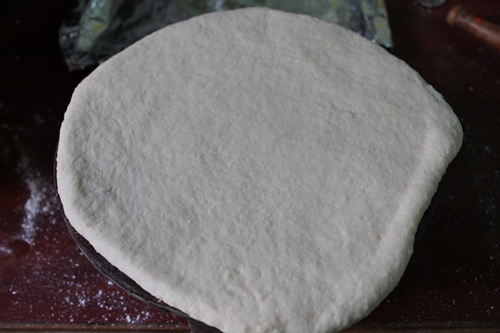
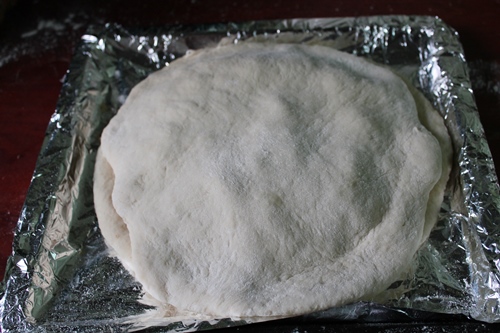
20)Now as you can see the dough has well risen. Divide the dough into two equal portions.
21)Take a portion of dough and roll it into a thick circle.
22)Roll it gently and place it in a parchment or foil lined baking tray.
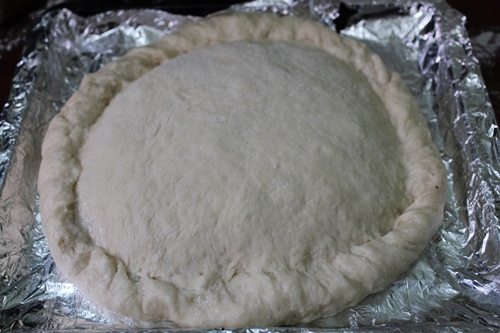
23)Spread the coconut into the rolled circle.
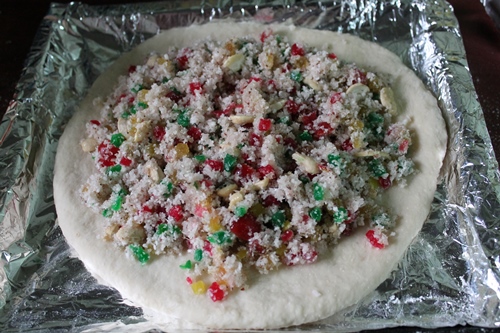
24)Apply some water around the sides.
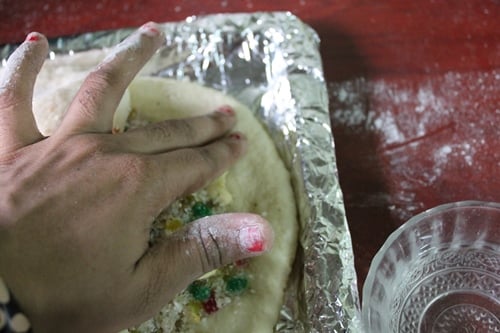
25)Roll another dough into circle.
26)Place it on top of the other portion. Let it stick together.
27)Now gently rim the dough in the sides.

28)Gently rim the sides.
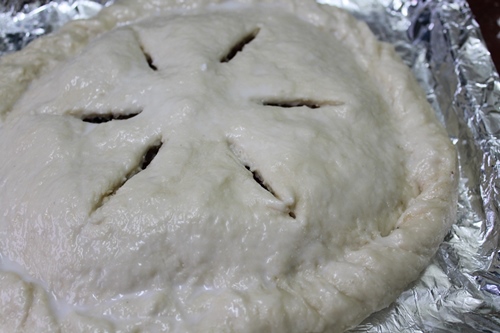
29)Cut small slashes in the dilkush. Brush top with milk or egg wash.
30)In the meantime preheat the oven to 200 degree C / 400 degree F. Bake it in oven for 25 to 35 mins. Don't over bake.
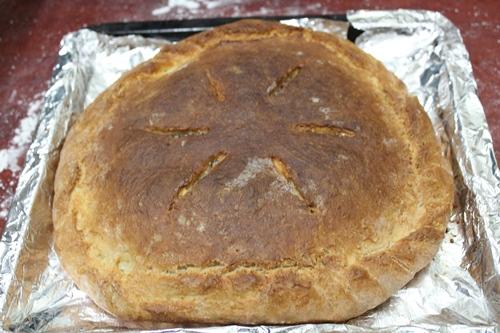
31)Once it is done, remove from oven and brush the top with some melted butter.
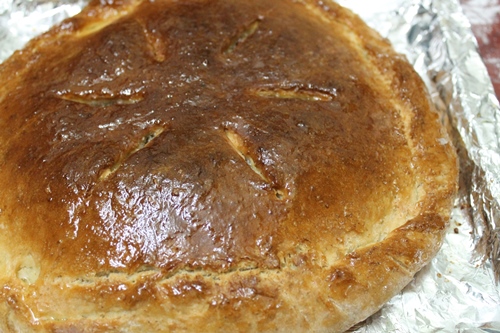
32)Cover the top with a damp cloth so the crust will become soft. Once it is cooled, slice and serve.
33)Slice and serve.
34)Enjoy.
Expert Tips
- Make sure you use warm milk for kneading the dough. If you use cold milk, then the yeast won't activate. If you use hot milk, then you will kill the yeast.
- If you are not sure that your yeast is fresh, then activate the yeast first and then add it to flour. To activate yeast, Add yeast to warm milk along with some sugar and leave it for 5 mins or so. You will see the mix will become foamy, now add this to the flour and continue the process.
- I added extra sugar in the bread dough, this will make it more tasty.
- I used fresh coconut in the filling to make it fresh. You could also use dessicated coconut too.
- You could use whatever nuts you like in the filling.
Storage Suggestions
If you are using fresh coconut, keep the bread in fridge if you have any leftover. so it wont get spoiled. you can reheat it in microwave for 30 seconds or so when serving, it will turn fresh.
More Bread Recipes to Try
📖 Get Recipe
Dilkush Recipe | Dilpasand Recipe | Bakery Style Dilkhush Recipe
Equipment
Ingredients
For Making Dough
- 2 cups All Purpose Flour 240 grams
- 1½ teaspoon Instant Dry Yeast
- 3 tablespoon Sugar
- 1 teaspoon Salt
- ¾ cup Warm Milk + 2 tablespoon of brushing on top
- 1 tablespoon Butter melted
For Coconut Filling
- 1½ cup Fresh Coconut
- ½ cup Tutti fruity
- ¼ cup Cashews
- 10 no Candied Cherries chopped
- ½ cup Sugar or more
- 2 tablespoon Butter melted
- 1 teaspoon Ground cardamom
Instructions
- Start by making the dough. Take flour, sugar, salt, yeast in a mixing bowl. Pour warm milk over it and knead it into a slightly sticky dough. Now drizzle some butter over it and mix well. Cover and let it sit in a warm place of 1 to 2 hours till it doubles in size.
- Now lets make the filling. Take coconut and sugar in a blender and blend them till it resembles a coarse mixture. In a bowl, add coconut mix, tutti fruity, cherries, nuts, cardamom powder and butter. Mix that well, filling is done.
- Line a baking tray with foil and grease it well with butter. Once the dough has risen punch it back down and knead well for a min. Divide the dough into two equal portions.
- Take one dough out and roll it into a round circle. Place the circle on the baking tray, spread the filling all over the dough circle. Now dip your fingers in water and moisten the edges. Now roll another dough into a round circle. Place that circle over the moistened edges and press with your fingers to seal them well. Now dip your fingers again in water and moisten the edges, fold the around the sides so it is well sealed. Leave it to rest for 10 mins.
- In the meantime preheat the oven to 200 degree C / 400 degree F.
- Now Use a knife to make some slashes over the top so the steam can escape. Brush the top with some milk and bake it in oven for 25 to 35 mins. Dont over bake.
- Once it is done, remove from oven and brush the top with some melted butter. Cover the top with a damp cloth so the crust will become soft. Once it is cooled, slice and serve.
- If you have any leftover, keep it in fridge. Reheat in microwave for 30 seconds or so while serving.
Video
Notes
- Make sure you use warm milk for kneading the dough. If you use cold milk, then the yeast won't activate. If you use hot milk, then you will kill the yeast.
- If you are not sure that your yeast is fresh, then activate the yeast first and then add it to flour. To activate yeast, Add yeast to warm milk along with some sugar and leave it for 5 mins or so. You will see the mix will become foamy, now add this to the flour and continue the process.
- I added extra sugar in the bread dough, this will make it more tasty.
- I used fresh coconut in the filling to make it fresh. You could also use dessicated coconut too.
- You could use whatever nuts you like in the filling.
Storage Suggestions
If you are using fresh coconut, keep the bread in fridge if you have any leftover. so it wont get spoiled. you can reheat it in microwave for 30 seconds or so when serving, it will turn fresh.Nutrition
Tried this Recipe
Mention @yummytummyaarthi or tag #yummytummyaarthi!If you have any questions not covered in this post and if you need help, leave me a comment or mail me @aarthi198689@gmail.com and I'll help as soon as I can.
Follow me on Instagram, Facebook,Pinterest ,Youtube for more Yummy Tummy inspiration.
IF YOU MAKE THIS RECIPE OR ANYTHING FROM YUMMY TUMMY, MAKE SURE TO POST IT AND TAG ME SO I CAN SEE ALL OF YOUR CREATIONS!! #YUMMYTUMMYAARTHI AND @YUMMYTUMMYAARTHI ON INSTAGRAM!


ShiWOW
Thanks for the step by step pics. Made my Dil very
Kush. Going to try it today.
Chandrani Banerjee
Very delicious and innovative dilkhush bread.
Shweet Spicess
very nice recipe
Pretend Chef
Looks like a treat my son would love.
Archana Kumar
This looks great ! My son loves in but we don't get it in the bakeries here, will definitely try this out...Thanks for sharing
Geetha Venkat
Awesome Aarthi. All time favourite. Thanks for the recipe..
hafsa imdad
Thankyou aarthi .luv u
Anonymous
Hi, i am purchasing an oven this new year, asking everyone's suggestions, so wt is your suggestion cos i need to bake cakes, cookies, cook some other stuff etc in the same..
POGO
Hi Aarthi...loved your recipes....so happy to found your blog....i have a microwave-grill oven. I am going to buy an oven to bake cakes,cookies,pies like ur dilkush etc... I need to know...what type I should buy for this? OTG or convection?And baking only for family purpose...do how much litres oven would be ideal?Please. Please suggest. Thanks in advance.
Aarthi
@POGO
Thanks for your mail, i am glad you liked my blog. And since you have microwave oven, i suggest you to go for OTG oven. For home purpose any OTG above 17 liter would be good.
Aarthi
@Anonymous I use a Koryo 19 liter oven in my mom place and morphy richards 40 liter oven in my home. I have used both ovens and found both of them to be good
POGO
Hi Aarthi..a doubt...again
From various net browsing....it seems that cakes or buns baked in an OTG turns out dry on top. Is it true? If yes... what can be done to avoid it? Pls help. Thanks
Aarthi
@POGO
no it is not like that. dryness comes because of the consistency of the dough. If you find your buns has crusty top, cover it with a damp cloth after it is baked. This will make the crust soft
Priyaseker
Hi Arthi,
i used fresh grated coconut and baked it..the filling inside the bun turned out to be watery immediately after baking and very wet after the bun is cooled. Pls give some tips as what to do if i use fresh grated coconut. With sugar , it becomes soggy and watery..Thnx!!!
Aarthi
@Priyaseker Keep fresh coconut in freezer for 30 mins, the powder it with sugar
Harsha Peddi
hi,
I left fresh coconut in freezer for 30-45 mins and grinded it with sugar.
at first it felt dry but after few mins it became wet and waht should i do to make it dry as possible?
Harsha Peddi
Hi,
I left the fresh coconut in freezer for 30-45 min and grinded it well with sugar. at first it feels dry but after few min it fells wet. how can i make it dry?
Sai Chikki
Superb dil kush....
Anonymous
hi aarthi ,i love all your recipes , just want to ask when ever it is writen pre heat for 180 d cel, what it means ,pre heat for how many minutes , it may be cake or breads , i have conventional oven of LG
Aarthi
@Anonymous Preheating means turning the oven on at the required temp for a good 10 mins, so when you put the cake or bread pan inside the oven, the oven has to be hot and not cold so it helps in good baking
swarna santosh
Hi aarthi.. i like ur recipes and way of presentation.. can u please place a pic of step that where u put the baking pan/sheet in oven.. and after that final pic of completing baking
. please please
Nivedhitha Arvind
Can we use active dry yeast for dis recipe
Aarthi
@Nivedhitha Arvindyes u can use
anija
Can v make it in a micro wave? ?? If yes how?
Aarthi
@anijaNo you cannot make this in microwave unless you have convection mode
Anonymous
Can you plz tel tel me how wil i know if the temp has reached to 180 or 200 coz i have a oven which shows high or low flame
Aarthi
@AnonymousI am not sure about it..
valar mathi
Hi
Anonymous
hi what to use instead of dry yeast
Aarthi
@Anonymousno substitute
aarthi dhanraj
Hai aarthi,is realy bread baling this simple ? I followed ur recipe to the core each n evry step in this one,n big whole wheat loaf n other version with curd whole wheat bread..all threehad thick crust n yeasty smell...where im going wrong?u r the only one baking bread in our region i can find...other baking recipes r from foreign contries n i cant follow theirs.wat brand of yeast u use? I bought gloripan n infud thats our super market brand..both same results
aarthi dhanraj
Today i tried ur pepper chiken n it turned wonderful n v.easy peasy...who ever gave u the idea of this photographic explanation thing ...im giving my whole hearted thanx to them dear..hows ur daughter doing?
Aarthi
@aarthi dhanrajI use a brand which is sold in my super market. I think it is because of yeast.
aarthi dhanraj
Hello aarthi..u becoming my kindoff pen friend...ur presence is always in my kitchen n mind..n bookmarks..today i tried this..actualy t second try...it came out so well...i even reolaced haf wheat flour n increased the sweetnes to hide ot...yet the bread in this s so nice...hope my breads too vl come nice hereafter...:-)
Kalpana Solsi
I will try this recipe.
Nandini
Hi Aarthi, plz lemme know if I can use whole wheat flour or oatmeal powder instead of maida for this recipe...
Aarthi
@Nandiniu can use wheat flour. but it will make the bread little denser
Maanit Gupta
Such a easy and wonderdul recipe .. Regards Pooja
uma mahi
akka can we make buns out of this recipe by simply stuffing the filling inside the buns?thank yu:)
Aarthi
@uma mahiyes u can make buns..check this link
https://www.yummytummyaarthi.com/2015/05/coconut-tutti-frutti-buns-recipe.html
Anonymous
Now a days dilkush bun is very different in bakery. itz brown in color filling. that taste is like exactly chocolate cake over baked.anyway i love dilkush buns.
Anonymous
hello.... i have a Havells OTG... i just want to know is it safe if i can use aluminium foil for baking in it...i m a new user of OTG
Aarthi
@Anonymousu can use foil in OTG. it is safe
Preetha Jayakumar
Hi aarthi being a first time user of yeast. For this bun I added a active dry yeast directly to the dough not by dissolving it in water as u mentioned in this recipe. But am scared dat wil it come double in size or wen i bake it wil it bake properly or not? Coz the dough has dat yeast granules all over it. Pls reply me soon and help me
Anonymous
Hi,
I added yeast directly only.It came out well.The granules will react and disappears.Don't worry,it works.
Anonymous
HI,
I tried it today.... but it doesn't turn out well. Can someone post the pic of yeast you are using..pls?
Aarthi
@Preetha Jayakumaru have to knead it well so the yeast will just meld into the dough
Anonymous
Hi Arthy,
I made this yesterday,it came out well.Soft,spongy and tasted good.Thanks for the recipe.
I use most of ur recipe only.
Najma
Dhivya
Hi aarthi I tried this recipe today it was baked above but underdone below wat to do reply asap dunno wat to do with it
Aarthi
Cover it in foil and bake some more time.
Sindu
Hi Aarthi,in Nagercoil we get coconut bun stuffing in a different way . can you share the recipe
NithyaK
Hello mam ,
I tried your dilkush recipe . It turned out good .
could you clarify my doubt.
I stored in an air tight box. After 2 days , the bread part started to harden . The 3rd day it was hardened to a tight bread . How to keep it soften for 3 to 5 days ?