
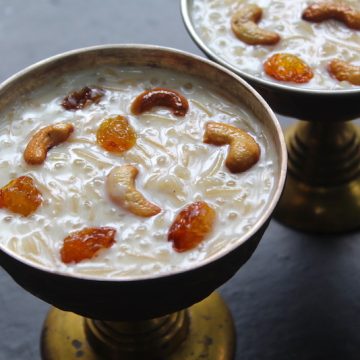
Semiya payasam is a South Indian sweet also known as vermicelli kheer, seviyan kheer. Payasam is made with vermicelli, sugar, milk, ghee, dried fruits and nuts. For a healthy alternative, semiya payasam can be made with jaggery and coconut milk. Making the perfect wedding style payasam needs few tips and tricks. I have shared recipe for semiya payasam using Instant pot, Stove top with step by step pictures and video.
Semiya Payasam
Any marriage function is not complete without this payasam along with 12 variety of other vegetarian dishes. Though I am a not a huge fan to these kind of marriage meals (kalyana chapadu).
Jump to:
But I would wait for the last part of the meals which is the different kind of payasam. My favorite is semiya payasam also called as paal payasam. It is usually ladled over puran boli, boondi and papadam. You should mix all these together and enjoy. It is one of my favourite combination.
About Semiya Payasam Recipe
Semiya payasam is a popular South Indian dessert or sweet recipe. It can also be called as Indian pudding made with vermicelli, sugar, milk, ghee, dried fruits and nuts. The name Semiya literally translates to vermicelli (type of Indian pasta or noodles); Payasam is South Indian pudding.
This is one of the dessert which can be made under 30 minutes or less. If you are craving for anything sweet, then this is the dessert you can go for. All you need is few ingredients which you already have on hand.
Semiya is cooked in milk and water, sugar or jaggery is added once semiya is cooked. We use jaggery to make semiya payasam for healthy alternative. But the traditional recipe is made with sugar.
I have included both semiya payasam recipe made with white sugar and jaggery in this recipe post with stepwise pictures.
More Semiya Recipes

Semiya payasam, Vermicelli Kheer & Seviyan Kheer
Yes, everything is same. Semiya is called as vermicelli or seviyan in different parts of the region. Depending on each region, the same dish gets its name.
Kheer is traditionally made with milk, sugar, nuts and dried fruits so does payasam. But there is another popular dish called as Sheer khurma which is also made with vermicelli but richer.
Check out my Other Payasam Recipes too,
Semiya Payasam Ingredients
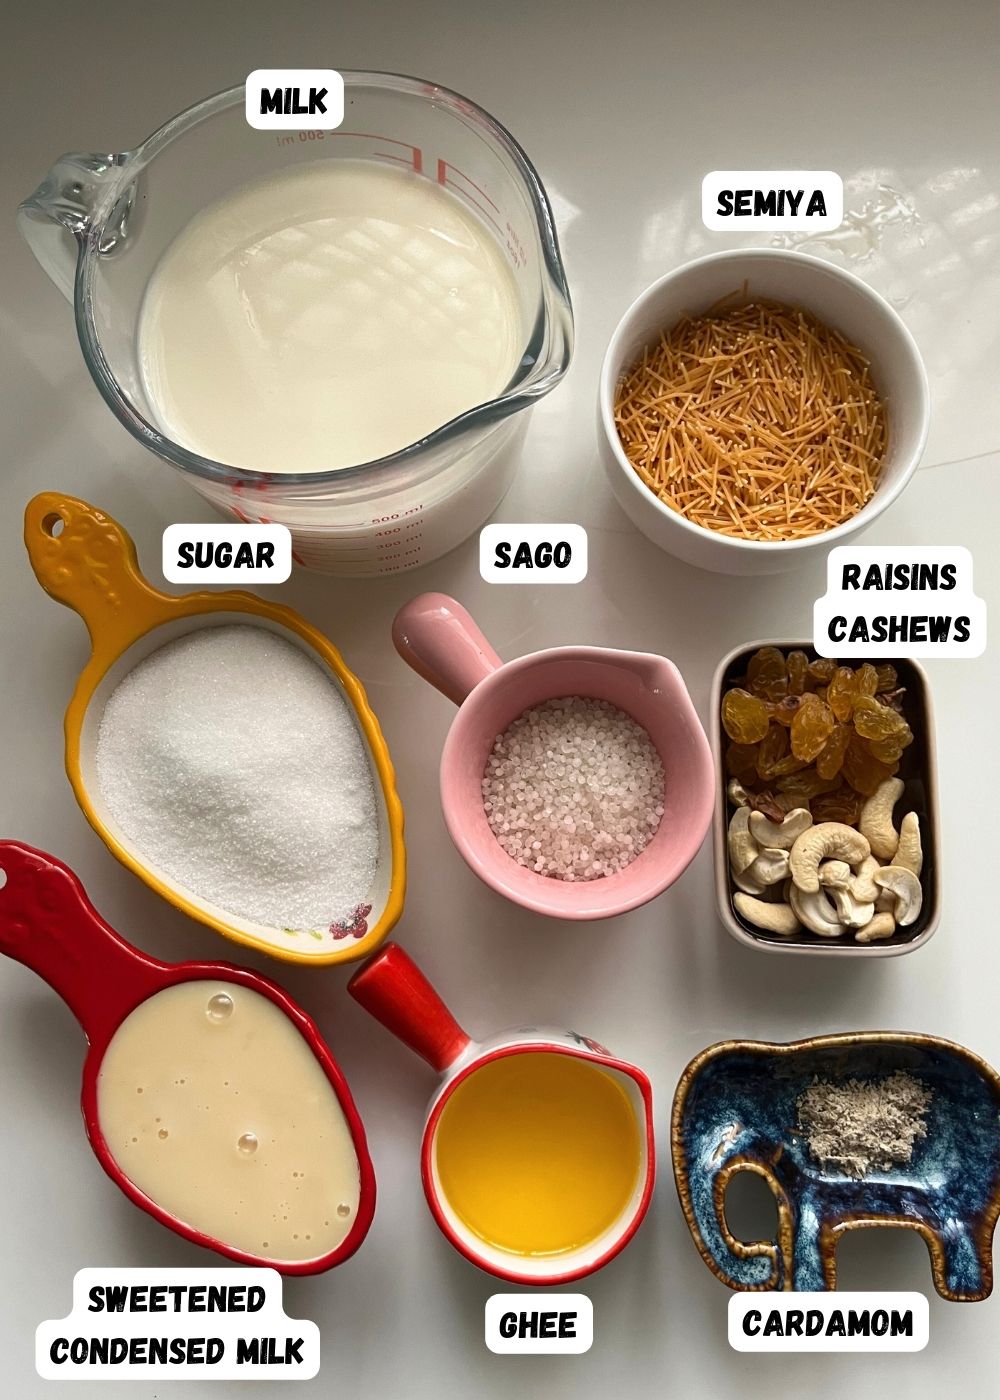
Semiya | vermicelli - use roasted vermicelli available in the market. It makes the process of making payasam. Even though I use roasted vermicelli, I like to give a quick roast for couple of minutes for aroma.
Sago - I like to use sago because it adds bulk to the payasam. I enjoy the texture of sago in payasam. But you can skip it.
Milk - use full fat milk for richer taste. Payasam tends to get thicker as it cools, so have some extra milk on hand to adjust the consistency.
Sugar - the quantity of sugar totally depends on your taste. I find ½ cup perfect to my taste. check the version of payasam below which uses jaggery.
Ghee - pure desi ghee adds the rich nutty aroma to every Indian sweet.
Sweetened condensed milk - Even though this is optional, I strongly recommend you to add. Milkmaid adds restaurant like taste to payasam. I used ¼ cup of condensed milk in addition to ½ cup of sugar. If you are not adding this, you might need to increase sugar quantity accordingly.
Cashews & Raisins - fry them in ghee and add as much or little as you need. Almonds can be added too.
Cardamom - most important flavouring for payasam!
Optional - you can add a dash of saffron and a pinch of crushed cloves (krambu) for taste.
Which Vermicelli or Semiya to Use for Payasam?
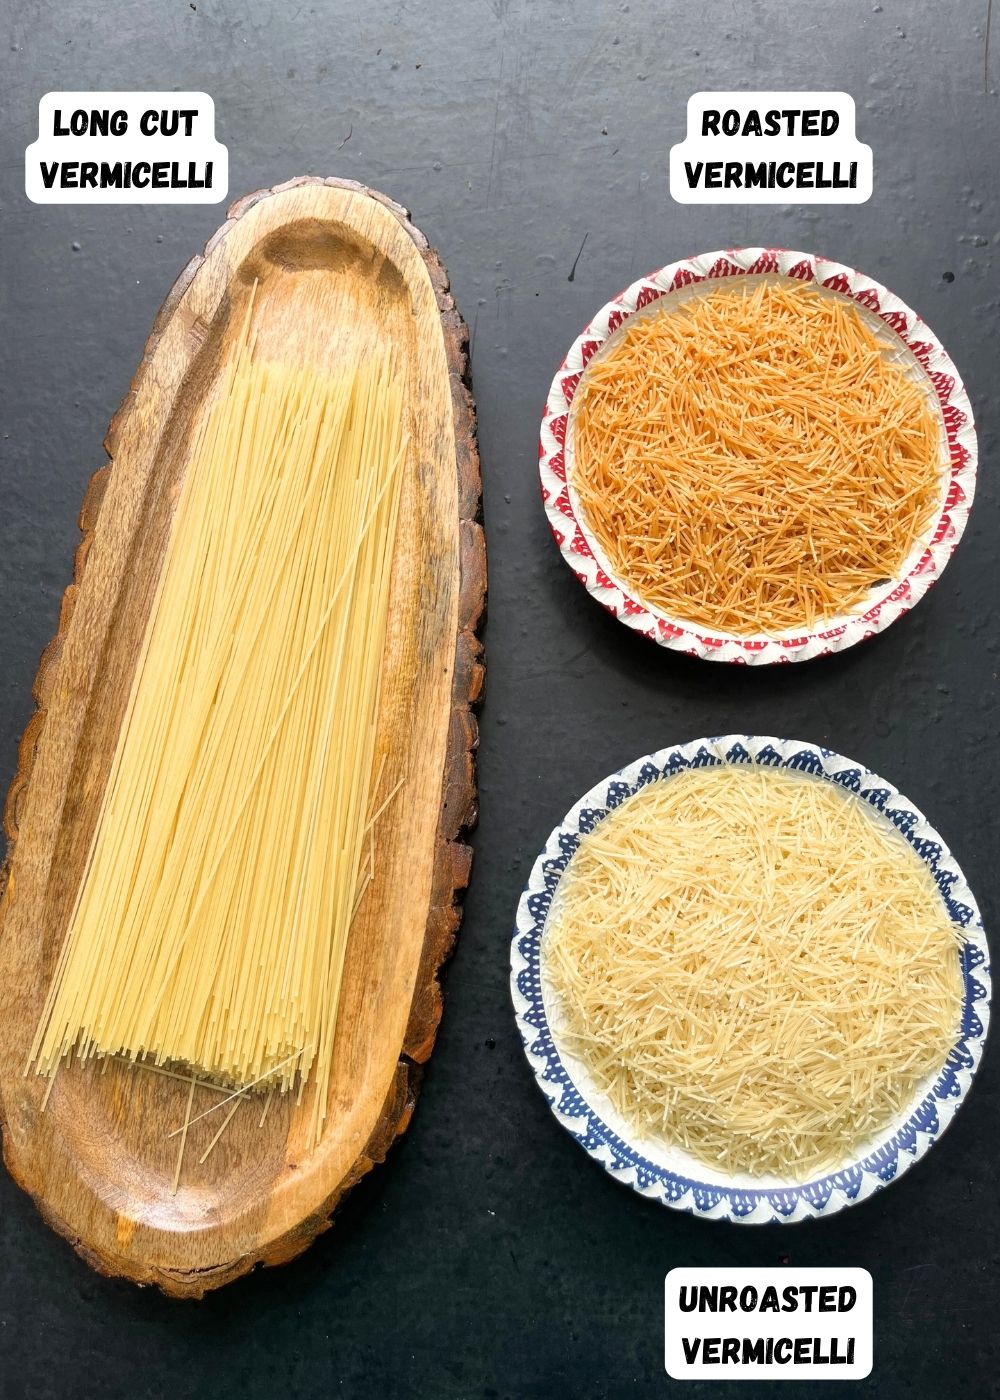
One of the main ingredient used in this payasam is vermicelli. There are many variety of vermicelli pasta available in the Indian market. Ragi vermicelli, rice vermicelli, millet vermicelli and many more which is used in making semiya upma. The variety which I use to make semiya payasam is roasted wheat vermicelli.
- Long Cut Vermicelli - Long cut variety of semiya is available in market which is specially used for making payasam. You might need to break it manually to small pieces.
- Roasted vermicelli - This variety of semiya is what I use for making upma and payasam. It is golden in colour and comes labeled as roasted.
- Unroasted vermicelli - You have to roast the unroasted semiya in ghee till golden brown for making semiya.
Time Constraint, Use Pressure Cooker
Don't have much time on hand. Cooking semiya payasam in pressure cooker. It will take half the amount of time and effort.
- Use pressure cooker or pressure pan. Heat ghee and fry nuts. Add semiya and roast.
- Pour water and milk. Cover and pressure cook for 1 whistle. Once pressure is released, open cooker and add sugar and cook for 3 minutes.
- Add in hot milk, condensed milk, cardamom powder, fried nuts and dried fruits andf mix.
- Thats it.
Step by Step Pictures
Frying Nuts & Dried Fruits
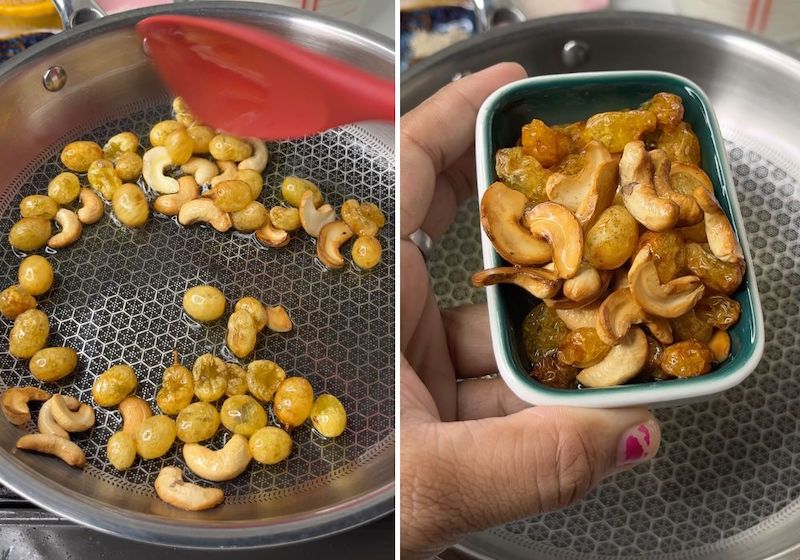
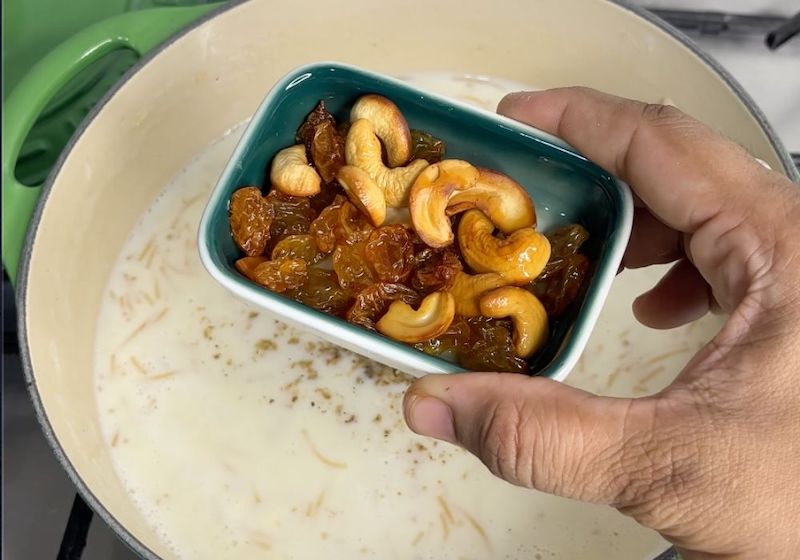
1)Heat ghee in a frying pan. Add in cashews and fry till light golden. Once cashews get golden, add in kishmish (golden raisins) and fry for few seconds.
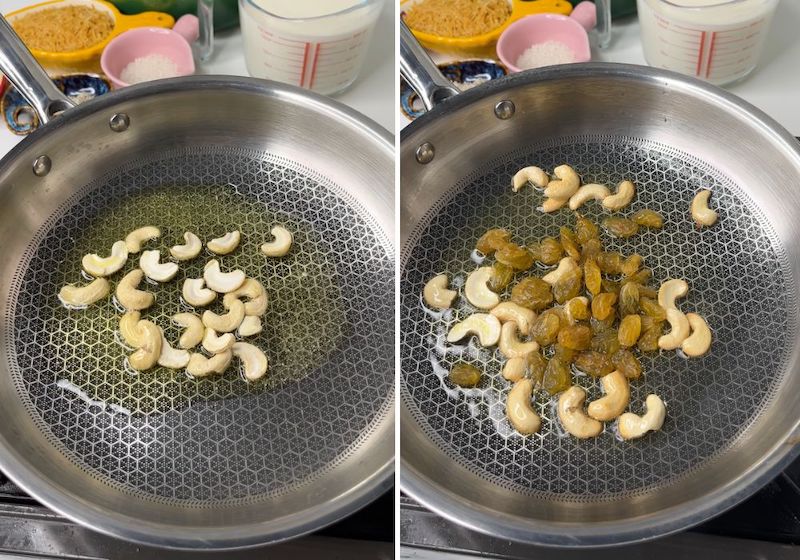
2)Now both cashews and raisins is golden brown. Remove them to a bowl and set aside.
Roasting Semiya
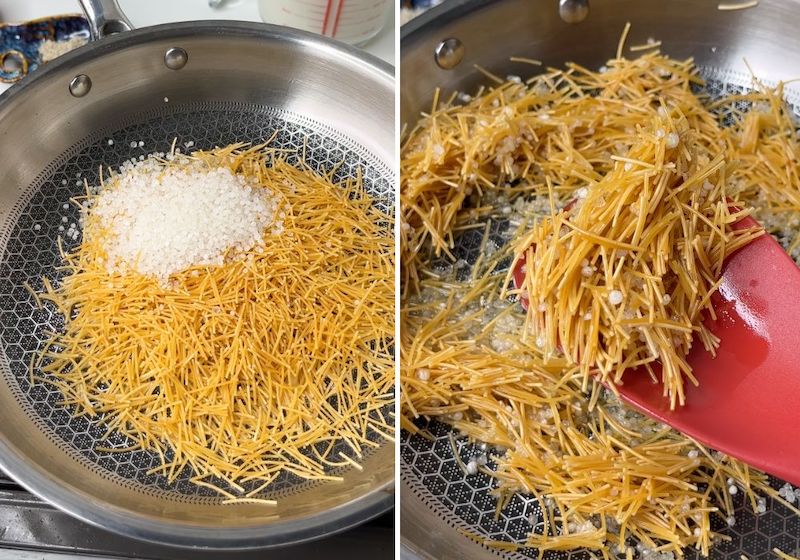
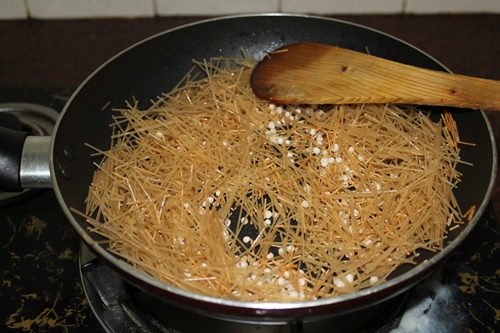
3)Now in the same ghee, add in vermicelli and sago. I used roasted vermicelli, so roasted only for couple of minutes. If you are using un roasted then roast till golden brown in colour. Remove this and set aside.
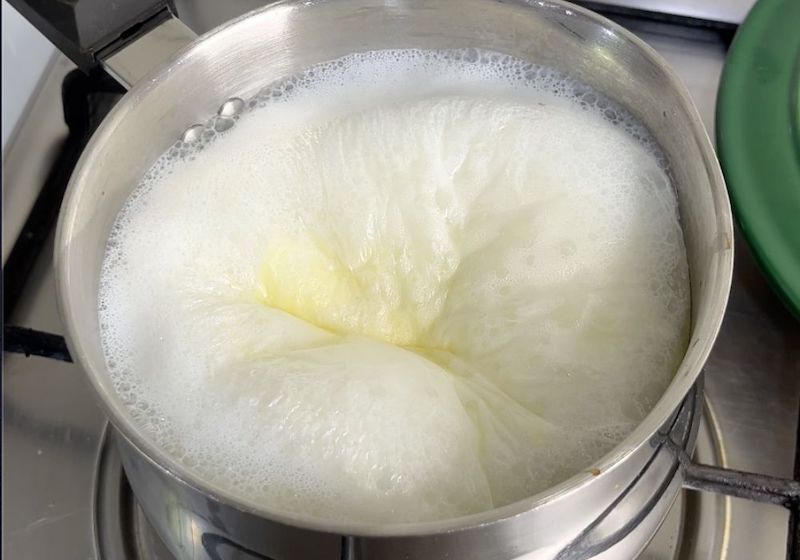
3)Meanwhile bring 1 litre milk to a full boil. The milk has to stay hot when you add it to the payasam.
Cooking Semiya & Sago
4)In another pot, take 2 cups water and ½ cup milk. Bring it to a full boil.
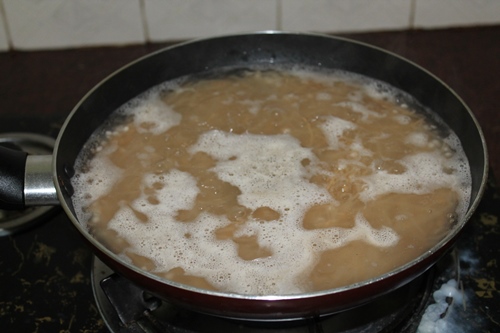
4)Once milk and water starts to boil. Add in roasted vermicelli and sago mixture in. Mix it really well and continue cooking till sago and vermicelli gets cooked.
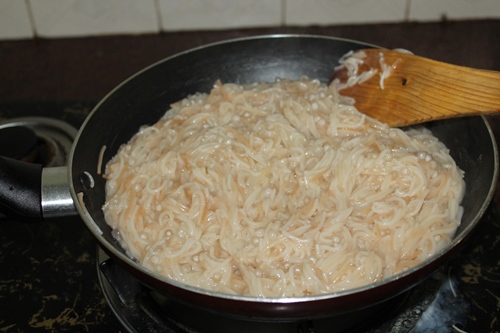
5)Keep stirring in between to prevent semiya sticking to the bottom of the pan.
6)After 15 to 20 minutes of cooking on a low flame. Semiya and sago is completely cooked. Sago will look translucent in colour and semiya will be soft if you press them with your fingers.
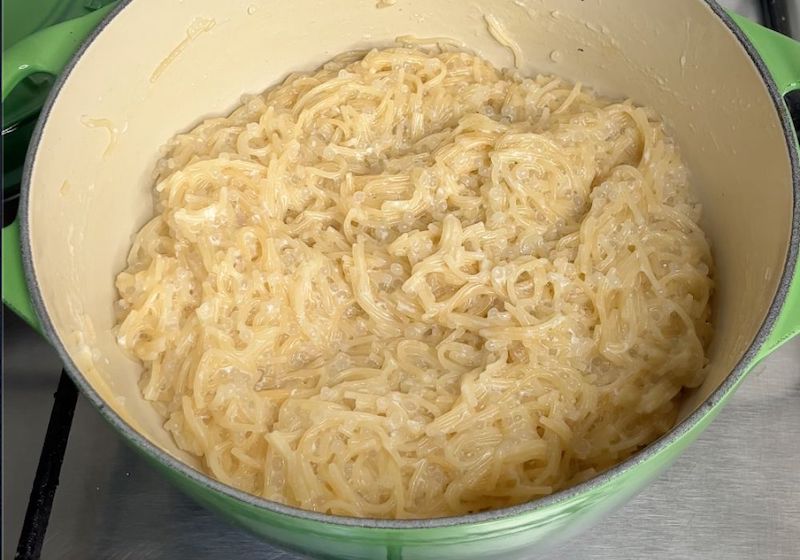
Adding sugar
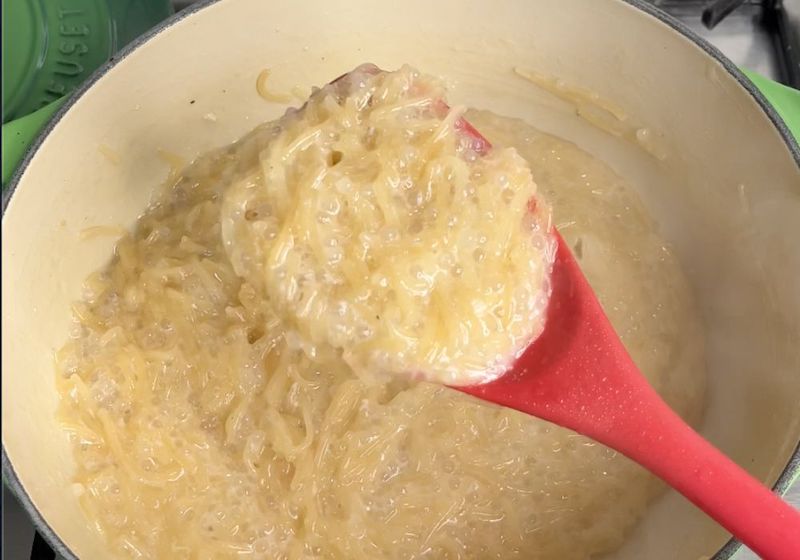
7)Now add in sugar to taste. The amount of sugar totally depends to your taste. You can add more or less as per taste.

8)Mix sugar into the cooked semiya. Once sugar is mixed into the semiya it will start to melt and gets thick. I like to cook sugar with semiya for at least 2 minutes.
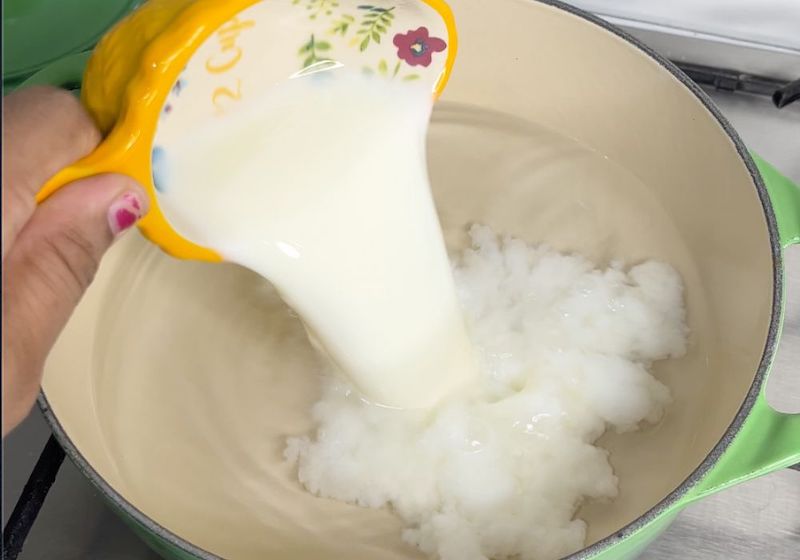
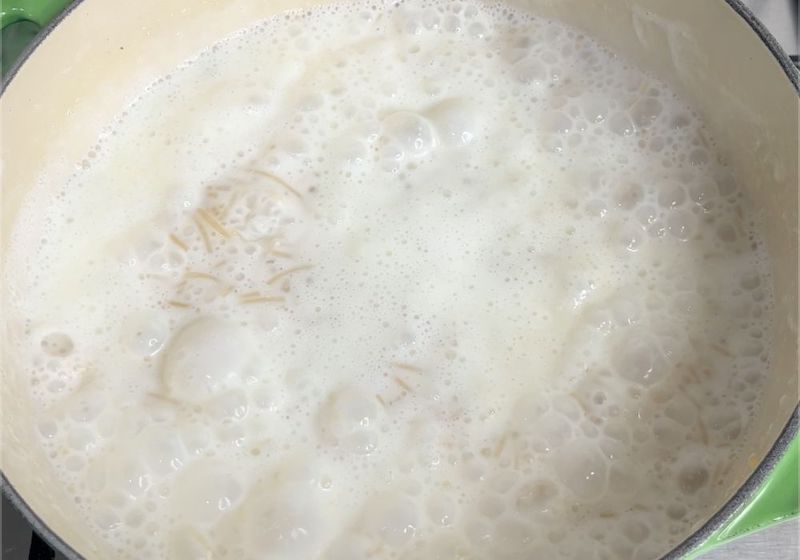
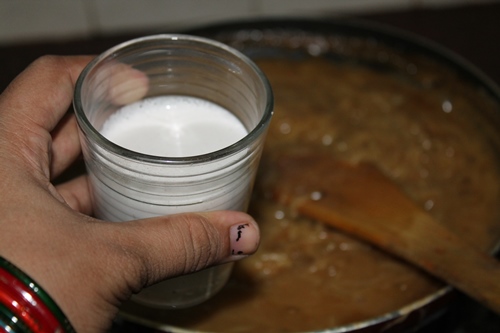
9)Now pour in your hot milk into the semiya sugar mixture. You have to use hot milk at this stage. If you add cold milk or room temperature milk into the hot semiya and sugar mixture, it may curdle.

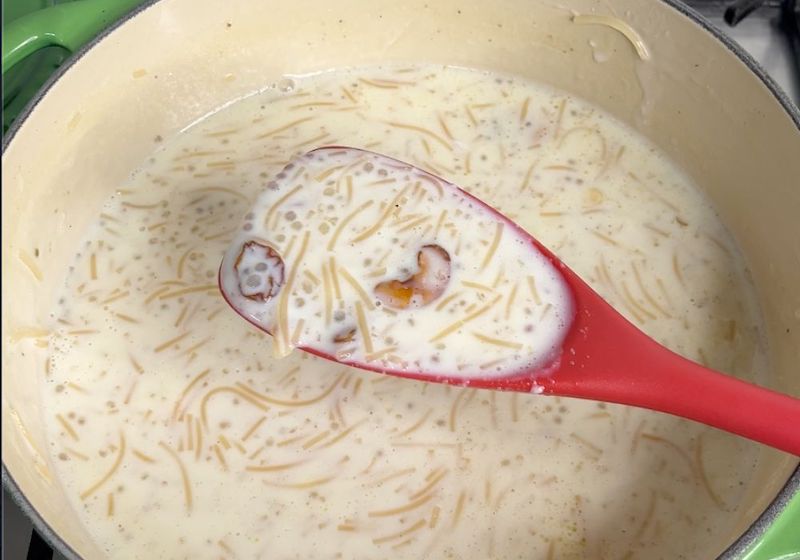
10)Once milk is added, mix well and cook together for 3 to 5 minutes.
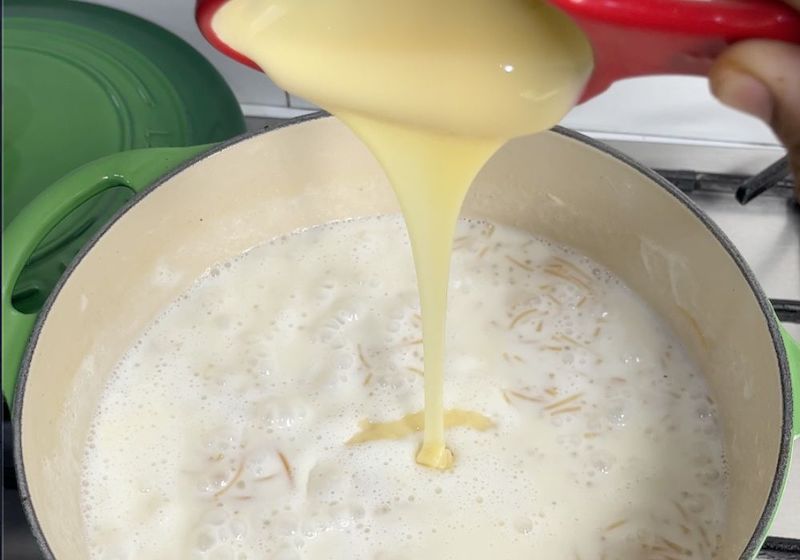
11)Now pour in milkmaid or sweetened condensed milk. this adds richness and gives you restaurant and wedding style taste to your payasam. if you want to skip, you can.
Flavourings
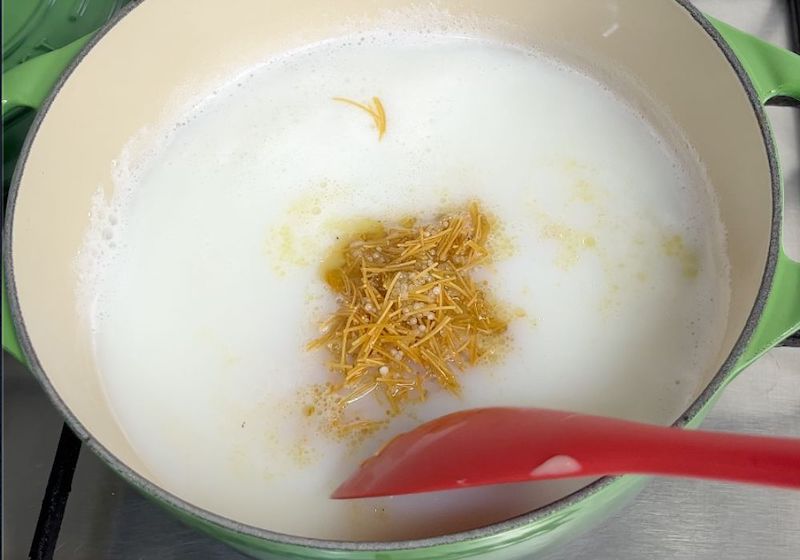
12)Now for flavourings add in ground cardamom powder. You can use a pinch of saffron at this point too.
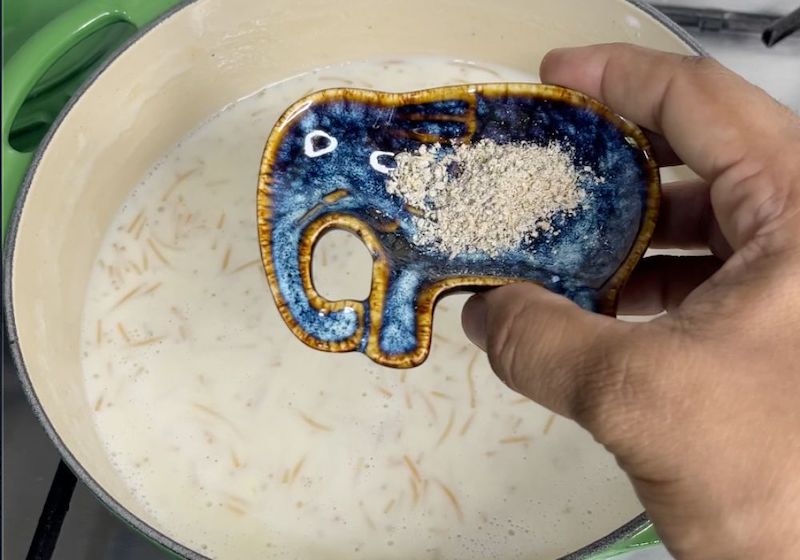
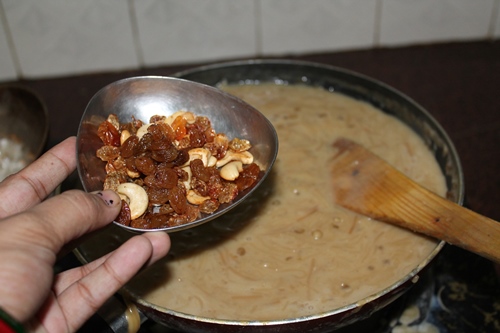
13)Add in fried cashews and raisins.
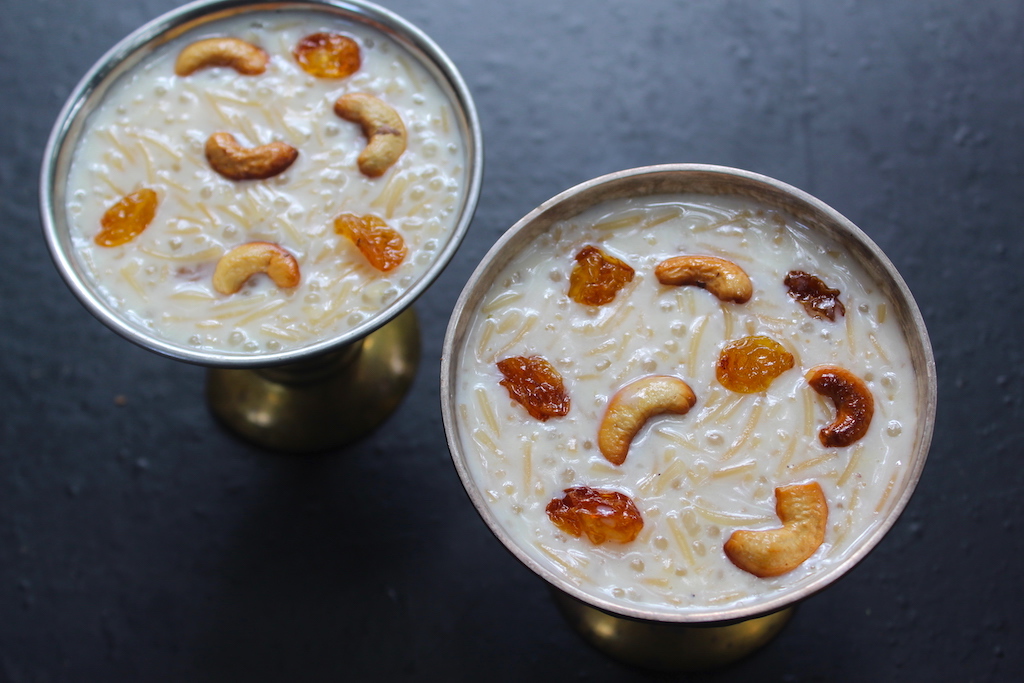
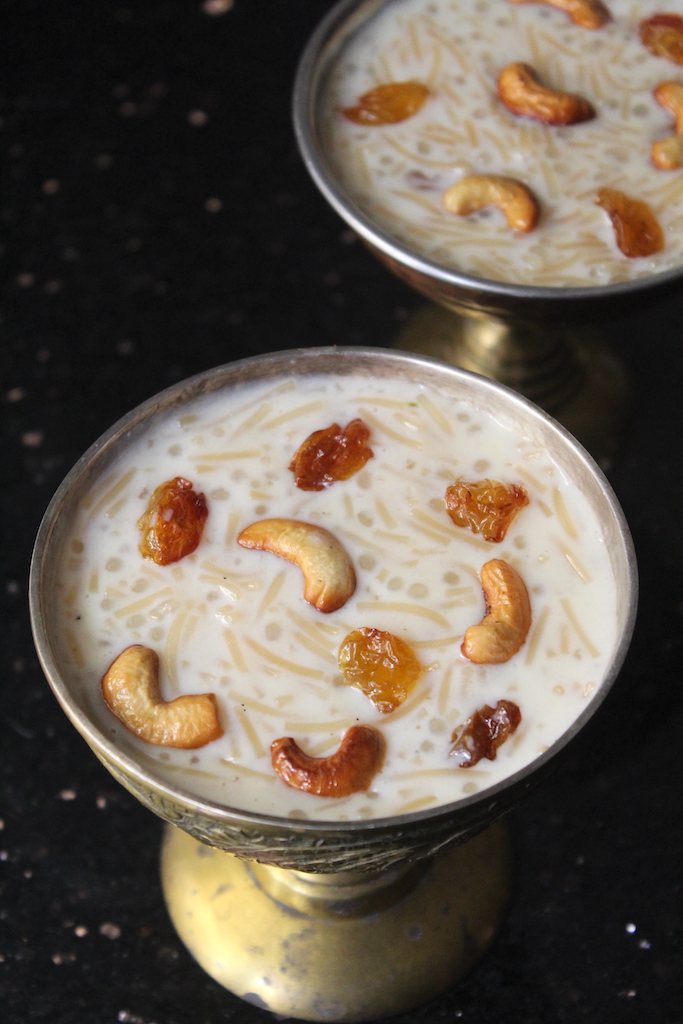
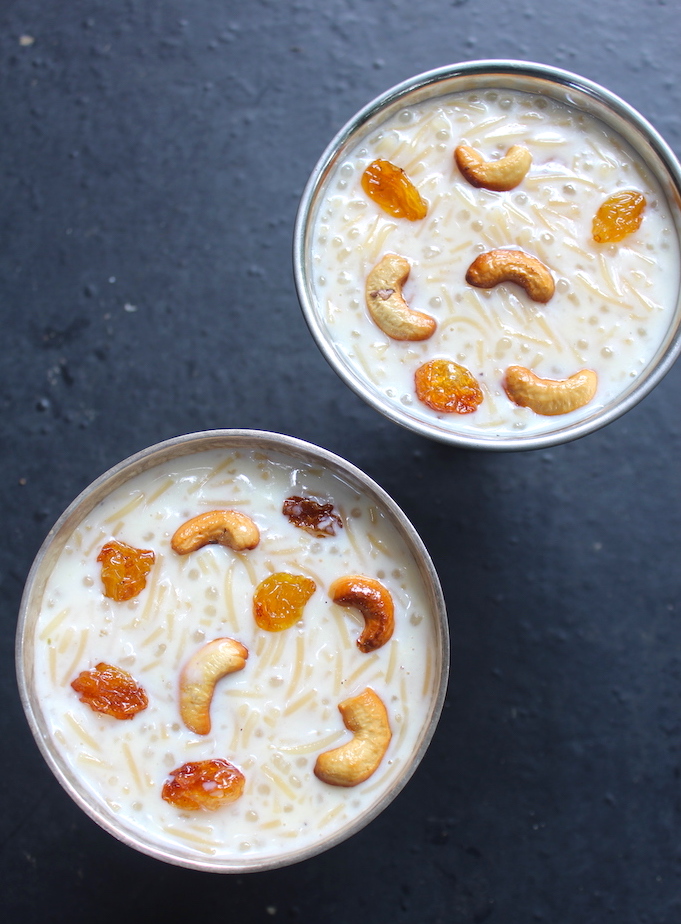
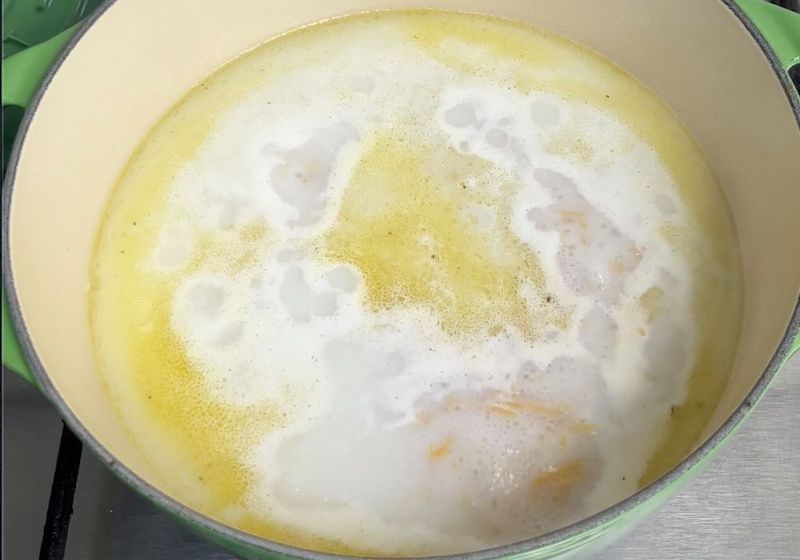
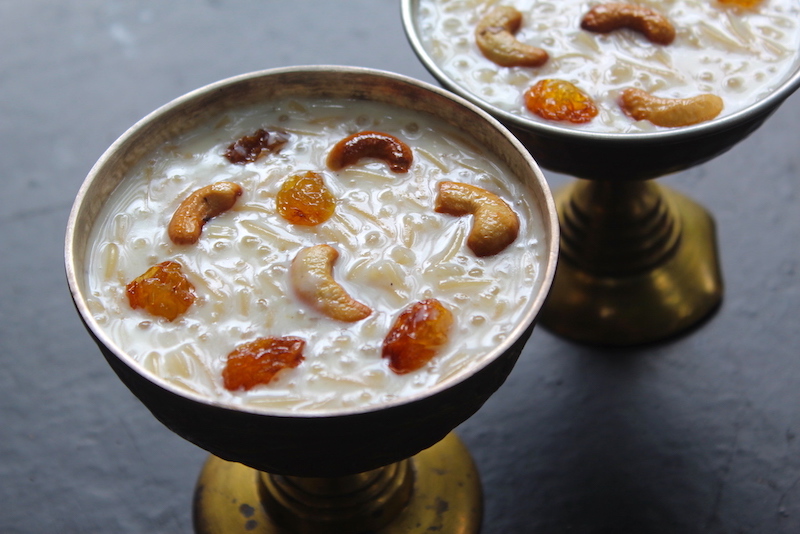
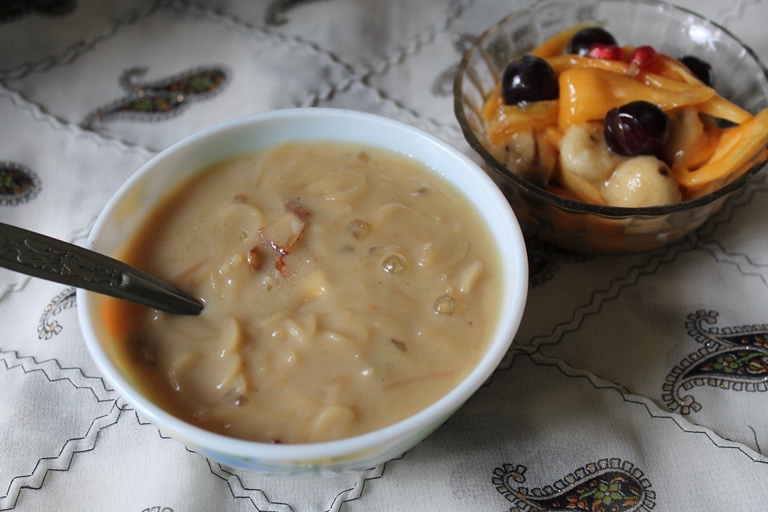
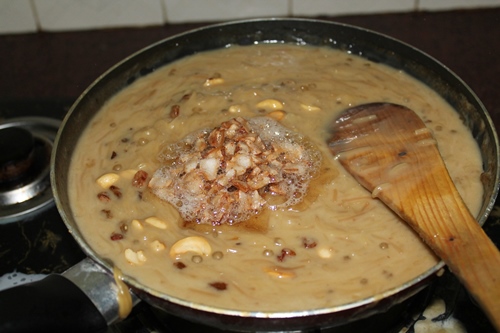
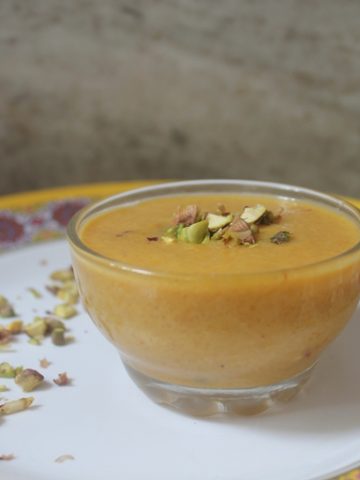
14)Semiya payasam is ready to serve. Payasam tends to get thicker as it cools, you can adjust the consistency with some hot milk.
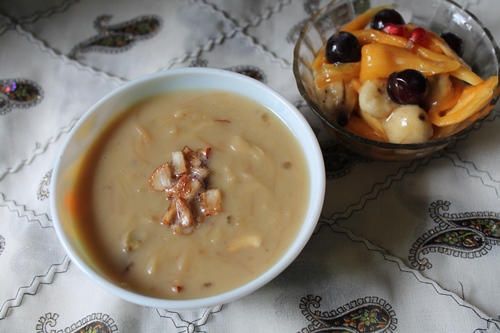
15)Serve.
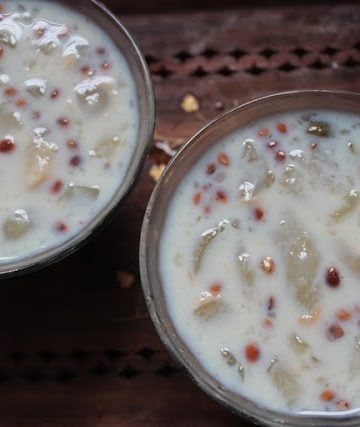
Semiya Payasam Recipe with Jaggery
Semiya Payasam is one of the staple dish which we make for every occasions. Traditionally it is made with milk, sugar. One of my friend brought this version of payasam made with jaggery and coconut milk to work. We all loved it. So here is my take on semiya payasam made with jaggery.
Ingredients
- 1 cup Semiya | Vermicelli
- 2 tablespoon Sago
- 2 cup Coconut Milk (second extract)
- 1 cup Coconut Milk (first extract)
- 1 cup Jaggery
- 2 tablespoon Ghee
- 2 tablespoon Cashews
- 2 tablespoon Sultanas
- 3 tablespoon Coconut chopped into small pieces
- 1 teaspoon Cardamom Powder
- 2 cups Water
How to Make Payasam with Jaggery
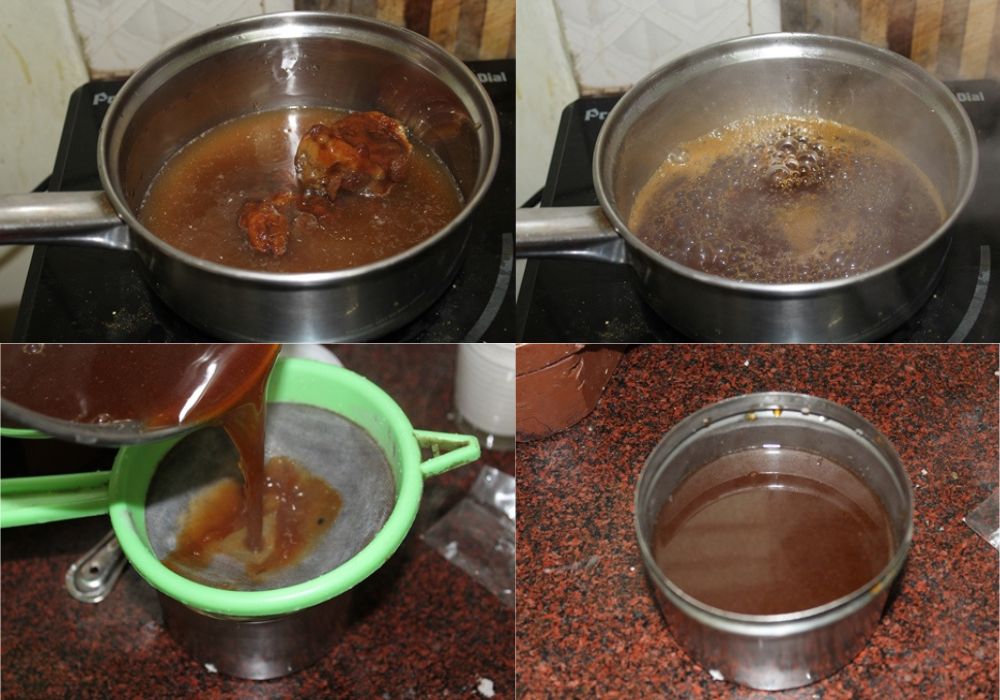
1)Make jaggery syrup. Take jaggery and 1 cup of water in a sauce pan and melt it. Once it is melted, strain it through a sieve. Set aside till use.
2)Now heat 1 tablespoon of ghee. Fry cashews and raisins till golden. Remove them to a plate and set aside. In the same ghee fry the coconut pieces till golden. Once it reaches golden. Set aside.

3)Heat 1 teaspoon of ghee in a pan. Add in semiya and sago. roast this for 3 minutes till golden brown.
4)Meanwhile boil 3 cups of water. Once it reaches boil. Pour this water in the semiya mixture and mix well. Cook for 10 to 15 minutes till semiya and sago is cooked completely.
5)Semiya and sago will be cooked in 15 minutes. vermicelli should be cooked, sago should look trasparent. Add more boiling water if needed.
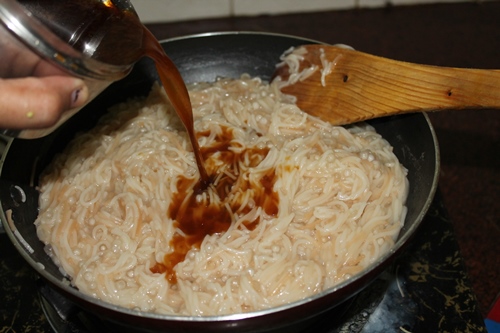
6)Now add in jaggery water and mix well. I like to cook the jaggery with the semiya for at least 6 to 10 minutes. This step caramelise the jaggery and make this payasam more tasty and rich.
7)Now Pour in thin coconut milk. This is the second extract of coconut milk. You can boil this with jaggery. Once coconut milk is mixed bring everything to a boil.
8)Finally Add in cardamom powder and switch off the flame.
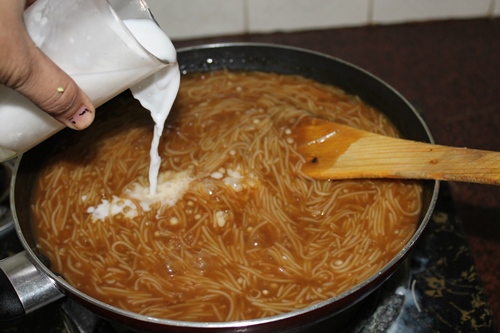
9)Now turn off the heat and add in thick coconut milk and mix well. You should never boil the payasam once first extract of coconut milk is added. Else it may curdle.
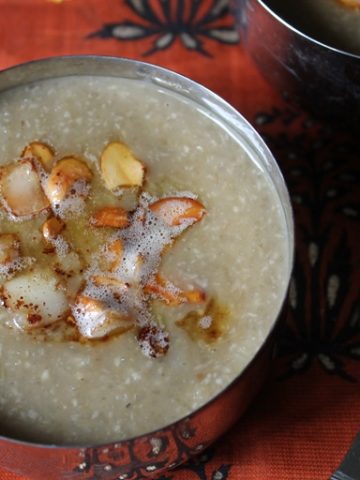
10)Finally add in fried cashews and raisins.
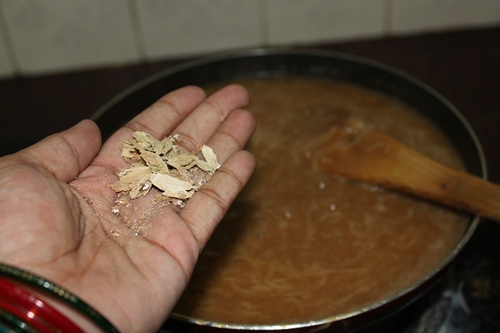
11)Add in fried coconut with the ghee.
12)Mix well and serve.
How to Make Semiya Payasam in Instant Pot
- Set saute mode in instant pot. Pour in 3 tablespoon ghee, add cashews and fry till golden. Once cashews get golden, add raisin and fry for few seconds. Remove it to a bowl and set aside.
- Now in the same ghee add in ½ cup semiya and 3 tablespoon sago. Roast till golden.
- Pour in 4 cups milk. Add in ½ cup sugar and mix well. Now press cancel and cover the instant pot with lid.
- Set the instant pot to pressure cook mode and set pressure cook for 3 minutes. Make sure instant pot pressure vent is set to seal.
- Once cooked, wait for the pressure to release naturally for 5 minutes. Manually release the pressure.
- Open the instant pot. mix everything gently. Add in ¼ cup condensed milk, ½ teaspoon cardamom powder, fried nuts and raisins and mix well. Switch off the instant pot and let it rest.
- Set aside for 10 minutes and serve.
Expert Tips & Troubleshooting
Roasting Semiya
This is the most important and essential step in making semiya payasam. If you are using un roasted semiya, take your time to roast in a pan till golden brown.
Semiya getting burnt when roasting - if you are using un roasted semiya, some may face issue of semiya getting burnt. Use a wide frying pan instead of a kadai for roasting. Keep cooking on low heat and roast gently till golden brown.
Cooking semiya in milk or water
When cooking semiya and sago, I prefer to use water and little milk added. This way I can control the texture of the payasam. Sometimes cooking semiya in milk might result in curdled texture if not monitored properly.
Sweetener & Condensed Milk
quantity of sugar can be reduced or increased as per your taste. I find using ½ cup of sugar and ¼ cup of sweetened condensed milk result in perfect balance of sweetness in payasam.
I strongly recommend to use condensed milk for more richer and milky tasting payasam.
Consistency
Payasam tends to get thicker as it cools down. I always have another 2 to 3 cups of milk on hand whenever I make payasam. I add more hot milk to my payasam if it gets thick.
For Vegan Version
I find using coconut milk for regular milk is perfect substitute than other dairy free milk. Check my recipe below for semiya payasam using coconut milk.
Storage & Serving
Payasam is best served hot or warm. Traditionally in South Indian marriage functions paal payasam is served hot with pural poli, sweet boondi, papadum and banana.
If you want to serve it chilled, once cooled store in fridge for few hours and serve cold. you can even portion it between individual serving bowls and refrigerate for few hours before serving.
Any leftover cooked payasam can be stored in an air tight container in fridge upto 4 to 5 days. When serving, reheat in a sauce pan till it is hot again, add more milk if needed. Optionally you can reheat it in microwave for a minute.
📖 Get Recipe
Semiya Payasam Recipe | Vermicelli Kheer
Equipment
Ingredients
Semiya Payasam
- ½ cup Vermicelli
- 3 tablespoon Sago | Sabudana (javarisi)
- 2 cups Water
- 1 litre Milk
- ½ cup Sugar
- ¼ cup Sweetened Condensed Milk (milkmaid)
- 3 tablespoon Ghee
- 4 tablespoon Cashews
- 4 tablespoon Kishmish (golden raisins)
- ½ teaspoon Cardamom powder
Instructions
How to Make Semiya Payasam
- Heat ghee in a frying pan. Add in cashews and fry till light golden. Once cashews get golden, add in kishmish (golden raisins) and fry for few seconds. Now both cashews and raisins is golden brown. Remove them to a bowl and set aside.
- Now in the same ghee, add in vermicelli and sago. I used roasted vermicelli, so roasted only for couple of minutes. If you are using un roasted then roast till golden brown in colour. Remove this and set aside.
- Meanwhile bring 1 litre milk to a full boil. The milk has to stay hot when you add it to the payasam.
- In another pot, take 2 cups water and ½ cup milk. Bring it to a full boil. Once milk and water starts to boil. Add in roasted vermicelli and sago mixture in. Mix it really well and continue cooking till sago and vermicelli gets cooked. Keep stirring in between to prevent semiya sticking to the bottom of the pan.
- After 15 to 20 minutes of cooking on a low flame. Semiya and sago is completely cooked. Sago will look translucent in colour and semiya will be soft if you press them with your fingers.
- Now add in sugar to taste. The amount of sugar totally depends to your taste. You can add more or less as per taste. Mix sugar into the cooked semiya. Once sugar is mixed into the semiya it will start to melt and gets thick. I like to cook sugar with semiya for at least 2 minutes.
- Now pour in your hot milk into the semiya sugar mixture. You have to use hot milk at this stage. If you add cold milk or room temperature milk into the hot semiya and sugar mixture, it may curdle. Once milk is added, mix well and cook together for 3 to 5 minutes.
- Now pour in milkmaid or sweetened condensed milk. this adds richness and gives you restaurant and wedding style taste to your payasam. if you want to skip, you can.
- Now for flavourings add in ground cardamom powder. You can use a pinch of saffron at this point too. Add in fried cashews and raisins and mix.
- Semiya payasam is ready to serve. Payasam tends to get thicker as it cools, you can adjust the consistency with some hot milk.
Video

Notes
- Roast semiya really well in ghee till golden for flavour.
- Even though I use roasted variety, I roast it again for 2 minutes to increase taste.
- Taste and adjust more sugar if needed.
- A pinch of saffron can be used.
- If your payasam gets too thick once cooled, add more hot milk and adjust the consistency.
Nutrition
Tried this Recipe
Mention @yummytummyaarthi or tag #yummytummyaarthi!f you have any questions not covered in this post and if you need help, leave me a comment or mail me @aarthi198689@gmail.com and I'll help as soon as I can.
Follow me on Instagram, Facebook,Pinterest ,Youtube and Twitter for more Yummy Tummy inspiration.
IF YOU MAKE THIS RECIPE OR ANYTHING FROM YUMMY TUMMY, MAKE SURE TO POST IT AND TAG ME SO I CAN SEE ALL OF YOUR CREATIONS!! #YUMMYTUMMYAARTHI AND @YUMMYTUMMYAARTHI ON INSTAGRAM!


Chitra
lovely paal payasam ....all time fav...
Priya (Yallapantula) Mitharwal
Looks perfect !!!
Hasna
hats off to ur effort!! step by step pix r rlly helpful to many,,,,
Premalatha Aravindhan
wow delicious payasam,luks yum...
Anonymous
dear aarthi, is vermicelli/semiya flour noodles? i can't find anything called semiya or vermicelli in the supermarkets except for the vermicelli noodles.Is it the noodles you mean?? Thanks in advance 🙂
Aarthi
@Anonymous Yes u can use that too. But dont buy rice vermicilli noodles.
Anonymous
in the pic javarusi s present bt u didnt add it .y
Aarthi
@AnonymousThe above final picture is a updated one..
Mumtaz begum
Omg.... Its sooooo awesome... My hubby loved it tha way. Thank u so much...
Mumtaz begum
Omg... It was awesome... My hubby loved this.... Thank u so much....
▓●•ܔܢܜܔMaHa▓●•ܔܢܜܔ
Aartthi akka its awsome, delicious dish loved it akka
Anonymous
Hi aarthi , can we use any substitute to condensed milk ??
bhommi
Good Morning Mam...
Today I tried this recipe...
Superb...
Evangelin
Hi Aarthi,
I replaced white sugar with Jaggery but the milk curdled. Do u have any idea why? Is there any better replacement for white sugar
Sheba
Hi Aarati Mam , many a times it becomes payasam becomes soft after sometimes like smashed ..What needs to be done
Aarthi
Don't over cook semiya. also add sugar if you find semiya getting mushy.