
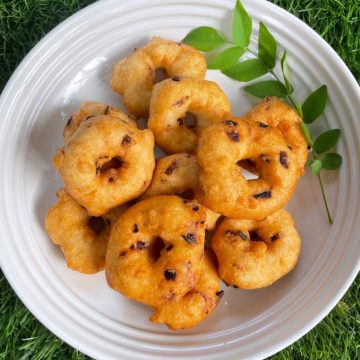
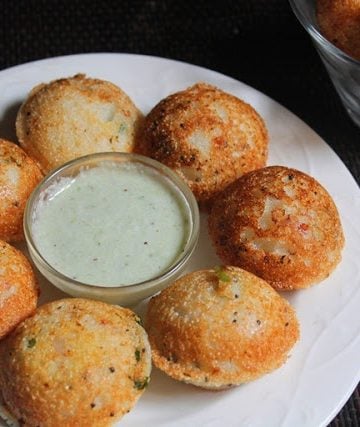
Medu Vada Recipe, Indian crispy doughnut shaped dal fritters. Most popular South Indian snack made with whole urad dal which is soaked and ground into a batter. Vada batter is flavoured with onions, chillies, curry leaves, ginger and asafoetida. It is shaped and fried which turn out crispy on the outside and fluffy inside. Serve it with coconut chutney or make Sambar vada, you are in for a treat.
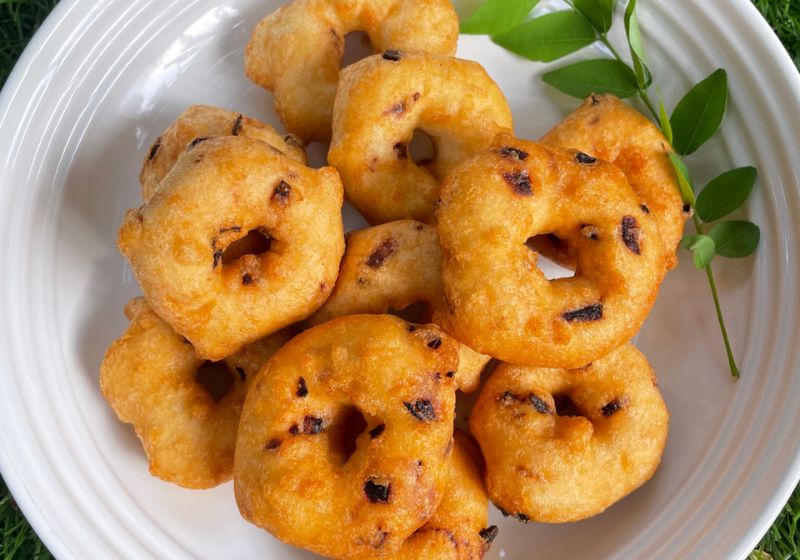
Medu Vada (Ulundu Vadai)
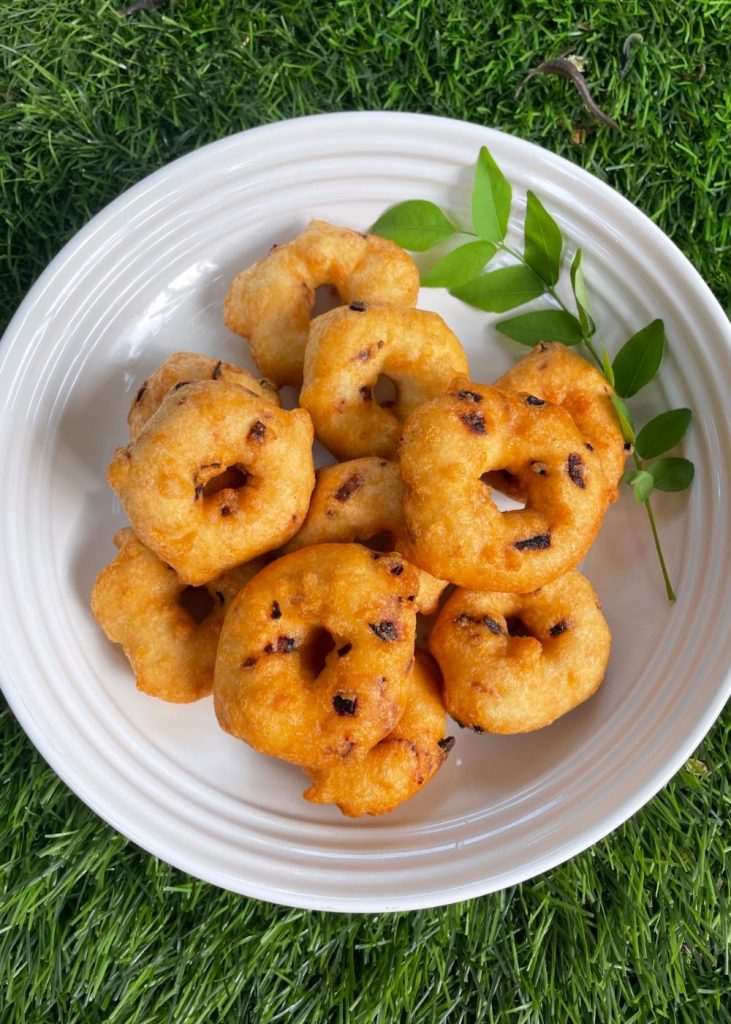
Vadai is my favourite evening snacks. These medu vadai is so crispy on the outside but wicked fluffy in the centre. Dipping this in chutney and sambar is heavenly. I love it with hot idli, sambar and chutney.
We make this combo often mainly during weekends. We often make this at home and if there is any special occasion in our house, then this is the one of which occupies the table.
Everyone think that this is complicated , but I can tell you that it is so easy peasy..The trick in this is you should grind the urad dal mixture till it is fluffy and smooth, but add very less water so that you will be able to shape it properly.
What is Medu vada (Ulundu vadai)
Medu vada batter is flavoured with onions, green chillies, curry leaves, ginger, chopped carrots and coriander leaves.
If you are making this for special occasions like ganesh chaturthi, janmashtami (Neivedyam) you can skip the addition of onions in the batter.
Instead add crushed black pepper and jeera (cumin seeds) along with curry leaves, asafoetida and green chillies. Sometimes I add lots of chopped cabbage in the batter to make cabbage vada.
Another tricky part in the making of Medu vada is getting the shape right. I have shared three methods of shaping Medu vada. Follow my method to get perfect round medu vada all the time without the use of vada maker.
Similar Recipes
About Medu Vada
Medu vada is also called as ulundu vadai or uddina vada recipe. This is a crispy and spongy urad dal donut shaped fritters. Often called as indian donuts.
This recipe involves three simple steps. Soaking dal, grinding them and frying them till crisp and fluffy. The key to a crispy medu vada is a fluffy batter. I have shared all my tips to get fluffy batter in this post.
Traditionally vadai batter is ground using stone grinder called as "ural" . But you can make it easily at home using wet grinder or mixer grinder. I have shared both recipes in the recipe card of medu vada.
Medu Vada Ingredients
- Urad dal - Black gram (urad dal) is used in the making of medu vada. Urad dal is made into thick fluffy batter and fried in donut shape.
- Onions - Medu vada batter is flavoured with onions, green chillies, curry leaves, ginger, chopped carrots and coriander leaves. If you are making this for special occasions like ganesh chaturthi, janmashtami (Neivedyam) you can skip the addition of onions in the batter. Instead add crushed black pepper and jeera (cumin seeds) along with curry leaves, asafoetida and green chillies.
- Green Chillies - chillies is purely used for the spice. You can add or even skip adding green chillies.
- Ginger - adds nice flavour to the vada. Since it is deep fried it even helps with the digestion
- Asafoetida - most important flavouring also helps with digestion.
Step by Step Pictures
Pre-Preparation
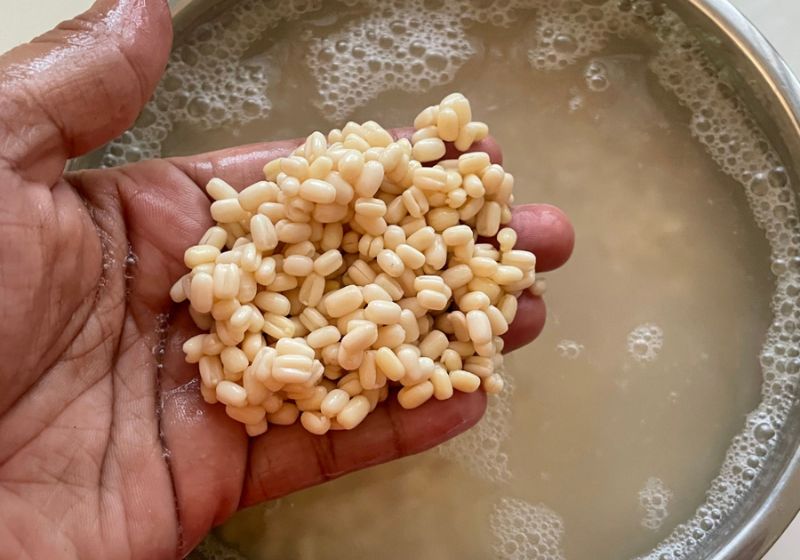
1)First let's prepare the batter for medu vada. Soak Urad dal for 2 to 3 hours.
Vada Batter Preparation
2)Now drain it and add it to a blender. If you have small blender jar grind it in two batches. Make sure that you drain your dal properly. Vada batter shouldn't have too much liquid else the batter will get loose and runny. Add few teaspoon of water when grinding Urad dal. Don't add too much water.
The batter has to be thick. Grind the urad dal till it is completely ground. It will take around 2 mins. Make sure you scrape the batter in-between using a spatula for even grinding.
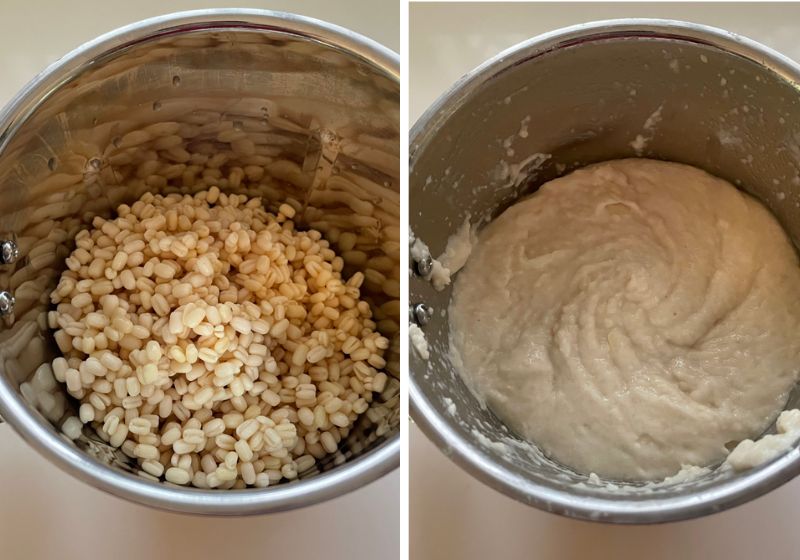
3)Transfer the batter to a mixing bowl. The batter has to be pretty thick at this point.
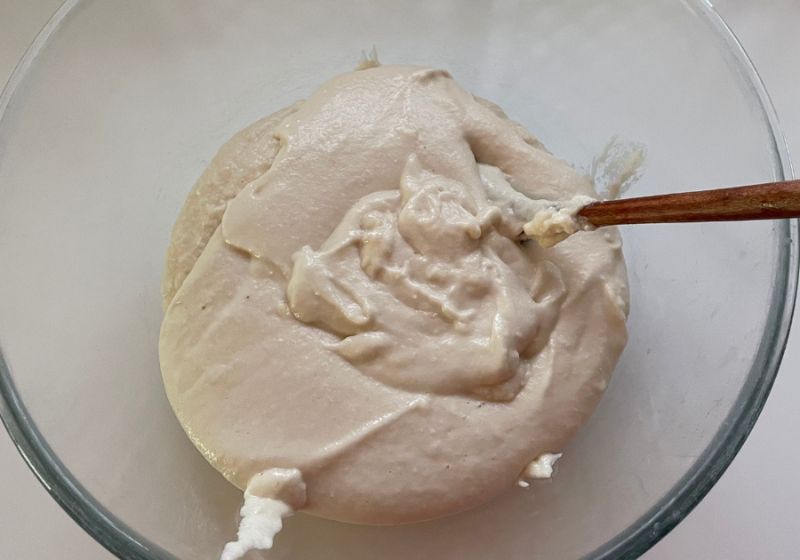
4)Now you have to incorporate air into the batter to lighten it. Use a wooden spoon or a whisk to whip some air into the batter. It will take around 5 to 8 mins. You can use your hands to whip some air into the batter. The more you whip your batter the more airy your medu vada batter becomes. This will give you crisp and soft vada.
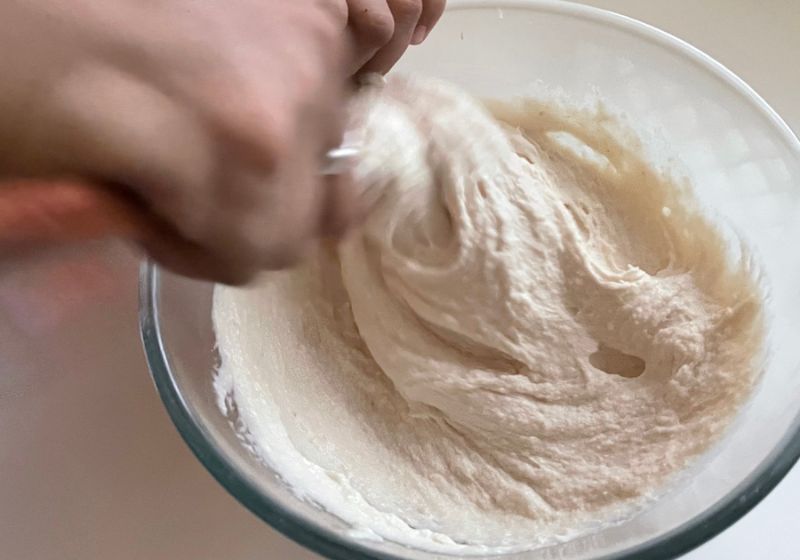
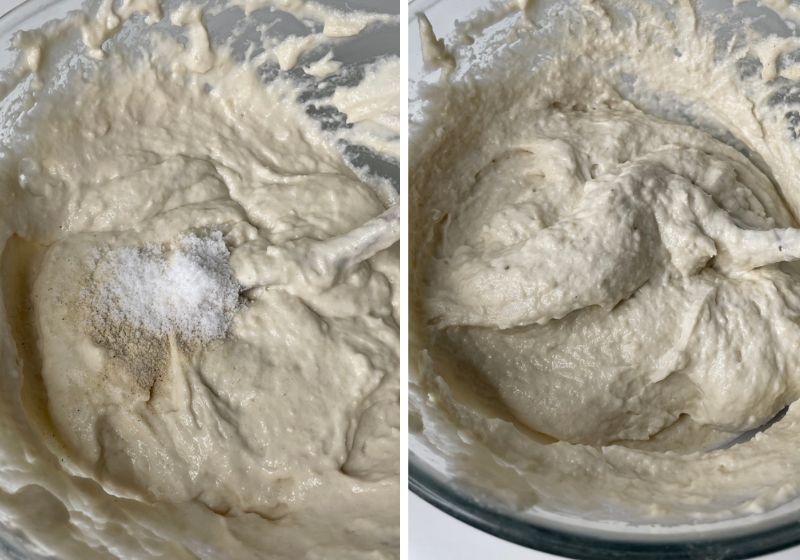
5)The batter is fluffy. This whisking step takes around 4 to 5 minutes of whipping air into it. You can use a electric beater for easy mixing.
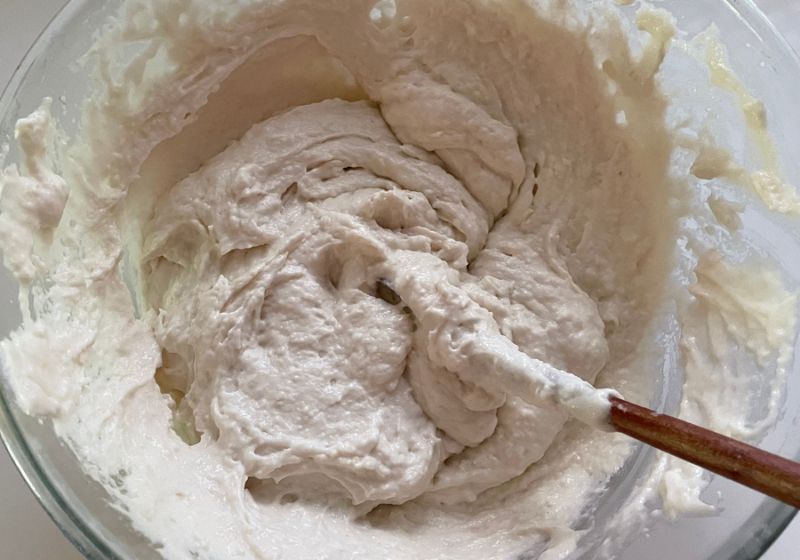
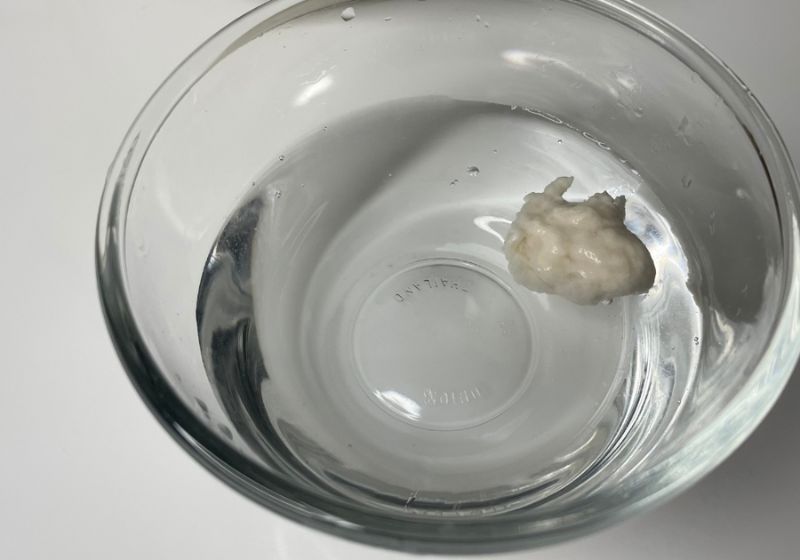
6)To make sure the batter is ready, do the float test. Take small portion of the batter and drop in a bowl of cold water. It has to float. If it floats then the batter is light.
7)Add in asafoetida and salt into the vada batter and mix it really well.
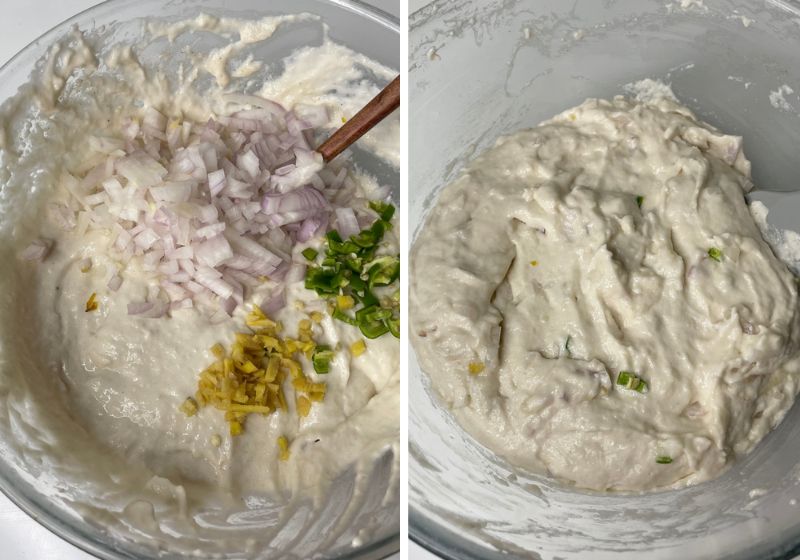
8)Mean while prepare the vegetables which we are going to add into the batter. You have to finely chop onions, green chillies, ginger and curry leaves. You could even add finely chopped carrots and coriander leaves. Add this vegetables along with salt, asafoetida into the batter and mix well. Scrape the sides of the bowl with a spatula and set aside.
Shaping Medu Vada
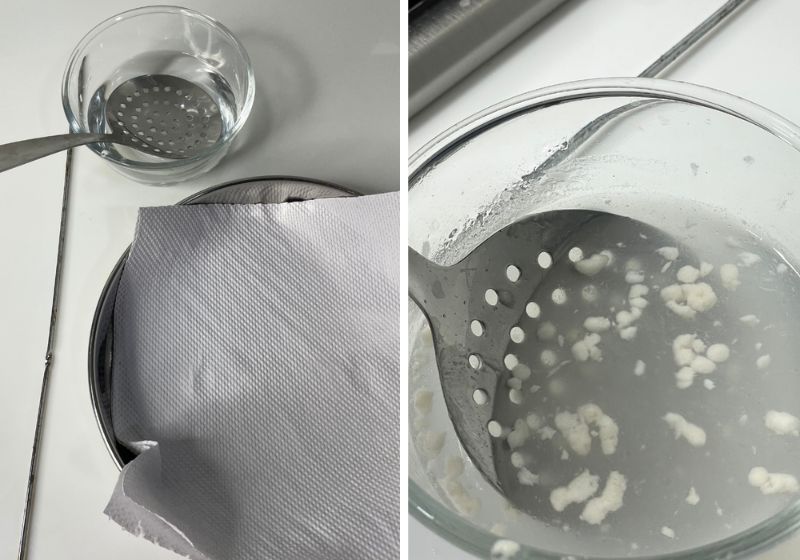
9)These are ingredients which you need. You need a slotted spoon dipped in a bowl of water. Paper towel lined plate for the keeping the fried vada. A skewer to remove the vada from oil.
Now for shaping vada, I am using a slotted spoon. You can use a metal tea strainer as well. Dip your slotted spoon in water. Shake off any excess water.
10)Wet your hands with water. Take small portion of batter in your hands. Place it on the slotted spoon. make hole in the centre.
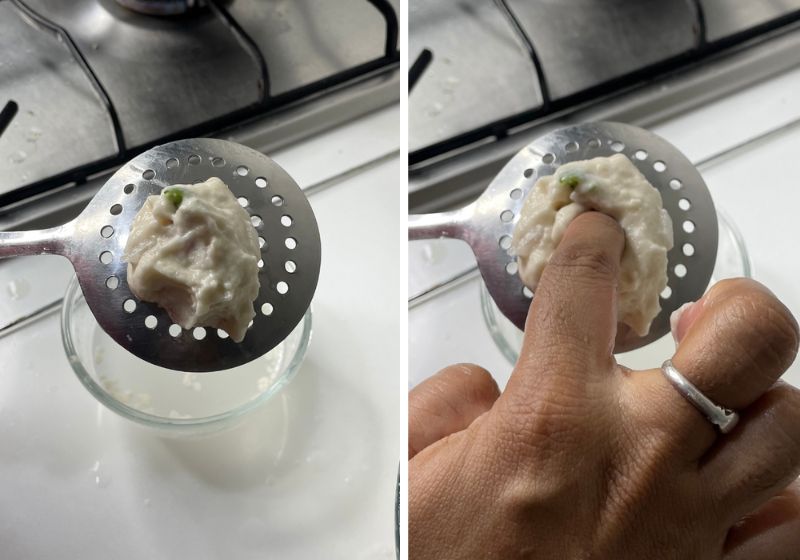
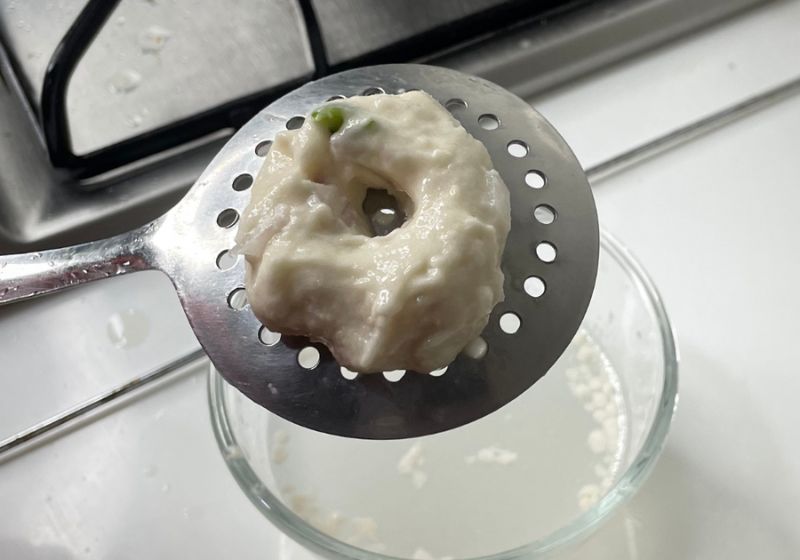
11)Vada is perfect shaped now.
Frying Medu Vada
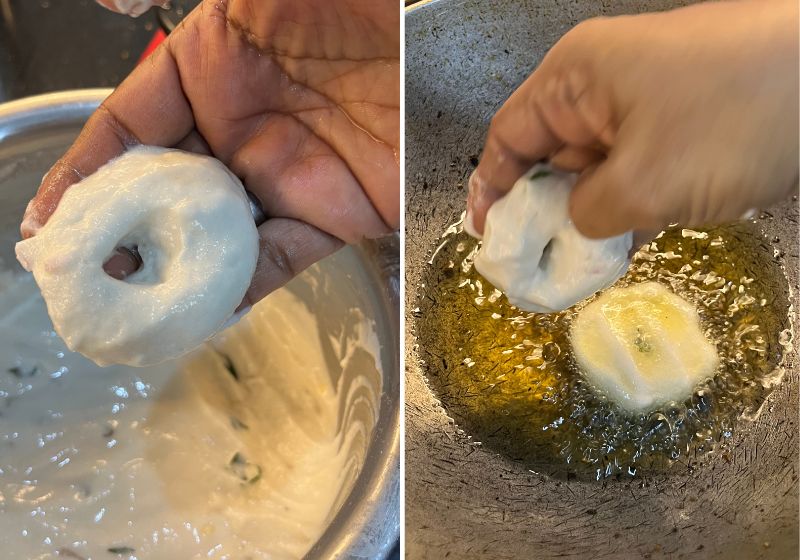
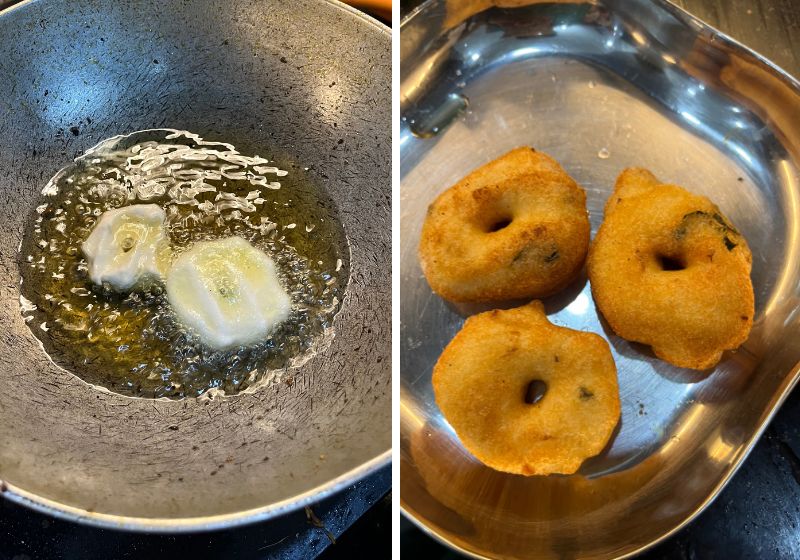
12)Drop the vada in hot oil using the spoon. The vada will slide into the oil since we have made the batter thick.
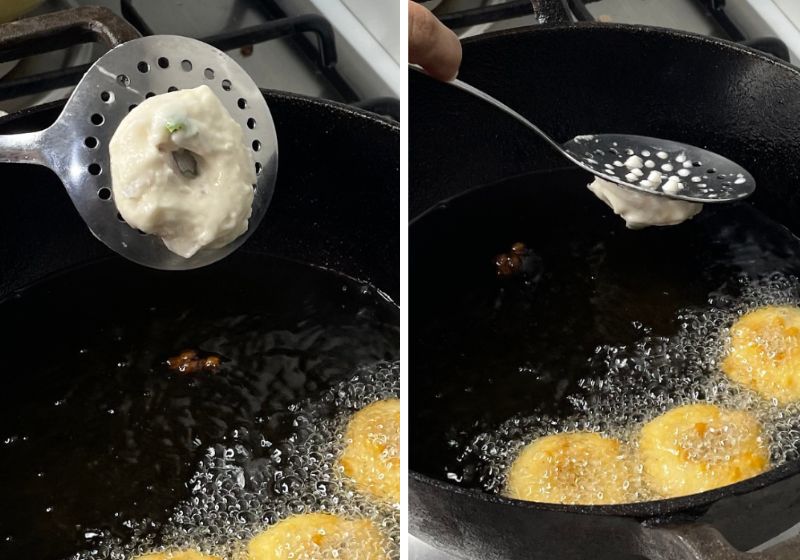
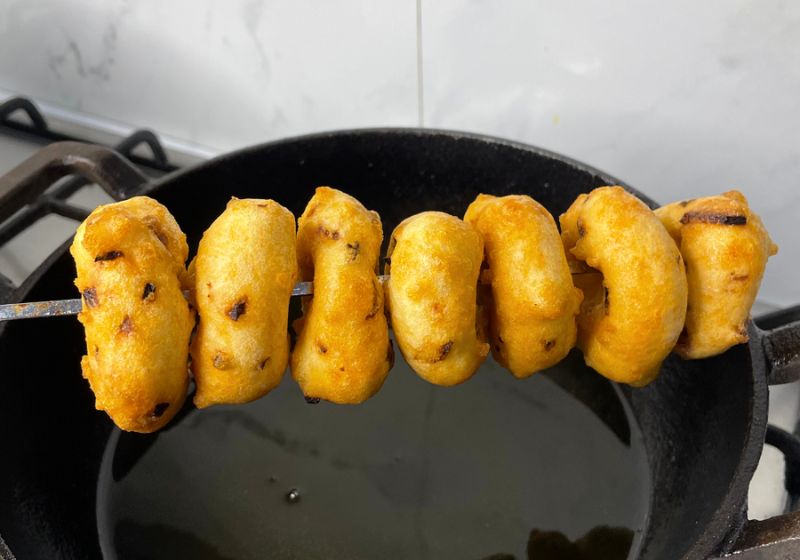
13)Fry the vada on medium to high heat till it gets golden and crispy. Keep cooking flipping often using a skewer or a steel rod. Fry till golden and crispy.
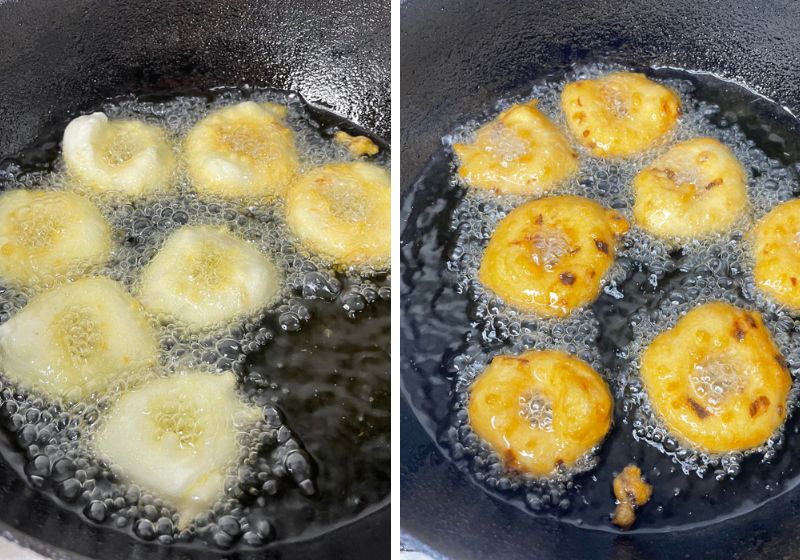
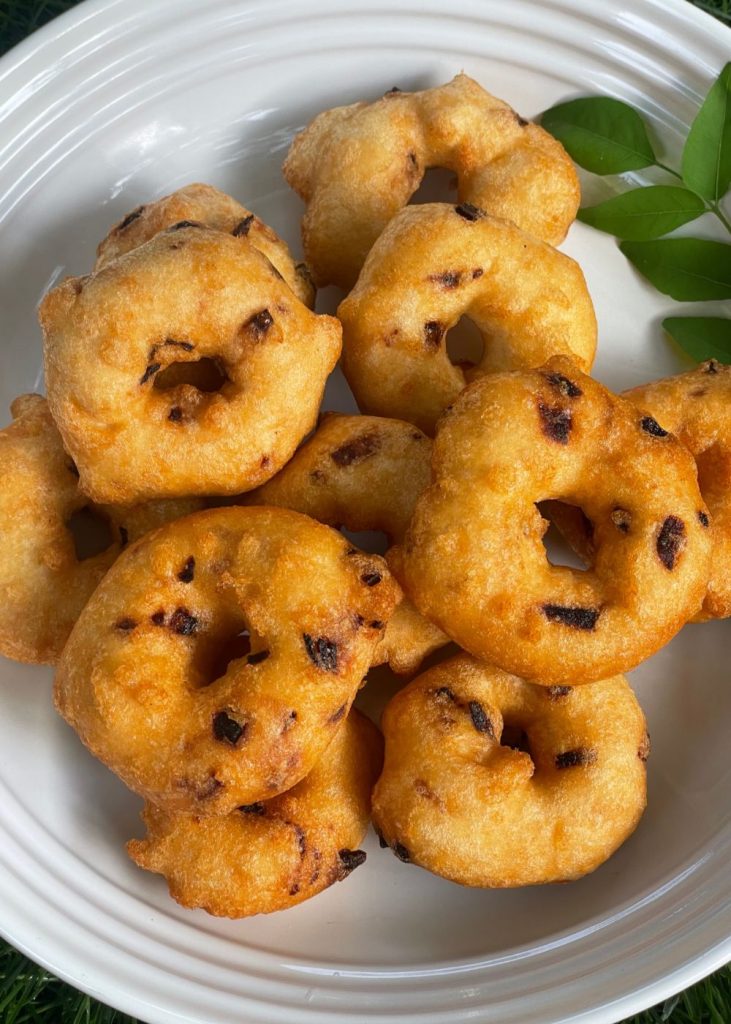
19)Once golden brown, strain the vada from oil and serve hot with chutney.
How to Shape Medu Vada using Banana Leaf or Plastic Wrap
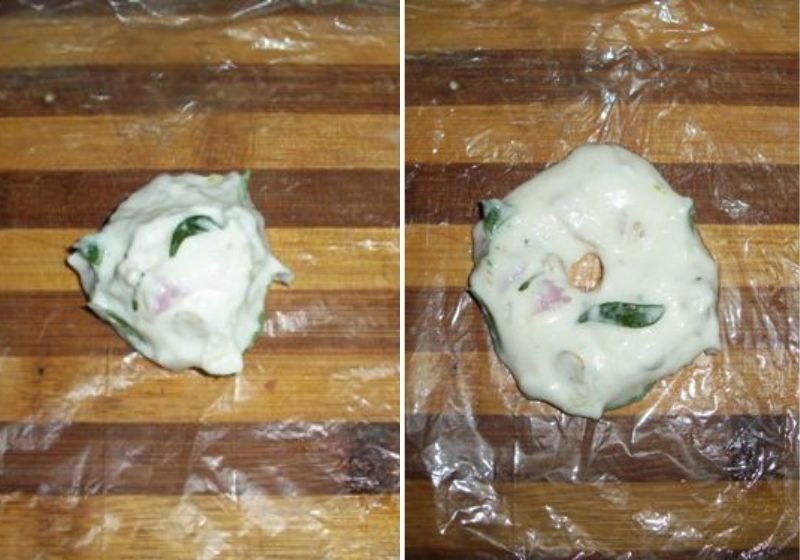
1)Using banana leaf or plastic wrap. Grease the leaf or plastic paper with some oil. Wet your hands with some water. Take small portion of the batter and place it on the banana leaf. Make a hold in the centre. Now gently drop the vada in oil with the help of the banana leaf. The vada will slide into the oil since we have made the batter thick.
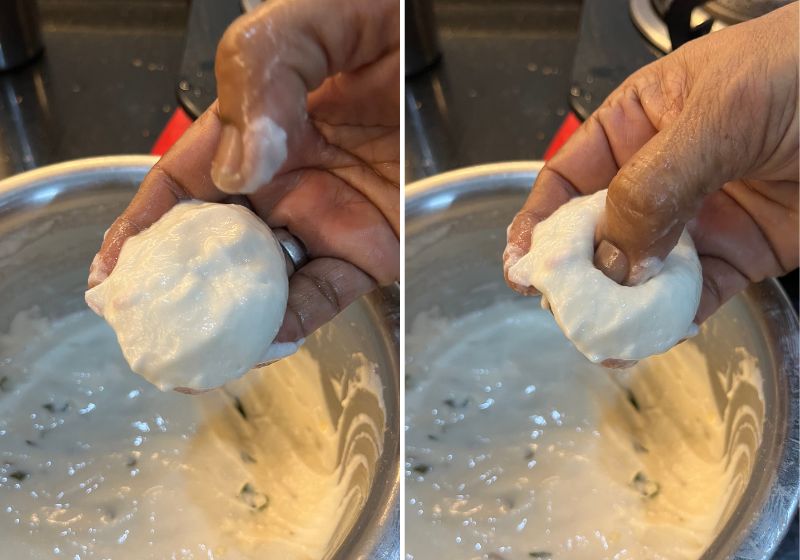
How to Shape Medu Vada Using Hands
Using your hands. If your batter is thick and fluffy. You can easily shape medu vada with your hands. Wet your hands with water. Take small portion of batter in your hands, make holes in the centre. Drop it gently in oil. Make sure you drop it gently.
Expert Tips
Vada batter Consistency - If your vada batter gets runny, you can add a little bit of rice flour or sooji, or all purpose flour to get it thicker. You can try storing in fridge to firm up a bit.
If your vada batter gets runny, you can add a little bit of rice flour or sooji, or all purpose flour to get it thicker. You can try storing in fridge to firm up a bit.
For Super Crispy Vada - Medu vada batter has to be made fluffy. if you want super crispy vada, try adding a pinch of baking soda to the batter. Baking soda helps medu vada turn crispier.
Too much oil - If your medu vada drinks too much oil. Try adding some all purpose flour to it. this tip reduces the oil consumption.
Serving & Storage
Medu vada is served with Coconut chutney and Sambar.
Cooked Medu vada can be frozen in a ziploc cover upto a week. Frozen medu vada is thawed and refried in oil to make fresh and crispy vada.
Leftover vada batter can be stored in fridge. Remove the vada batter 1 hour before frying to bring it back to room temperature.
FAQ
Medu vada is called as black gram donut fritters or indian donuts, indian donut fritter.
One medu vada containes 73 calories. If it is served with chutney or sambar, the calorie count will add up.
If your medu vada drinks too much oil. Try adding some all purpose flour to it. this tip reduces the oil consumption.
Yes leftover vada batter can be stored in fridge. Bring back to room temp before frying.
Urad dal needs 2 to 3 hours of soaking. Soak urad dal in hot water. Hot water reduces the soaking time. Soaking in warm to hot water for just 1 hour equals to 3 hours of soaking. Don't over soak else it may affect the texture.
Cooked Medu vada can be frozen in a ziploc cover upto a week. Frozen medu vada is thawed and refried in oil to make fresh and crispy vada.
Fry vada in medium temperature for a longer period will make the vada stay crisp longer. Adding pinch of baking soda helps in crispy medu vada.
📖 Get Recipe
Medu Vada Recipe (Ulundu Vadai, Garelu)
Equipment
Ingredients
- 2 cups Whole Urad Dal
- 1 large Onion finely chopped
- 3 Green Chilli finely chopped
- 1 tablespoon Ginger finely chopped
- ½ teaspoon Asafoetida
- Curry leaves finely chopped
- Salt to taste
- Oil for deep frying
Instructions
- Medu Vada Batter Grinding - Soak Urad dal for 2 to 3 hours. Now drain it and add it to a blender. If you have small blender jar grind it in two batches. Make sure that you drain your dal properly. Vada batter shouldn't have too much liquid else the batter will get loose and runny. Add few teaspoon of water when grinding Urad dal. Don't add too much water.
- The batter has to be thick. Grind the urad dal till it is completely ground. It will take around 2 mins. Make sure you scrape the batter in-between using a spatula for even grinding. Transfer the batter to a mixing bowl.
- Fluffy Vada Batter - Now you have to incorporate air into the batter to lighten it. Use a wooden spoon or a whisk to whip some air into the batter. It will take around 5 to 8 mins.
- You can use your hands to whip some air into the batter. The more you whip your batter the more airy your medu vada batter becomes. This will give you crisp and soft vada.
- Vada Batter Preparation- Mean while prepare the vegetables which we are going to add into the batter. You have to finely chop onions, green chillies, ginger and curry leaves.
- You could even add finely chopped carrots and coriander leaves. Add this vegetables along with salt, asafoetida into the batter and mix well. Scrape the sides of the bowl with a spatula and set aside.
- Heat oil - Now heat oil for deep frying. You can use refined oil, ground nut oil, vegetable oil for frying. Let the oil heat well before you drop the vadai in.
- Shaping of vada - Dip your slotted spoon in water. Shake off any excess water. Wet your hands with water. Take small portion of batter in your hands.Place it on the slotted spoon. make hole in the centre. Drop the vada in hot oil using the spoon. The vada will slide into the oil since we have made the batter thick.
- Frying Medu Vada - Fry the vada on medium to high heat till it gets golden and crispy. Keep cooking flipping often using a skewer or a steel rod. Fry till golden and crispy. Drain and serve hot with chutney.
Video

Notes
- Adding pinch of baking soda helps in crispy medu vada.
- Soak urad dal in hot water. Hot water reduces the soaking time.
- Don't add too much water when grinding the batter. Just sprinkle water when grinding.
- Soak urad dal for 2 to 3 hours. Don't over soak else it may affect the texture.
- Grind vada batter in wet grinder will give you more thicker batter.
Nutrition
Tried this Recipe
Mention @yummytummyaarthi or tag #yummytummyaarthi!If you have any questions not covered in this post and if you need help, leave me a comment or mail me @aarthi198689@gmail.com and I'll help as soon as I can.
Follow me on Instagram, Facebook,Pinterest ,Youtube and Twitter for more Yummy Tummy inspiration.


faseela
drooling here....my fav...
Tina
Crispy and delicious vada..
maha
vadas looking so crispy n hot yaar...tastes best vth coco chutney
Mélange
Perfectly made Aarthi..I love them.
Hema
Crispy and soft vadas, very tempting..
ramya anand
OMG!!Looks crispy and tempting
Anu
Tempting vadas.
Only Fish Recipes
wow...drooling here....i love this very much 🙂
Shri
Perfect Arathi; very tempting!
DivyaGCP
Vadais looks perfect and delicious. For me getting the shape is the very difficult part.
Sensible Vegetarian
All time favorite, looks awesome.
Deeksha
super yummy vadas. irresistible!
Prabhamani
Me too like this Vadai a lot..You know what i wont get perfect shaped vadais when i grind the batter in mixer..wondering how you got a perfect shape!!
The Pumpkin Farm
u r on rol,l, lovely vadas
Richa
perfect vadas.. been so long since i had a good one!
Deeps @ Naughty Curry
wow! they have come out perfectly
Indulge
Lovely.. MY son has been asking me to make these with holes in them.. thanks for the share.
Love Ash.
Rujuta
Vadas look great
Gayathri Anand
Perfect made ..Looks so crispy and my fav.
Ruchikoottu
looks nice..liked your step by step instructions too...following you.. 🙂
Sujitha Rajagopal
I tried this vadai today n it turned up very well.. very crispy n delicious.. tq for the recipe 🙂
ktsue
This looks so delicious Aarthi! I have a question: in the recipe it says to soak the dal for 2-3 hours, but underneath the photo it says to soak for 4 hours. Which is best? I can't wait to try this!
Mona Arumugam
I tried Medu vada today, come up very well & very tasty too...Thank u
Pravina Parikh
Thank you for posting yummy and
Mouth watering recipe
Ghaniemah
Which rice? Idly rice or pachari(white rice)?
Aarthi
@GhaniemahIt is regular cooking rice, white rice
khadhija
Hi art hi vada looks so tempting..but if I grind d batter in blender it won't come gud..but in grinder it comes nice..what's d reason...
Aarthi
@khadhijawhen you grind urad dal in blender, grind till it is fluffy. That gives soft and crispy vada
bhavini heniya
Hi aarthi can u tell me urad dal measurement in cups....I have tried many of ur recipes n they turned out to amazing...n specially ur making understanding in detail every time with writeup n pics....Thanks dear...plz reply me soon as I want to make it today itself
Aarthi
@bhavini heniyaIt is around 2 cups
Sumi
Hi aarthi, should I use raw rice or boiled rice... Paccha arisi or puzhungal arisi
Aarthi
@SumiIt is normal cooking rice, puzhugal arisi
KRITI KOTHARI
I made vada today with coconut chutney. It turned out great. Tomorrow I m gng to try ur strawberry icecream but using pineapple
Anonymous
Do we need to ferment the batter after grinding
Aarthi
@Anonymousno need to ferment
Wajeeha
Hi Arthi,there is no need to use of baking soda or baking powder
Aarthi
@Wajeehano need for those
Sarah Gul
Hi,
I really like your recipes, they are easy and mouthwatering, and also try some of them i.e potato smiley, chicken crocates, badusha, mango cake etc. Now I want to make Idli and Dosa, but I've a problem, here in my city I couldn't find whole white Urad dal, please tell me can I use split urad dal instead of whole dal?
Aarthi
@Sarah Gulyes u can use split urad dal
karunyaraj
Hi aarthi Iam viewing your blog in my iPad, continuously it's getting loaded and is can't able to read ur recipes please do check it.
Devaki
Hi.. It is awesome. I tried it today. Im preparing vada for first time. It has come out really well. My husband liked it 🙂
Fouzul Farwina
can i use urad flour instead of grain? if can how long we have to ferrment it?
Aarthi
@Fouzul Farwinanot sure about using powdered urad dal
Ranjini
Hi dear sis I love ur blog so much today I tried medu vada I was a great hit in breakfast am really happy I feed my family really good thanks for ur wonderful recipes
Anonymous
Hi Aarthi. Can you please tell me, if I can prepare the batter a day earlier and refrigerate it and use it next day morning? Thank you
Unknown
I have the same doubt .please reply.
Aarthi
it is best to make the batter fresh. But if you cannot, just make it and store in a air tight container in fridge
Sophie
Hello,
Thank you soooo much for this recipe, tried Today and adopted ! My dad really loved it, it was really crispy on the outside and soft in the inside ! Some difficulties with the round shape of the vadai.
Thanks, have a Nice day.
samanyaa gawtham
Hi arthi. My vada burst out in oil. My batter was thick. I jus add little rice flour in d batter. It oozes out soon after burst out wen I dropped in oil. M sure my hands r not wet. Wat may be reason.
Aarthi
i think the batter is not that thick. Add some maida and make.
Unknown
I NEED TO START A SMALL VADA HOTEL IT WILL BE PROFITABLE RITE PLEASE HELP ME MY NUMBER IS 8904665873
Ramya
Hi,
Made vadais .. used grinder and made a fluffy, thick batter..the vadais were not soft..they were too crispy and they flattened out..what's the reason? Guide me pls
Anonymous
Measurement 1 cup = how many ml. Kindly mention in all your blog in future. It will be very helpful to follow.
Aarthi
My 1 cup measures 240 ml
Pappitha
How’s many spoons of water do we need to add kindly specify.
Aarthi
you will be needing around 3 to 4 tbsp of water.