
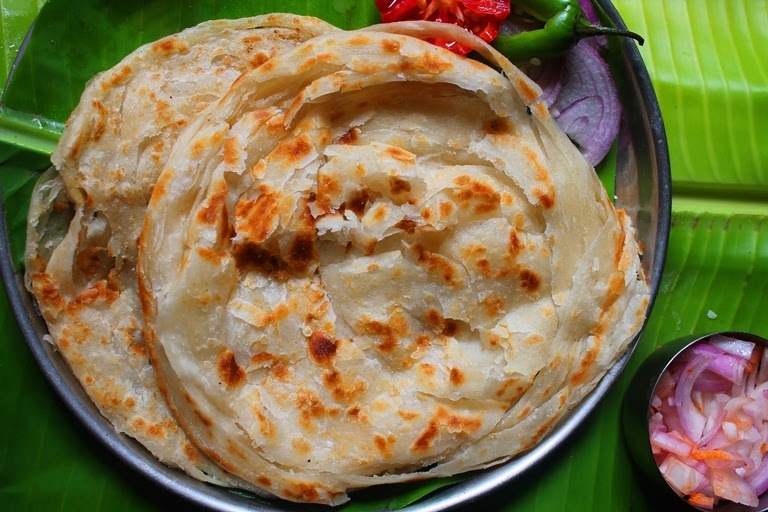
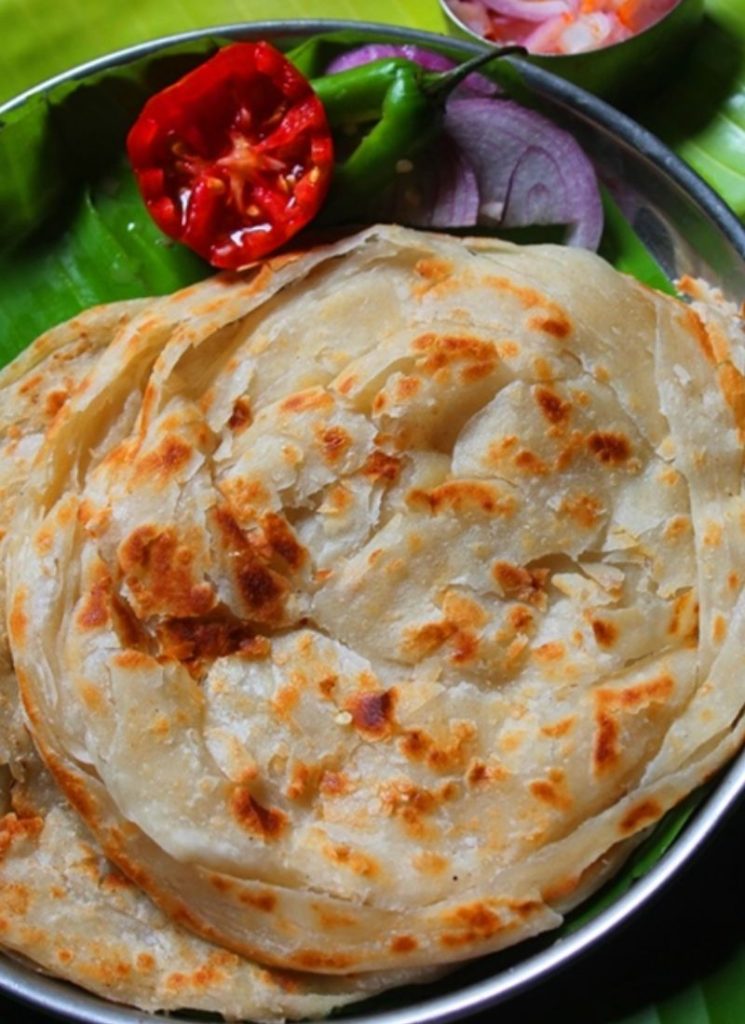
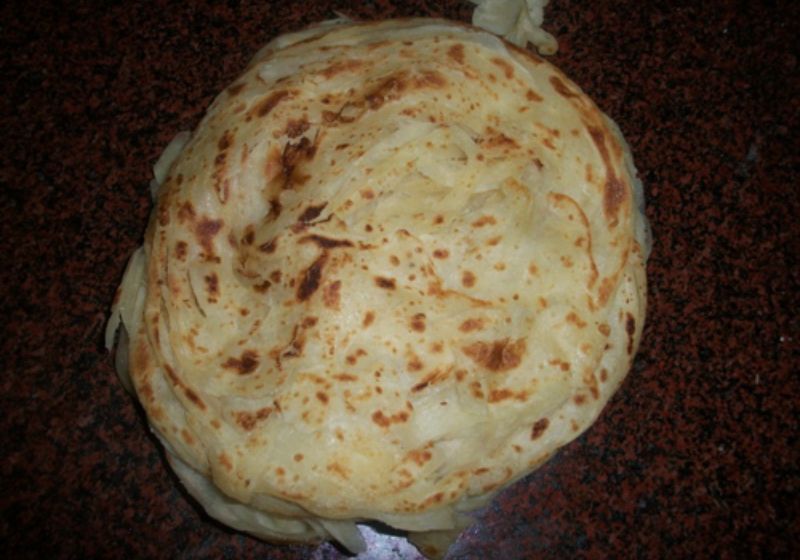
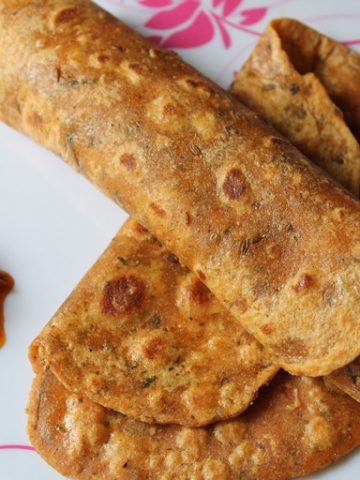
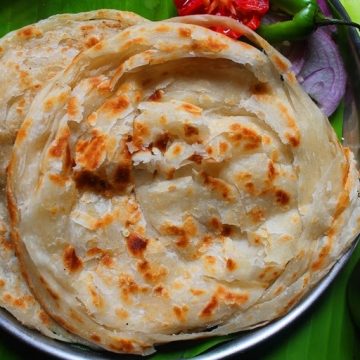
Parotta | Kerala Parotta Recipe | Malabar Paratha is a flaky layered flatbread. It is a popular South Indian, Kerala dish which taste delicious with veg salna or chicken salna. Parotta dough is made using refined flour, salt, sugar, milk and oil. The dough is allowed to rest for many hours to make soft flaky paratha. Learn how to make flaky soft kerala parotta with step by step pictures, video and expert tips.
Malabar Paratha
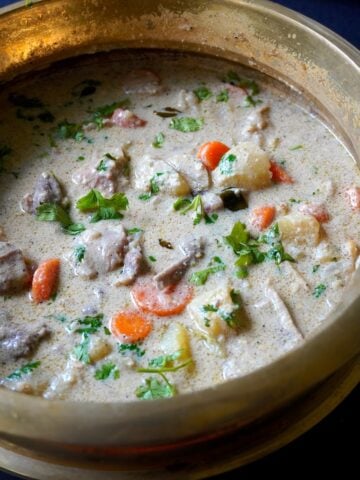
Who doesn't love flaky parotta. It is one of my favorite, Love it specially with chicken salna. Paratha is usually called as parotta over here. Here in Nagercoil there are so many parotta shop,They usually serve parota with a lovely salna, it will be so nice to have on a rainy day.
About Kerala Paratha (Parotta)
Parotta also known as Lerala paratha, malabar paratha or porotta in and around many parts of India. It is mainly popular in South of India and Kerala. It is equally popular in Srilanka, Singapore & Malaysia as well.
Paratha or Parotta dough is made using plain flour, sugar, salt, oil, milk. The dough is allowed to rest for few hours before shaping and rolling the dough. For healthier option wheat flour is used to make laccha paratha. You can check my ghee paratha which has flaky layers.
The Parotta they make is entirely different there are so many methods in doing that, they will just throw the dough in air to make it thin but it doesn't work for me. But this recipe is so simple and the parota even turns out so flaky and so soft. So every one can try it.
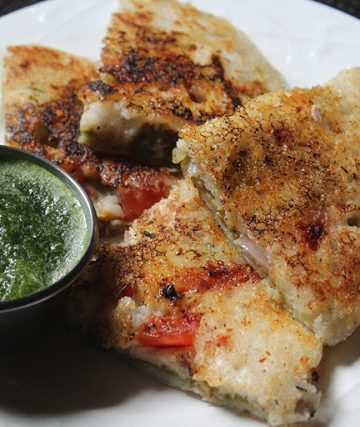
I served it with vegetable korma but you could serve it with Chicken gravy or Salna. I had even given Step by step instructions so it will be so helpful to you. You will love my pheni paratha & the popular nool parotta.
Similar Parotta Recipes
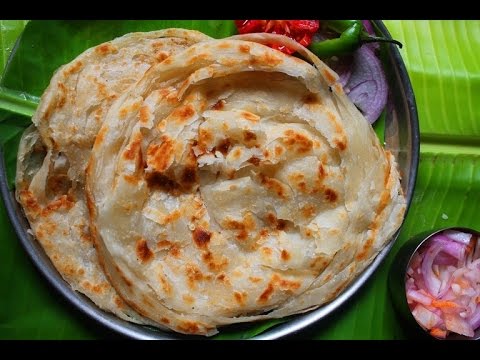
Watch Kerala Parotta Video
Parotta Ingredients
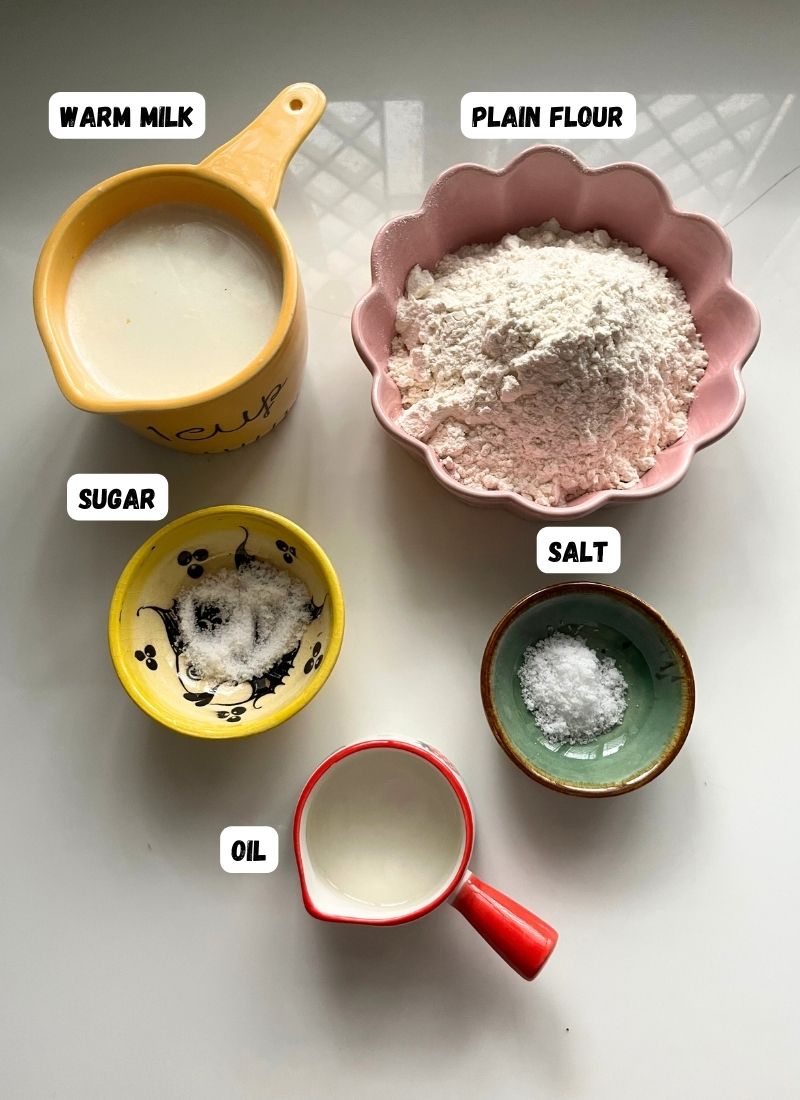
Plain Flour - Use high quality refined flour, It gives the elasticity to the parotta. For healthier option you can use wheat flour, try my laccha parotta. Once the dough is made into dough allow it to rest for minimum 1 to 2 hour which allows the gluten to rest.
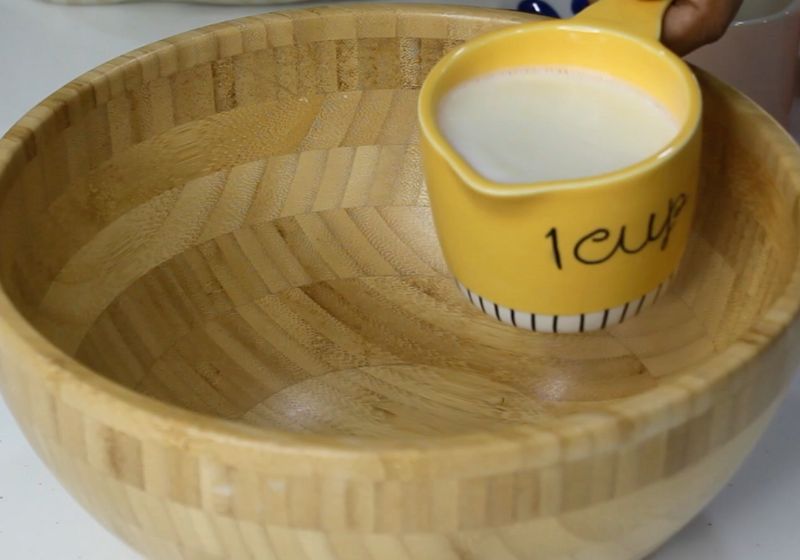
Milk - use milk to make the dough. Milk tenderizes the dough and makes parotta soft. Make sure you use warm milk for making the dough. If you want you can use ½ milk and ½ water.
Salt - Salt enhances the flavour. For every one cup of flour used, you need ¾ teaspoon of salt. Make sure you use fine flowing salt and not rock salt (sea salt).
Sugar - I like to add little sugar when making dough. Sugar helps with the browning of the paratha when it gets cooked. It makes them golden brown.
Oil - For making parotta you need generous amount of oil to achieve the flaky texture. Oil is mixed with the dough and also made into a paste with some flour which is applied all over the rolled paratha to create the layers.
Methods of Making Parotta Dough
The key for making soft paratha is getting the dough right (soft & smooth), resting the dough for few hours which allows the flour to absorb the milk better, Rolling it thin and creating the layers.
Parotta or paratha dough is made with plain flour, salt, sugar, milk and oil. This is the basic recipe that is used in this method. But Kerala or Malabar parotta is made various method. I am sharing few methods which I have tried before.
Dough with Egg - traditionally parotta dough has one egg added into the flour when making dough. Adding egg helps with the soft flaky texture and binds the dough. It also helps create strechy layers when rolling. Technique used to make paratha is called as "veechu" in which paratha dough is carefully thrown in the air to create the thin texture. Egg helps with the process which prevents the dough from tearing.
Ghee + Milk - milk, ghee is added when making dough which makes it soft and supple. Slightly warm the milk and use that to make the dough for the softest flakiest paratha.
Rava + ghee - a version of paratha called as pheni paratha is made with a combo of rava, flour, ghee, milk, water, sugar and salt.
Flour + Baking powder - some recipes uses baking powder added into the flour when making dough. Though I don't prefer to use that, but it makes the paratha more fluffy.
How to Roll Parotta (Kerala parotta)

Most important part in making parotta is rolling, shaping and creating the layers. Technique used to make paratha is called as "veechu" in which paratha dough is carefully thrown in the air to create the thin texture.
For making easy parotta. Make dough as mentioned above. You have to allow the dough to rest for few hours which makes the gluten relax and makes the parotta soft and flaky.
I mixed flour and oil together to form a paste. I used this paste to spread all over the paratha which inturn helps creating the flaky layers.
For rolling parotta. Take a dough ball and spread it into a thin chapati, Add in a tbspn of maida oil over the chapati and spread it evenly. Now with a sharp knife cut strips on the chapati, pull all the strips together and curl it into a round. Apply some oil on the dough ball and set aside in an oiled plate(See picture). Make every dough ball the same way. Rest the dough for few hours before rolling & cooking.
For making best flaky parotta all you need is patience.
Healthy Stuffed Paratha Recipes
Rajma Paratha
Paneer Paratha
Capsicum Cheese Paratha
Mushroom Paratha
How to Make Parotta at Home (Easy Way)
Dough & Pre Preparation
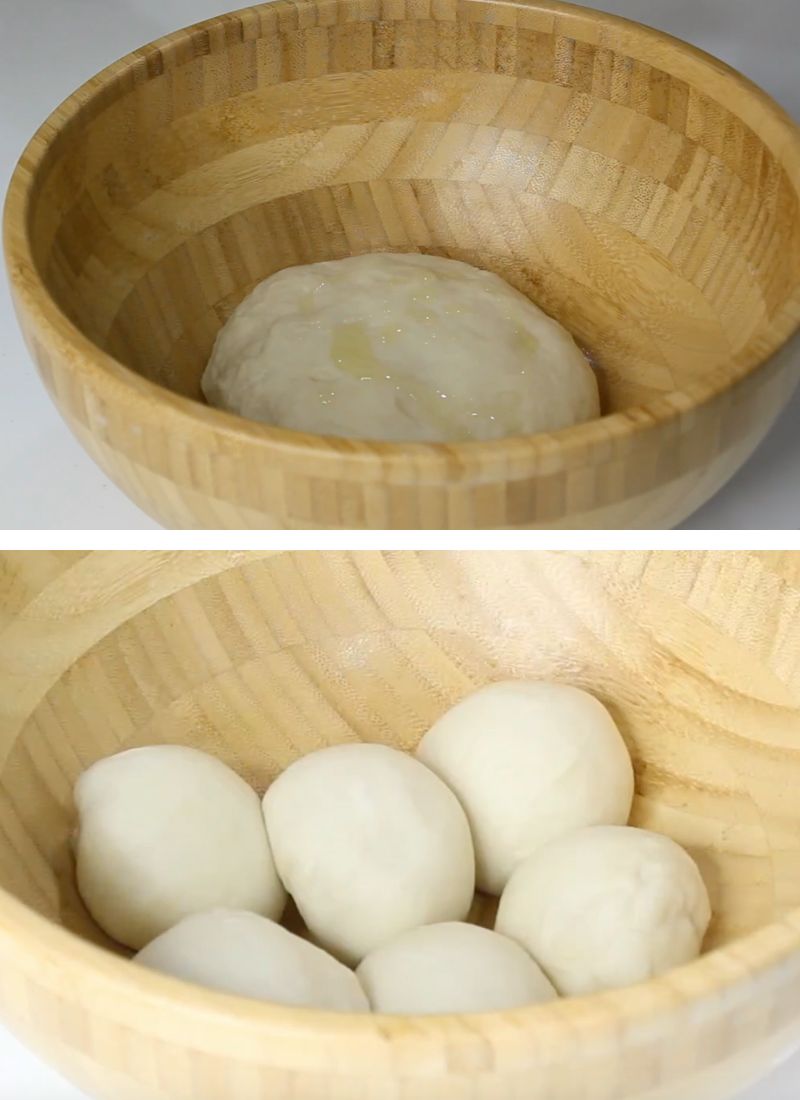
Mix every ingredients in a mixing Bowl and form a dough, cover it with a damp cloth and let it rest for about 4 hours. In a bowl add around ½ cup of maida and pour in some oil and make it into a smooth paste and set aside.
Rolling Paratha
The most important part in making parotta at home is the rolling & shaping. Check above for details on rolling paratha.
Cooking Parotta
Heat a tawa on high heat and place this over the pan and cook the parotta on both sides by applying oil till it is golden brown.
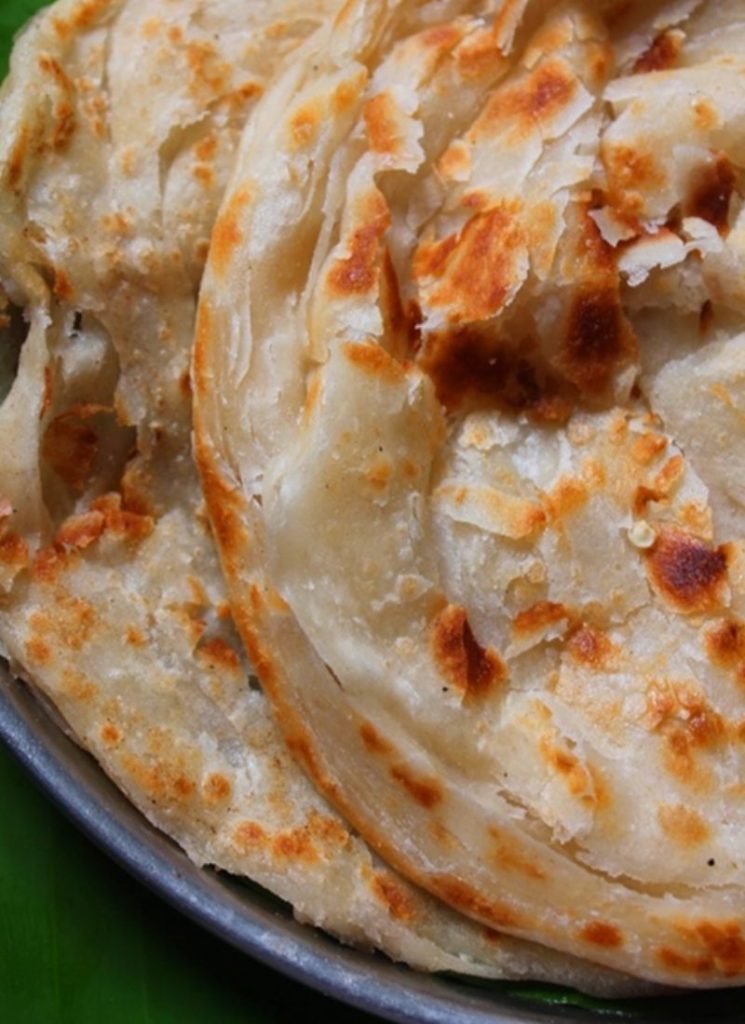
Flaky Parotta
Make some 5 parotta the same way,then stack them together and crush them with your both hands vigorously till the flakes separates. Put them in a casserole and repeat the process until everything is done. Serve them hot with your favorite curry.
How to Make Kerala Parotta (Stepwise Pictures)
Parotta dough
1)I used milk for making the dough. You can use half milk and half water also. Warm milk helps to make parotta soft.
In a mixing bowl, Take warm milk.
2)Add in salt, sugar and oil. Mix well till sugar is mixed.
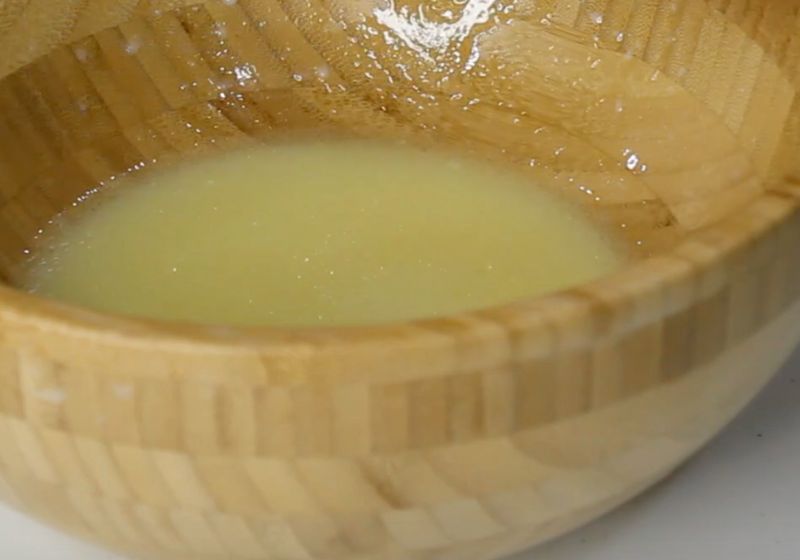
3)Add in plain flour and form it into a dough. I like to use a spoon or fork to mix the flour into the milk first, then use my hands to knead the dough. This tricks helps making my hands sticky.

4)You have to knead the dough for at least 5 minutes till it is soft and smooth. Add 1 teaspoon of oil on top and spread it all over the dough. This helps prevent the dry skin forming on top.
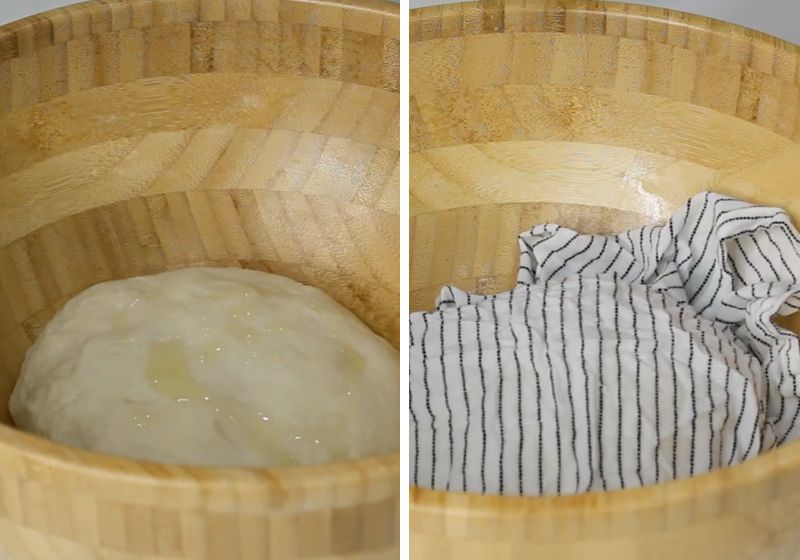
now cover the dough with a wet (damp) cloth and set aside for 3 to 4 hours.
Making Oil paste
5)Mix plain flour with oil to form a paste like. This is what we are going to use for spreading over the rolled paratha to create the layers.

Divide Paratha Dough
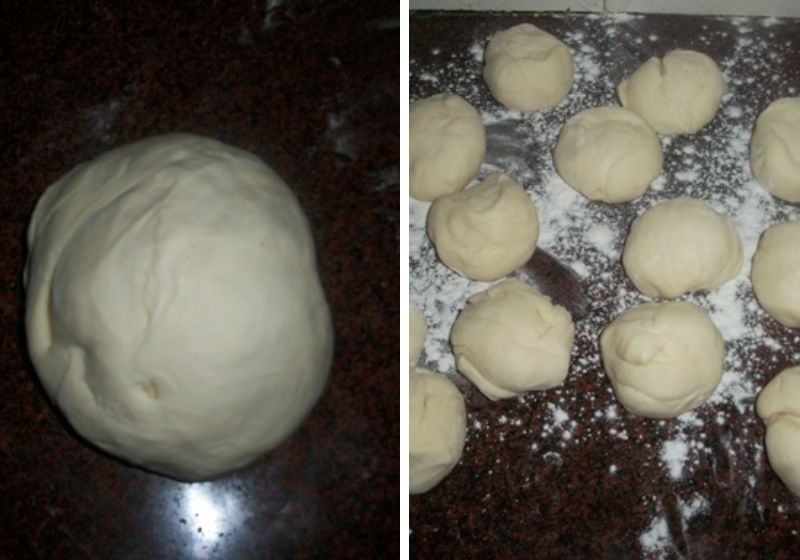
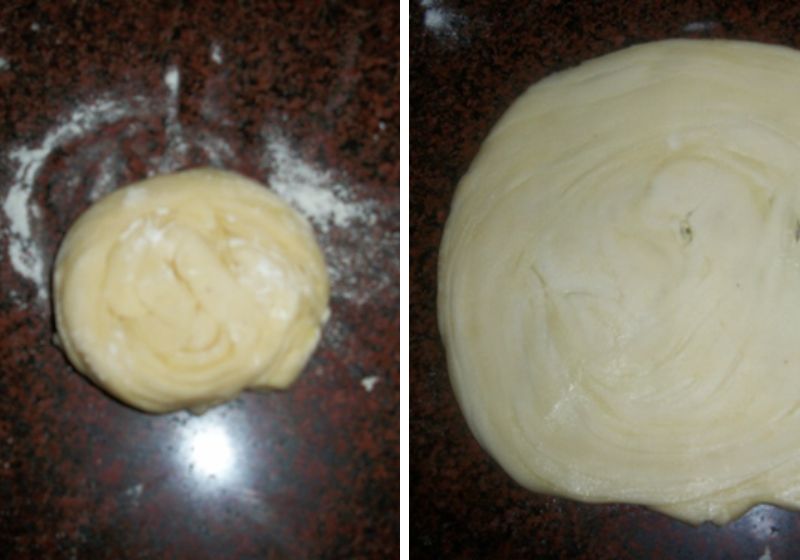
6)Take the dough on a work surface. Roll the dough into log like. Divide the dough into equal portions using a knife. Shape the dough into smooth round ball and set aside for 10 minutes.
Shaping Parotta
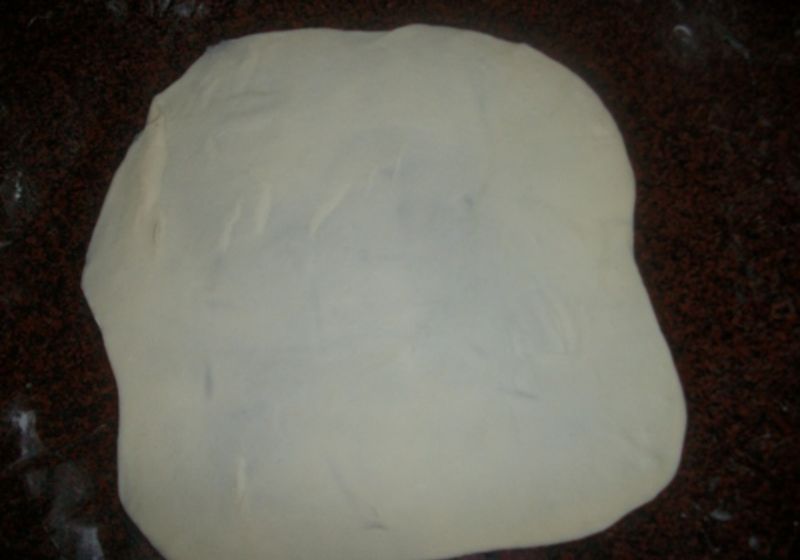
7)Take one portion of the dough. Roll it as thin as possible on the work surface. Don't use flour for rolling so you get a grip when rolling.
When you are rolling, if it springs back. Rest for few minutes and then roll it thin.
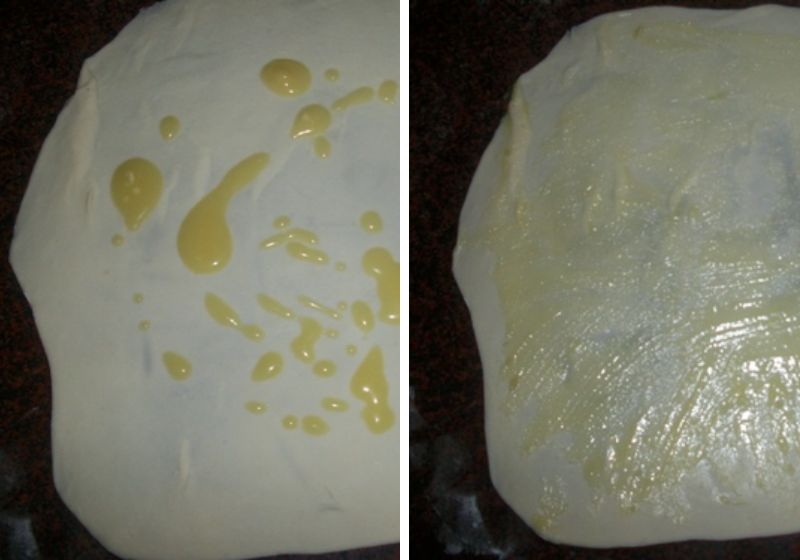
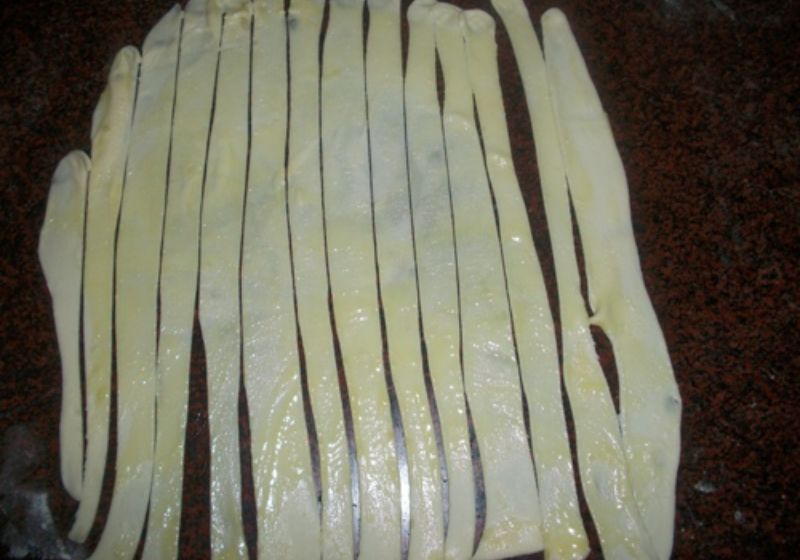
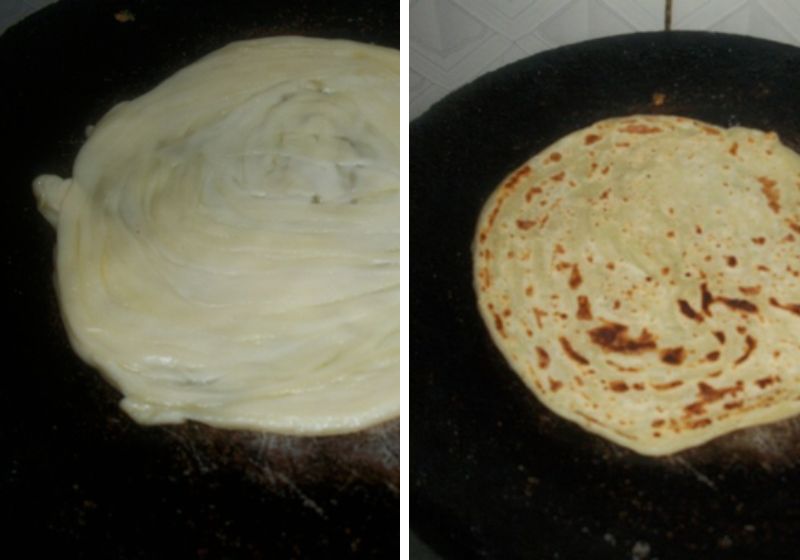
8)Spread the flour + oil mixture which we made earlier over the rolled paratha. Spread it evenly in a thin layer. This mixture will create flaky layers.
9)Cut the rolled paratha into thin strips. Cut it as thin as possible. I use a pizza cutter for this process. You can use a knife also for this process.
Pro Tip: for more flaky layers, you have cut as much strips as possible.
10)Gather all the strips together. Swirl it into circle, like shown in the picture.
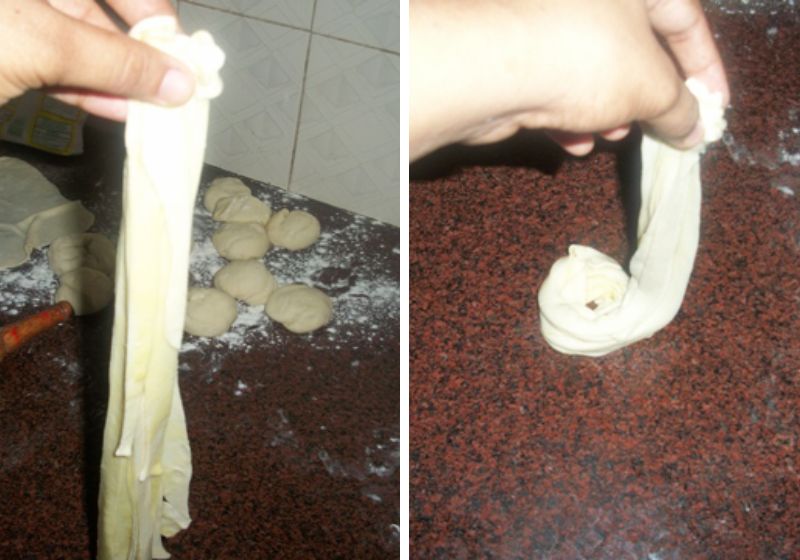
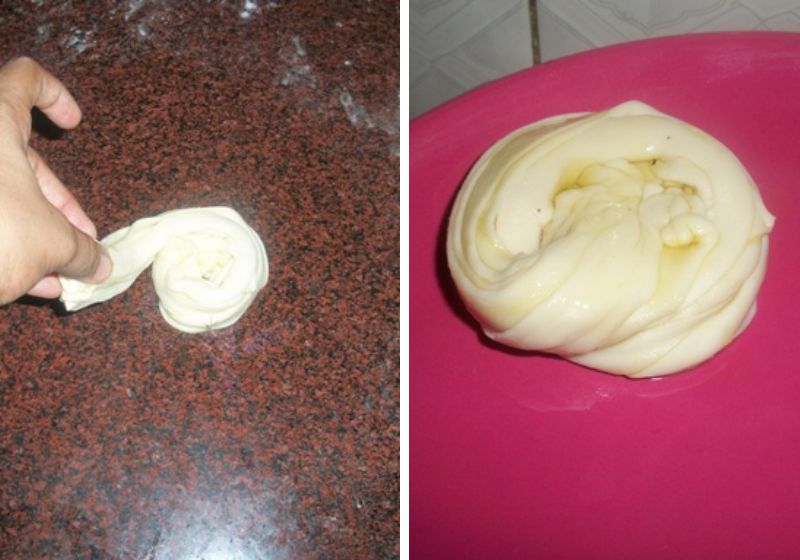
11)Once it is rolled. Place it on a plate, apply some more oil on top.
Resting Parotta
12)Once the parotta is shaped like this, you have place it on a plate. Apply oil on top generously. Allow the dough to rest for at least 30 minutes to 1 hour.
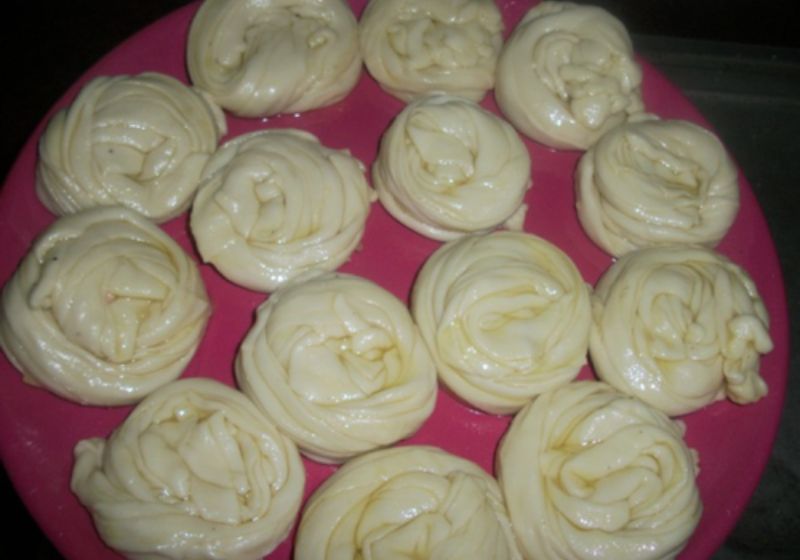
13)Now cover the dough with damp cloth and allow it to rest for few hours.
Pro Tip: I prepare till this step in advance and allow the dough ball to rest. When I am ready to serve, I take each portion, roll and cook my paratha fresh and hot.
Cooking Kerala Parotta
14)Take a portion of dough on a work surface. Roll it into a thick parotta. You can use your hands to press to shape the paratha or use a rolling pin to roll.
Don't roll it super thin. This parotta has to be little thick.
15)Place the parotta on a hot tawa. Let it cook for 20 to 30 seconds. Flip over using a spatula. Drizzle oil around the sides. Cook for few seconds. Flip over and cook till both sides is golden brown.
Crushing Parotta
16) This is one of the most important step in making parotta. Once you remove the parotta from the pan, make 2 more parotta the same way. Stack each parotta on top of the other.
Once you have a stack of 2 or 3 parotta. Use both hands to crush the paratha to separate the layers. The more you crush them the more flaky the layers will be.
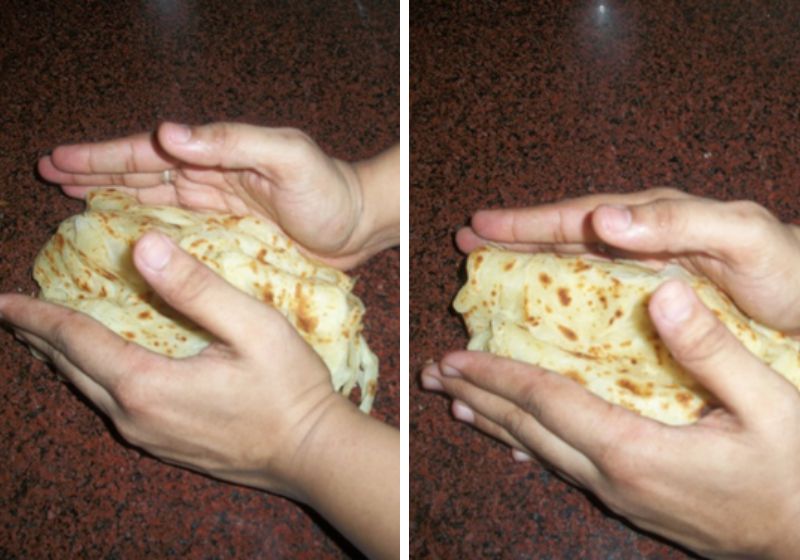
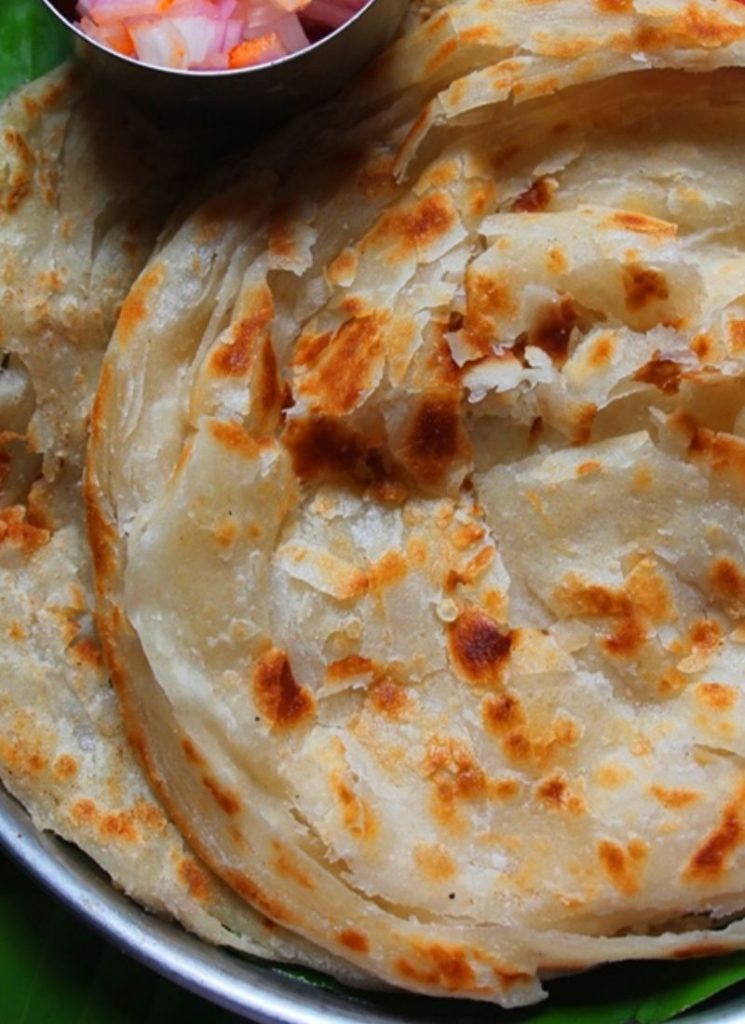
17)Flaky hot Parotta is ready to serve.
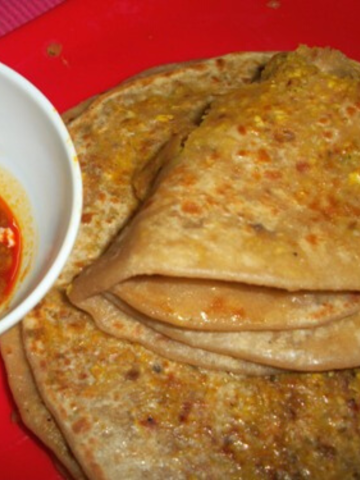
18)Serve parotta hot with raita, curries.
Expert Tips
- Make Parotta dough soft and not too stiff else the parotta will turn hard.
- Allow the dough to rest at least for few hours to make soft paratha.
- Cook the paratha on low to medium heat and not high heat to make sure the paratha cooks from inside.
- Crush the paratha while it is still hot to get flaky layers.
Serving Suggestions
Love it specially with chicken salna. It is a popular South Indian dish which taste delicious with veg salna or chicken salna.
Side dish for Paratha
Make sure you check my collection of Side dishes.
FAQ
What are the ingredients of parotta?
Basic ingredients like flour, salt, sugar, warm milk, oil is formed into a soft dough to make paratha. The dough is later rolled, shaped and cooked into paratha. Cooked paratha is crushed using hands to create the iconic flaky layers.
Why is my parotta not soft?
Soft paratha or parotta is achieved by following few steps. Making dough soft and not stiff. The dough has to be let to rest for few hours which results in soft paratha.
Which flour is used to make parotta?
All purpose flour is used in making paratha. You can use wheat flour to make lachha paratha.
What is the difference between paratha and parotta?
Both paratha and parotta are kind of similar. But the usage of the type of flour and process of making makes it differ slightly.
How to make Malabar Parotta at home?
Follow the mentioned recipe to make malabar parotta easily at home. You can also check my nool parotta, Bun parotta, poricha parotta.
Similar Parotta Recipes


📖 Get Recipe
Parotta Recipe | Kerala Paratha Recipe | Malabar Paratha Recipe
Equipment
Ingredients
For Paratha Dough
- 500 grams All Purpose Flour
- 300 ml Warm Milk
- 2 tablespoon Oil + more for frying paratha
- 1 tablespoon Sugar
- 2 teaspoon Salt
For Making Paste
- ½ cup Oil
- ½ cup All Purpose Flour
Instructions
- Mix every ingredients in a mixing Bowl and form a dough,cover it with a damp cloth and let it rest for about 4 hours.
- In a bowl add around ½ cup of maida and pour in some oil and make it into a smooth paste and set aside.
- Divide the Dough in to equal portions.
- Take a dough ball and spread it into a thin chappati,Add in a tblspn of maida oil over the chappati and spread it evenly.Now with a sharp knife cut strips on the chappati,pull all the strips together and curl it into a round,Apply some oil on the dough ball and set aside on a oiled plate(See picture).Make every dough ball the same way.After that cover the plate with some damp cloth and set it aside for about 1 hour.
- After 1 hour take the dough and make it to a slightly thicker Parata.
- Heat a tawa on high heat and place the parata over the pan and cook the parata on both sides by applying oil till it is golden brown.
- Make some 5 parata the same way,then stack them together and crush them with your both hands vigorously till the flakes separates.
- Put them in a Hot case and repeat the process until everything is done.
- Serve them hot with your favorite curry.
Video
Notes
Tips & Tricks
-
- Making Parotta dough soft and not too stiff.
- Allow the dough to rest atleast for few hours to make soft paratha.
- Cook the paratha on low to medium heat and not high heat to make sure the paratha cooks from inside.
- Crush the paratha while it is still hot to get flaky layers
Serving Suggestions
Love it specially with chicken salna. It is a popular south indian dish which taste delicious with veg salna or chicken salna.Nutrition
Tried this Recipe
Mention @yummytummyaarthi or tag #yummytummyaarthi!If you have any questions not covered in this post and if you need help, leave me a comment or mail me @aarthi198689@gmail.com and I'll help as soon as I can.
Follow me on Instagram, Facebook,Pinterest ,Youtube and Twitter for more Yummy Tummy inspiration.
IF YOU MAKE THIS RECIPE OR ANYTHING FROM YUMMY TUMMY, MAKE SURE TO POST IT AND TAG ME SO I CAN SEE ALL OF YOUR CREATIONS!! #YUMMYTUMMYAARTHI AND @YUMMYTUMMYAARTHI ON INSTAGRAM!


Karen Xavier
I love this, the whole presentation... will try it out pretty soon. I've never found a good paratha recipe before, this looks easy and really flaky.
Lavanya
It really turned out good, for any recipe I can rely on your site 😊
Anonymous
Is there a way to make these parathas without milk, using curd or water or butter instead?
Anonymous
Use luke warm water
Rajini
Hi Aarthi
Big fan of yours . Made this party a yesterday. It came out very well. Followed exactly your steps. Thank you so much. Can I try the same with wheat flour for a healthier option? Will it turn out well?
Rajini
It’s parotta and not party. Typo
Aarthi
thanks for trying. for wheat flour options. check this link https://www.yummytummyaarthi.com/lacha-paratha/
Aarthi
Yes...You could use Curd+Water and knead the dough and follow the same procedure...Give the dough a resting time of 1-2 hours.It will probably give you the same result.I haven't tried this...Hope you try and tell me how it turned out...
Viswini
Hi Aarthi.. tried this.. Came out soooo good.. Thanks for the recipe..
nivedita
wow, bookmarking it to make it soon.
detailed photos makes easy to follow the recipe.
thanks.
sangee vijay
wow...very detailed recipe...looks so fluffy n layered...want to give a try soon...thanx for sharing...
Bindhu
Tried this one and my folks just loved it.Btw..nice blog,keep going.
soujanya
Vowww!!!real flaky...very detailed presentation.....thanq...
i tried twice but i failed so stopped will try again..
thanq...
Chitra
Aarthi love this paratha love the technique used here...lovely...will try this soon and post it linking it back to u...let me know if it's ok with u...
Anonymous
hi to all yummytummy-aarthi.blogspot.comers this is my first post and thought i would say a big hello to yous -
regards speak again soon
g moore
Anonymous
@Karen Xavier
I am definaletly going to try it. But i will us whole wheat flour. hope it will be as flaky as Maida .
Vanita.
Anonymous
How did u get this paratha by doing it with whole wheat?
Anonymous
hey dear ur blog is wonderful and you have explained each recipe very well..thanks a lot dear...God Bless!!
Anonymous
hey dear ur blog is wonderful and you have explained each recipe very well..thanks a lot dear...God Bless!!
nisha
Hi dear
I just tried this recipe. It came really well. Thank you so much. My husband really likes. It
Rayyan
hey dear u really doing a great job!! especially the detail photographs makes r life easy in the kitchen...thanks a ton!!
Rayyan
hey dear u doing a really great job!! especially the detail photographs step by step..u make r life easy in the kitchen..thanks a ton!!!
Vanita A
Good morning Aarthi. As I said the photographs makes things much easier. thks for the Post. Will try this out.
Suchi Sm
fantastic work aarthi..... u make all the tough recipes to feel easy......
remya sean
I trieed to make soft kerala parotta several times.But all the times it end up with a disaster..
Sure I will try ur version soon..n let u know the result
Anonymous
I tried this with wheat flour n came out nice...thankyou Aarthi...👍👏
Anonymous
Very nice recipe.. Thanks for sharing.. Will try it out soon..
Anonymous
Gr8....u r amazing.....
Anonymous
Looks yummy will surely try it very soon by the way tried the suji lados and they were a hit thanks alot
Anonymous
I tried this.....lushhhhh result yummyy.u r suprrb
deepak Raj
I did this parota and kurma, it came out very well..
Thanks..
Deepthi Rain
Hi Aarti, ur recipe is awesome.. I tried it at home. It came out amazing. I have clicked the snaps also.. But couldn't upload to show u
Hemapriya Natesan
Hai, Is there anyway to.Store the dough to do it later, I have 2 small kids, and it is difficult to do the procedure evrrytime
Aarthi
@Hemapriya NatesanYou can store this in a air tight container in fridge and use it whenever you need. It will keep well for 2 to 3 days
Praveena Dewars
This recipe looks great, but I'm a beginner so of course it did not turn out as well as yours. I could use some tips, i replaced maida with all purpose flour and the dough came out very elastic, so it was hard to roll out. I managed with a great deal of effort to roll it out paper thin and everything looked fine till I tried rolling the balls into parathas. They were very Rubbery and wouldn't hold shape so they wound up thick, hard and uncooked inside. Just wondering if this is because I used all purpose flour instead of maida or if there could be another reason?
Aarthi
@Praveena DewarsI think it is because you have kneaded to dough really hard i hope. You have to make it soft and smooth and allow it to rest for 4 hours. if you do this, you will get a soft paratha
Deepu
haiiii arthi......
first of all congrats for ur recipes..... all the recipes was amazing.. yesterday i tried one of ur recipe ... ya that is parotaa..... i correctly follow all your steps.... finally the out put whahooooooooo !!!!!!!!! it was fantastically came out,..... ssssss i done the parotaa.....
the taste was yummyyyyy and it luks lik i was eat in hotel....
Anonymous
Hai Aarthi. unka paratto
making parthawey seinum pola iruku.
I will try. Ur baby is so sweet.
I like name Maha. so cute.
-bhuvaneswari,salem.
Me
Hey Aarthi, I tried dis recipe today n parantha came out super flaky n soft..my mom dad wr amazed by my cooking..I had dis parantha for d 1st tym wen I ws in dubai..wondering of its recipe bt thnks to u I found wat I wanted..
Thahira Tasneem
I am an ardent follower of your blog.Thank you, for posting such wonderful and easy to follow recipes.My family enjoys every dish i make from your blog.
Anonymous
U make all tough recipes sound so easy.....ur pictorial illustration makes it very tempting to try.....u r too cool....keep it up....and enlighten us with more of such recipes.
God Bless you
Preethi
Archana Kathirvel
Hi aathi....
Am Recent follower of ur blog...every girl who s new to cooking can be presented with ur blog ....so that all will become masters in cooking.....hats off to u....keep up the good work....
Anonymous
wowwwww...mouth watering i love the way you prepared n clicked pics to help others to cook without confusion suppeerrrbbbb thanq
Anonymous
Thank you sister for all ur recipes nowadays am getting rewards by my family members bcs of u and I get confident in my cooking very thank u
Anonymous
Thanks for sharing
Prem
Hi Aarthi.. I started following ur blog few days back. IT IS AMAZING . I m gonna start experimenting parota as first step.. Thank you for all thr recipes.
Prem.
Anonymous
Hi. I tried it. It came out very well. Thanks for the receipe.
Anonymous
U r great..
jeevitha balakrishnan
Hi friend this is the first time I m seeing ur recepi I think it wil use ful for me. Very nice and easily u have explained with very good pics. I wil do it and let u know how it comes.
jeevitha balakrishnan
Very nice I wil prepare and tel u how it comes I hope it wil com good
Anonymous
Arthi,
Should I leave the dough in refrigerator or out for 4 hr, n same question after making the balls should I put in in fridge for 1 hour or just at room temperature. I appreciate ur help.
Aarthi
@Anonymousno need to put in fridge, store it out at room temp
Anonymous
I am a begginer..I followed many of your recipes and everything came out so well and tasty...thanks for it...
Anonymous
Looks yummy porota ... Never eating good porota other than south Tamil nadu.. I tried once with egg similar to your recipe but couldn't get this flakes.. So avoiding egg is better right aarthi??
Aarthi
@Anonymousyes this recipe works wonderful
Anonymous
Your blog is too helpful,nd thanks for your blog,i am having one doubt.after making the dough the resting time is 2 hours and after making the stripes nd ball, again 2 hours,orelse 4 and then again 4 hours???
Manivasagan S
Hi aarthi,the dough can make thin rotis by oil or atta?when we try to make thin parathha ,it will shruk again and again na? Bcoz its maida na,if we can make thin means how to do??plz help me to do this.
Aarthi
@Anonymousmake the dough and rest it for 4 hours. roll it and cut it and make it into the ball and rest it for 1 hour. then make paratha
Aarthi
@Manivasagan Sthe paratha will be little thick not too thin..
Anonymous
@Praveena Dewars You can also check the oil content. Parota takes up lot of oil. Maida and all-purpose flour doesn't make any difference.
Anonymous
Thanks so much for the recipe.
For the vegan folk out there, you can sub the milk for soy milk (or any other plant based milk, really). It's better for the animals and better for you too! Give it a try.
I just made mine and they turned out awesome!
Jincy Firoz
How many cups s halfkg maida ??
Jincy Firoz
How many cups s halfkg maida ??
Jincy Firoz
How many cup s half kg maida??
Aarthi
@Jincy Firozhalf kg is around 4 cups
momsrecipes
Bookmarking the recipe.... Will make it vegan ... Thank you for sharing the detailed recipe....
Anonymous
tried this and got soo many compliments... thanks for the recipe��
Nimmi Maanu
I really loves your way of presentation in this blog and i likes malabar parota very much.but my mom dont know how to make it.I think this blog will very helpful for my mom.Thank you so much for this wonderful blog...The best parota maida will help to make best parota.
husaindeen himazy
Hi arthi, is it fresh milk or coconut milk that we should add..?? btw i m from sri lanka. i started cooking 3 months ago.. i really dont have any experience in cooking. your recipes are really really great and its very easy. i tried out the oats uthappam, fried chicken and the microwave chocolate lava cake.. thankyou so much for ypur easy recipes and keep on uploading more..
Aarthi
It is fresh milk
Anonymous
Hi aarthi,all ur recipies are really good.can we use wheat flour instead of maida
Anonymous
Can we make it with wheat flour??
Hemalatha Lingamoorthy
Hi Aarthi... How much milk( in cup measurement) for one cup maida?
Jayanthi Ramaraj
Thanks for the nice pictorial info..
All ur recipes are easy to follow thro pictorial
Anonymous
Great recipe. This was the first time Intried it and it turned out great. Only thing Inwould change next time is to reduce the sugar to 1/2 or even 1/4 tbsp of sugar. Thanks for the recipe😊.
Sruthi
Hi arthi.. tat was a perfect recipie. I tried an got the best ever parotta 😊😊.Thanks a lot an keep the grt work going... Best wishes..😊😊
RANJINI PRASAD
Hi Aarathi its my dream paratha my mouth is watering definitely I vl try it
Thanks
Valarmathi
Superb such an easy paratha recipe ever seen...i tried and my whole family loved it...thank u so much...
Anonymous
Wonderful recipes...I always google yummy tummy for any recipe.... Thanks Aarthi!
Best Business Blog
awsome recipe